Cirrus Insight for Gmail User Manual
To access this document with a clickable Table of Contents and jump-to navigation links, view it here.
Table of Contents
- Installation
- Set Up
- Email Sync
- Email Tracking
- Calendar Sync
- Side Panel Features
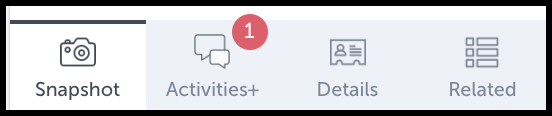
- Snapshot View
- Details View
- Related View
- Search
- View in Salesforce
- Create a Record
- My Tasks and Lists
- Activities+
- Email Features
- Add Emails to Salesforce
- Book Meeting
- Templates
- Attachment Tracking
- Mass Email
- Email Campaigns
- Flight Plans
Installation
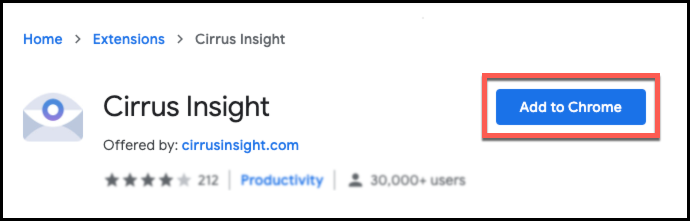
1. Navigate to the following link to install Cirrus Insight from the Chrome Web Store.
2. From the Chrome Web Store page, select Add to Chrome.
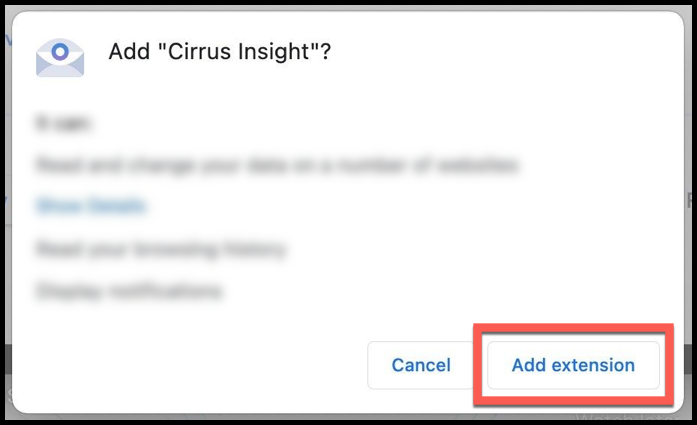
3. Choose Add extension from the resulting confirmation message.
4. After Gmail reloads, you can sign in to the Cirrus Insight side panel on the right-hand side of your inbox.
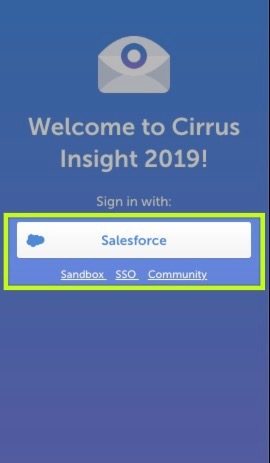
- There are three other login options aside from Salesforce:
- Sandbox
- SSO
- Community
- Sandbox
- If you don't see the Cirrus Insight sidebar, review What can I do if Cirrus Insight disappears from my inbox?.
Set Up
After signing in for the first time, you’ll want to thoroughly review all of your settings to get the most out of Cirrus Insight. The most commonly used settings control your Email Sync, Email Tracking, and Calendar Sync features.
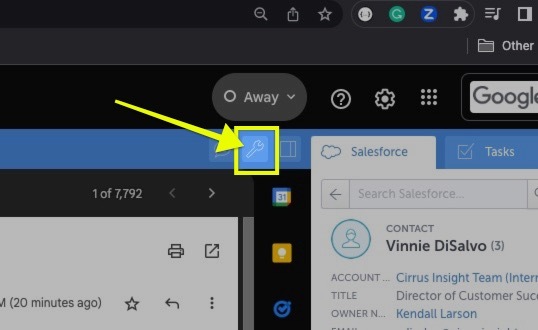
From Gmail, navigate to Cirrus Insight Settings (the wrench icon in the top menu bar) to get started.
Email Sync
Email Sync is a background process that automatically logs all emails to and from leads/contacts to Salesforce. You can select the Sync All Emails option (which will automatically log both outbound and inbound emails into Salesforce), or you can choose Only Sync Replies and Responses to Emails I’ve Previously Saved to Salesforce.
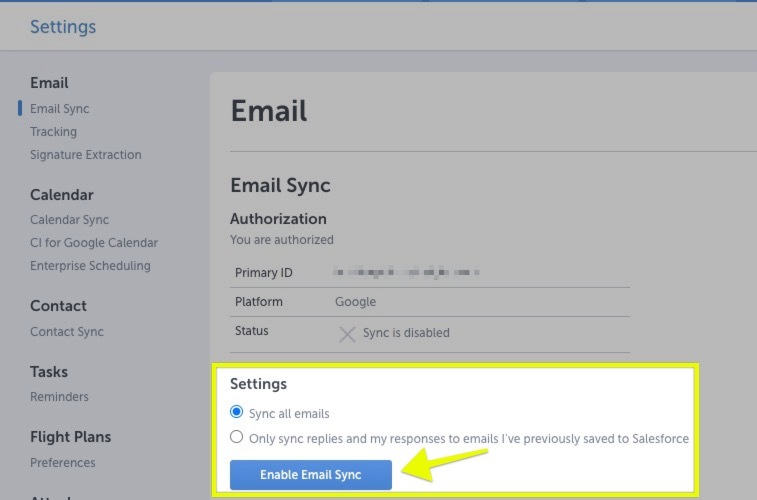
After you enable Email Sync, it will continue to run in the background whether you are logged into your Gmail account or not.
NOTE: If you’d prefer to manually log your emails, you can use the Add to Salesforce feature, covered in the Email Features section of this manual.
Email Tracking
Email Tracking helps you determine if your outbound emails are being opened (and how often), if emails are being replied to, and if your links within emails are being clicked.
From Tracking settings, we recommended enabling at least the first three options in order to utilize the feature fully.
If you haven’t already, enable Gmail's "Undo Send" setting to ensure you’re getting accurate tracking statistics. To do so, review the article in the Deep Dive section below.
Deep Dive: |
Calendar Sync
Calendar Sync is an automatic two-way sync that supports creation of new events, updates to events, and deletion of events on both Salesforce and Google calendars. Attendees/invitees are automatically synced, and Calendar Sync will automatically relate contact records to events that are synced to Salesforce. All-day and recurring events are supported.
CAUTION: If you’ve ever used a calendar syncing application in the past, confirm with your Salesforce Admin that the old process is blocked in Salesforce to avoid event duplication.
Before enabling Calendar Sync, select any Options you want to enable.
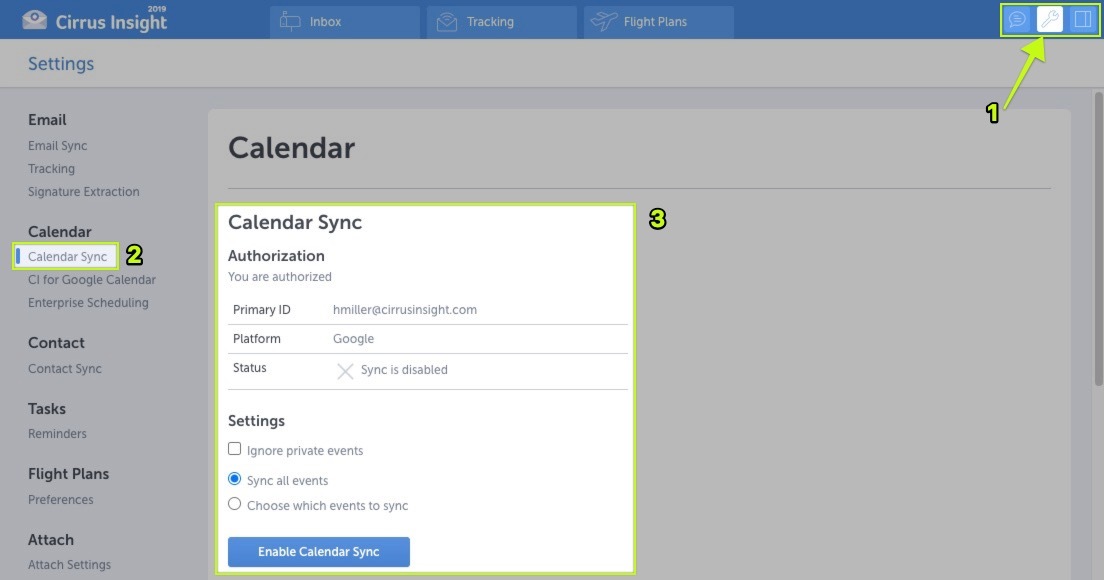
- Ignore private events will prevent events marked as private from syncing.
- Sync all events will sync all events regardless of their color in Google Calendar (except for private events if you have the Ignore private events setting enabled).
- Choose which events to sync allows you to select which color of Google Calendar events you want to sync to Salesforce. You can select multiple colors.
- Note: With this setting enabled, all Salesforce events will still be synced to Google Calendar, but they'll appear with the color in the Default Color for Salesforce Events section.
If you’d prefer to manually add events to Salesforce, check out Cirrus Insight for Google Calendar.
Deep Dive: |
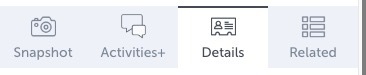
Side Panel Features
The Cirrus Insight side panel allows you to view, edit, and create Salesforce records without ever having to leave your inbox. There are four views that will allow you to easily navigate records.
Snapshot View
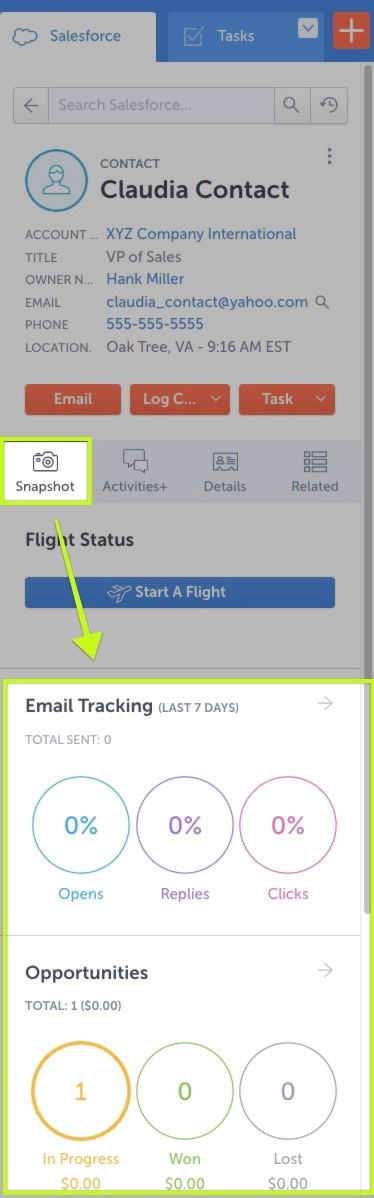
When you’re emailing a lead or contact, Cirrus Insight will automatically load the matching record (based on email address) into the side panel so you can quickly see their contextual information; you can also hover over an email address to load their record. The default view in the side panel is Snapshot, which provides a summary of Salesforce and Cirrus Insight information, such as open opportunities or recent emails from you that they’ve opened.
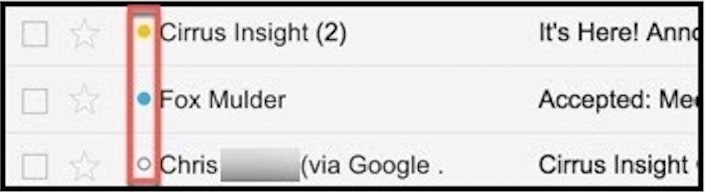
To quickly load leads/contacts into the Snapshot view, just hover over email addresses to load the record associated with that email address. You can quickly identify if an email address is in Salesforce based on the color of the dot beside the name.
- Blue dot: contact record
- Orange dot: lead record
- Clear dot: email address is not yet in Salesforce
If you see a clear dot beside a name, you can easily create a new lead or contact record from the Cirrus Insight sidebar.

When creating a new contact/lead from an email, Cirrus Insight will attempt to scan that person’s email signature and auto-populate as much information as possible. You can review and fill out any additional fields before clicking the Save button.
The next time you interact with that individual, you’ll notice the colored dot beside their name and their Salesforce record will automatically populate in the sidebar.
Deep Dive: |
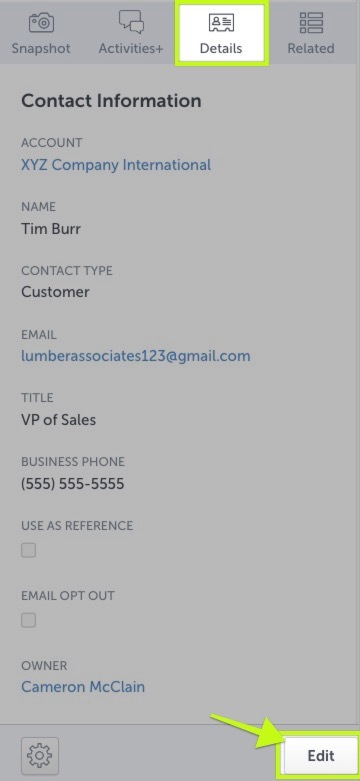
Details View
The Details view displays the full record like you’d see in Salesforce (your Cirrus Insight Admin can customize the fields displayed in the side panel). If you need to make any changes to the record, select the Edit button.
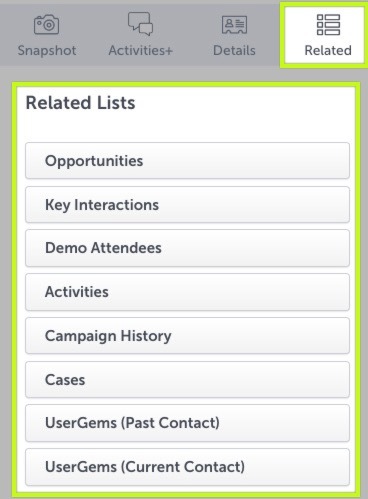
Related View
The Related Lists view shows both standard and custom Salesforce objects that are related to the record you’re viewing. For example, if you’ve pulled up a contact and want to see their case history, you’d navigate to the Related view and select Cases.
Side Panel Features (Continued)
In addition to using the four views to navigate records, you can leverage the side panel to search, keep up with tasks, create records, and more.
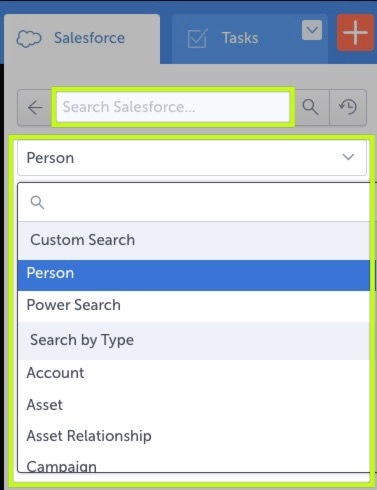
Search
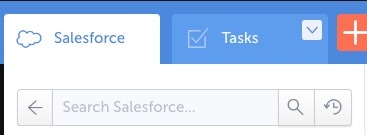
From the Search Salesforce field, you can search by object type (account, opportunity, etc.) or by Person if you’re not sure whether you’re looking for a lead or contact. Power Search allows you to search across multiple objects at the same time to give you a more complete list. Power Search can be configured by your Cirrus Insight Admin to include or exclude specific objects.
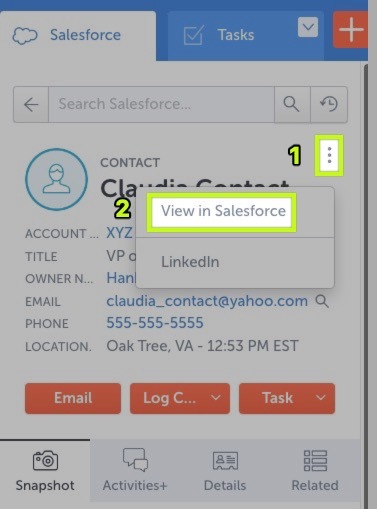
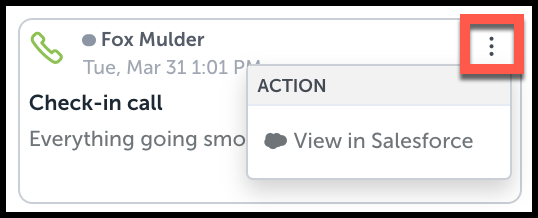
View in Salesforce
Click on the three vertical dots at the top right of a record to View in Salesforce. If you have a lead/contact loaded in the side panel, you can also search for that individual on LinkedIn.
Create a Record
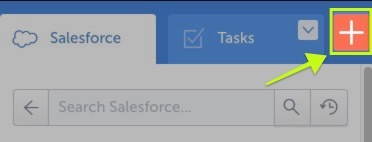
At any time, you can create a new Salesforce record by clicking the red + button.
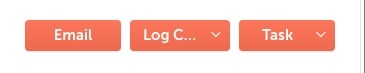
In addition, you can easily compose a new email, log a call, or create a task-- any of which will be automatically related to the record loaded in the side panel at the time of creation-- by using the red shortcut buttons.
My Tasks and Lists
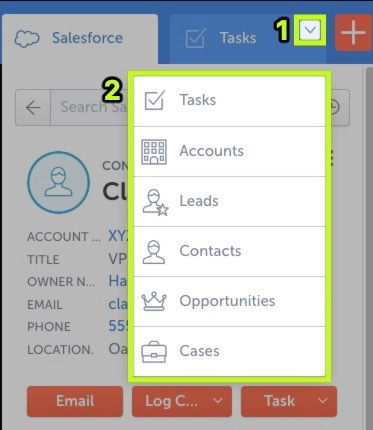
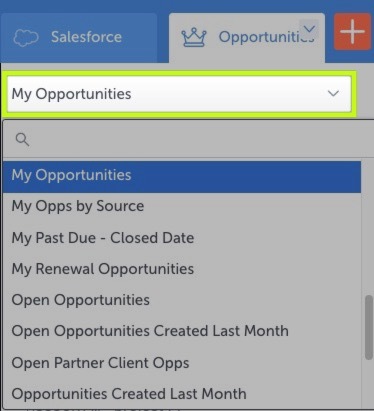
You can review your Salesforce tasks and other lists by selecting the Tasks tab. This will show you a list of all open tasks in the selected time frame.
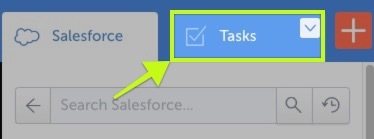
You can also use the Tasks tab to access list views that you’ve created in Salesforce. Just click the dropdown arrow to see the different objects you can filter by.
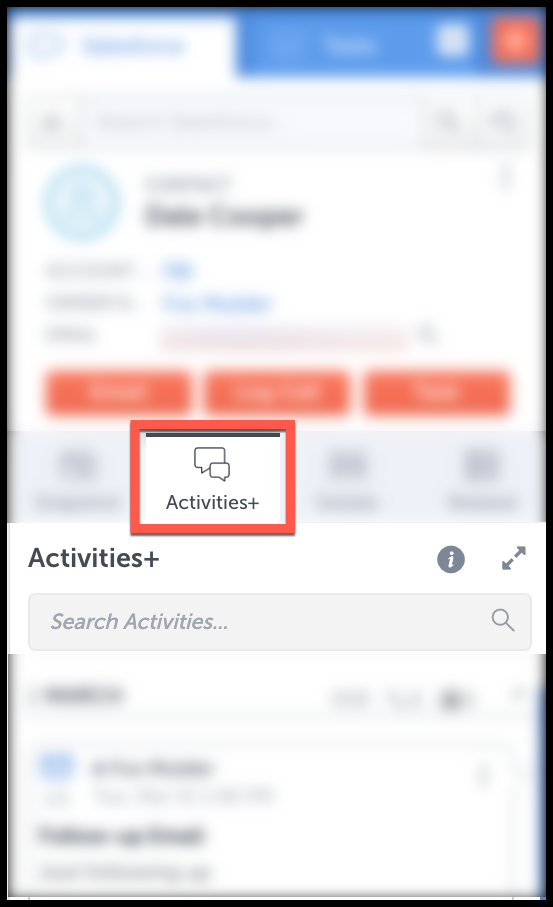
Activities+
Activities+ is the easy-to-read conversation view that allows you to make sense of all the emails, calls, and meetings you and your team have saved to Salesforce for a particular record.
Review monthly communication numbers, search for specific details, and bring conversation intelligence into the inbox so you'll always know a record's status.
Monthly Metrics
Review activities and quickly determine the number of emails, calls, and events for any record, separated by month.

Search
Track down specific details with contextual search.

New Activities Notification
Easily determine when a record has new activities to review.
View in Salesforce
Load activities directly in Salesforce.
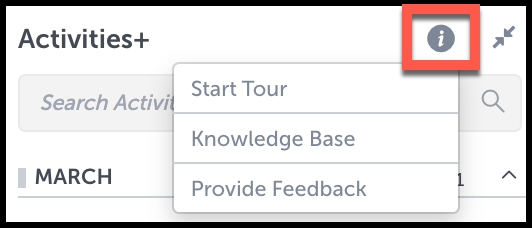
Information
Take a tour, review relevant help articles, or provide feedback about Activities+.
Fullscreen
Expand the view to fullscreen to see more activities at once.

View More
Load even more activities by selecting "View More".

You can use Activities+ with any Salesforce object as long as the Activity History related list has been added to the object's page layout.
Email Features
Now that you can navigate the side panel, you’ll want to take advantage of the features that Cirrus Insight brings to your emails. When you’re composing an email, you’ll find seven main features-- Add to Salesforce, Email Tracking, Book Meeting, Send Later, Follow-up, Templates, and Attachment Tracking.
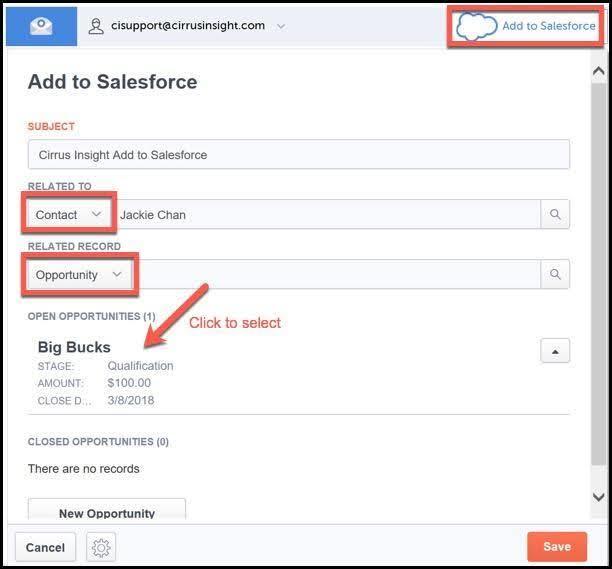
Add Emails to Salesforce

If you want more control over which emails are logged to Salesforce, you can manually log emails to Salesforce by using Add to Salesforce. You can also use this feature in conjunction with Email Sync’s Only Sync Replies and Responses to Emails I’ve Previously Saved to Salesforce setting. Add to Salesforce is available for both incoming and outgoing emails.
After selecting the Add to Salesforce button, you can choose Quick Add to relate the email to the lead or the contact and their account.
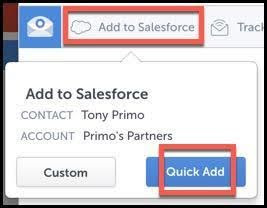
For even more control, you can select Custom to select another Salesforce record (such as an opportunity or case) to relate the email to.

In the following example, Cirrus Insight automatically inserted the correct contact into the Related To field. After choosing Opportunity from the Related Record dropdown, Cirrus Insight then found the contact’s related opportunity. To finish logging the email to Salesforce, you’d just need to select the suggested opportunity (or search for a different one) and click the red Save button.
If your email has more than one recipient, Cirrus Insight will log the email to each recipient’s contact record, as long as your organization has Shared Activities enabled in Salesforce.
Deep Dive: |
Email Tracking
You can manually enable Email Tracking on a per-email basis if you’d prefer not to enable Track Emails by Default in Settings. All you need to do is click the Email Tracking icon and it will turn blue once enabled.
You can review all your Tracking statistics from the Tracking Details window. To get there, select the Tracking tab from the blue Cirrus Insight ribbon at the top of your inbox.
From the Tracking Details window, you’ll find your open and click statistics. You can search for specific names or email addresses, filter results based on date, and view emails.
Alternatively, you can review Tracking statistics for a given contact/lead from the Snapshot View in the side panel.
Book Meeting

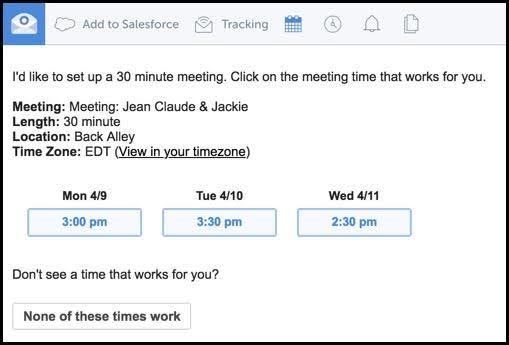
Book Meeting makes it easy to insert your calendar availability into an email, so that all the recipient has to do is click a time in the email to instantly confirm a meeting with you.
After you click the Book Meeting icon, a new window will open where you can select the times that you’re free to meet.
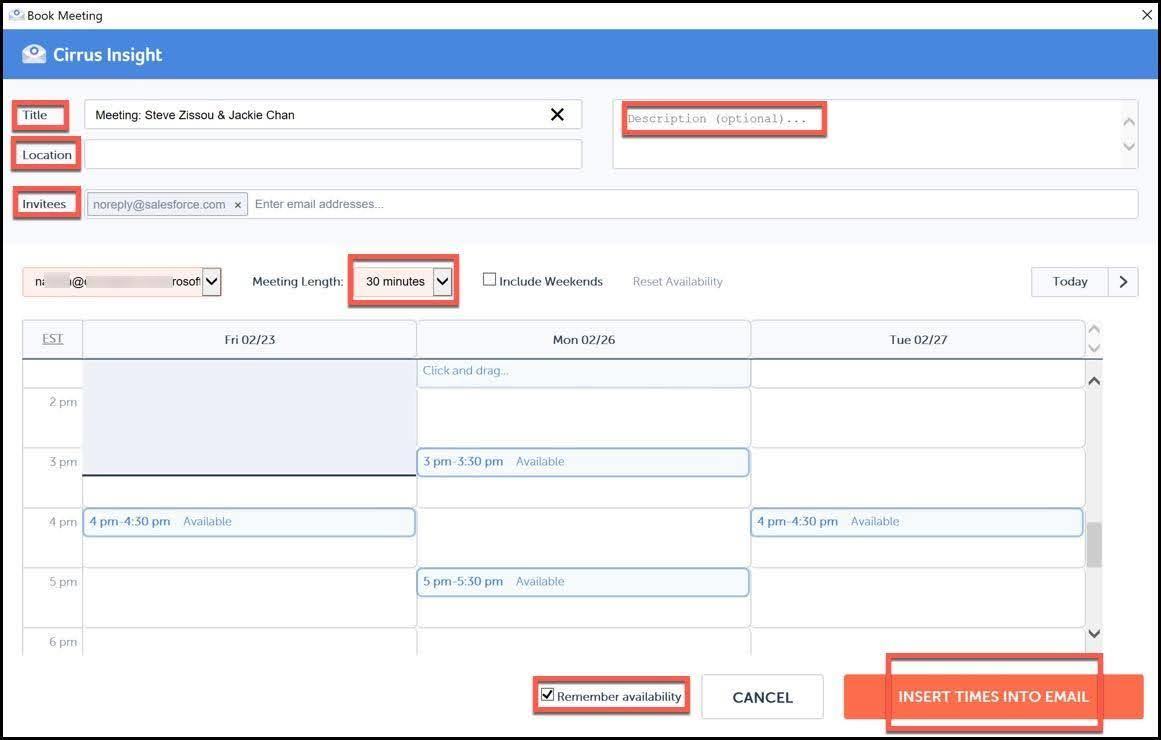
You can also change the location, title, and meeting length from this window. If using a static link for a conference line, this can be added to the location field.
Once you have confirmed the correct time periods are selected, click Insert Times into Email and Cirrus Insight will format the invitation to contain clickable links for your recipient. Once your recipient clicks on their desired meeting time, the event will be scheduled and you’ll both receive confirmation emails.
Bonus feature:
After selecting the Book Meeting button for the first time, you’ll have the option to create a Personal Scheduling Page (a custom URL you can send to show your availability and allow recipients to schedule a meeting) if you’re on the Closer or Rainmaker plan. Setup information can be found in the Deep Dive section below.
Deep Dive: |
Send Later

To schedule an email to be delivered at a later date/time, click the Send Later button and choose when you want the email to be sent.

When you click Gmail’s Send button, the email will be saved into your drafts folder. At the date and time you selected, your email will automatically be sent.
Deep Dive: |
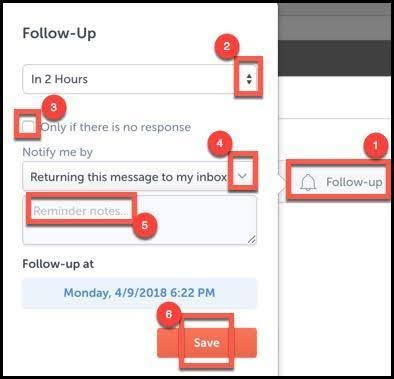
Follow-Up Reminders

If you want to be reminded to follow-up on an email that you’re about to send (or have already sent), use these steps:
- Select the Follow-up button.
- Choose when you want to be reminded (you can set a specific time and date).
- If you only want a reminder if your email doesn’t get a response, check the box.
- Choose whether you want an email reminder or a Salesforce task reminder.
- Add any notes.
- Review and Save.
You can manage all of your follow-up emails from the Follow-up Gmail folder (on the left side of your inbox), which Cirrus Insight will create after you set your first Follow-up.
Deep Dive: |
Templates

From the Templates window, you can select an existing template by filtering from Salesforce folders or you can search for a template by name. Once you find the template, you can preview it, edit it, or see how it has performed in the past. You can also create a new template.
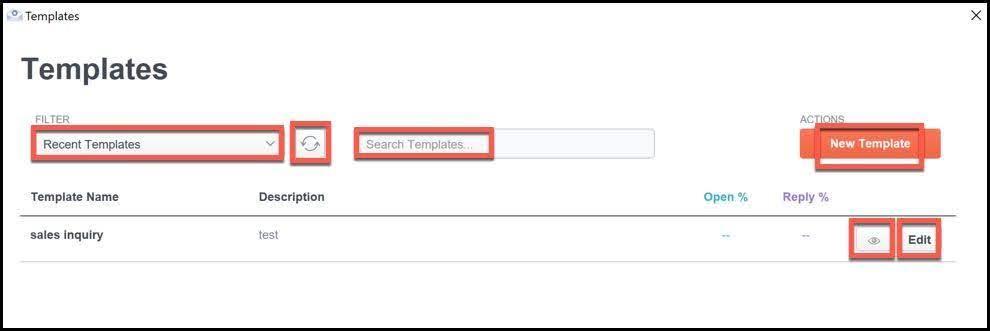
You will have the same access to templates that you have in Salesforce. This includes any of your personal templates or shared folders that you have access to in Salesforce.
Attachment Tracking
Use Attachment Tracking to know who opens your documents, which pages they read (and for how long), and who they forward it to. When composing an email, select the light blue paperclip icon next to the Send button to initiate the Attachment Tracking interface.
From there, you can upload new documents or find existing ones by searching or using the folder navigation menu on the left.
After selecting your document(s), you’ll need to decide whether you’re sending to one recipient (individual) or multiple recipients (custom).
Depending on what type of link you choose to create, you’ll have different sharing options, but you can choose to enable or disable features like real-time notifications, password protection, expiration date, reminders, downloading, and visitor info requests.
Deep Dive: |
Mass Email
Email Campaigns
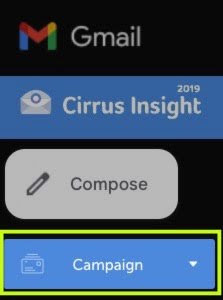
With Email Campaigns, you can reach up to 500 recipients at a time with personalized, templated unique emails. They are are all sent from your inbox just like you composed them individually.
To create a Campaign, start by selecting the blue Campaign button (right under Gmail’s compose button).
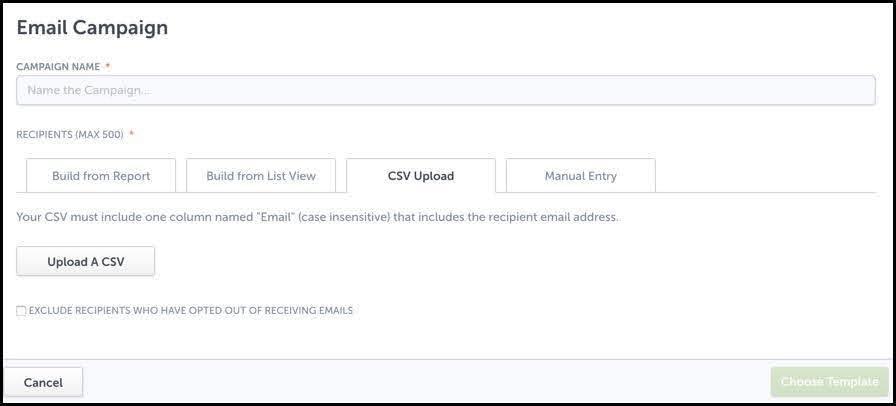
This will launch the Email Campaign interface, where you’ll start by naming the Campaign. Then you can choose to build your recipient list from a Salesforce report, Salesforce list view, CSV file, or even manual entry.
After reviewing your recipients, select the green Choose Template button.
Select the Salesforce or Cirrus Insight template you want to use, or create a new one.
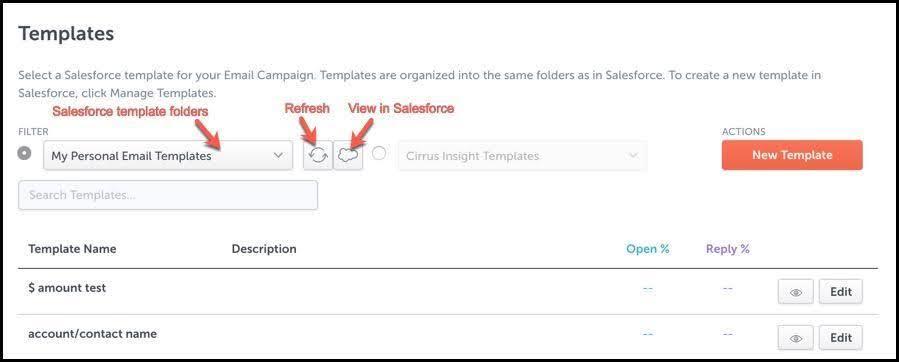
You’ll then preview the unmerged template. From the preview screen, select Continue to merge the template with your recipient information and create drafts to review.
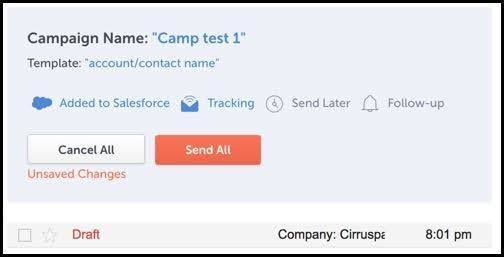
Finally, you can review the drafts and choose to enable Add to Salesforce, Email Tracking, Send Later, and/or Follow-up. After reviewing and choosing your options, select Send All.
Depending on how many recipients you have, there may be a slight delay while Cirrus Insight composes and sends all the individual emails.
Each Campaign you create will add a new label in Gmail so you can easily keep track of separate campaigns in your inbox. Just look for the Campaign name in your Gmail folders on the left side of your inbox.
Deep Dive: |
Flight Plans
Flight Plans is a powerful but easy-to-use sales automation tool available on the Rainmaker plan. Cirrus Insight Admins can create Flight Plans, which are sales playbooks that have all the right moves to win deals. As a user, you can start Flights, which are intelligent, targeted drip campaigns that leverage the right Flight Plan for the situation.
Although Flight Plans is designed to be simple to use, its power should not be underestimated. We recommend that Cirrus Insight Admins who wish to roll out the feature first meet with their Cirrus Insight account representative for an overview of initial setup and best practices.
To get better acquainted with Flight Plans, check out the resources in the Deep Dive below or contact your Account Manager.
Deep Dive: |
Related Articles
-
How do I disable Google Labs that conflict with Cirrus Insight?
Learn how to determine if an issue is caused by a Google Lab and, if so, how to disable the conflicting Lab.
-
How do I troubleshoot performance issues in Outlook?
Microsoft offers specific guidance on this topic.
-
For Admins: How do I set organization preferences for Calendar Sync?
Admins can enable/disable Calendar Sync for their organization and choose sync options for their users.
-
For Admins: How do I update our credit card/billing information?
As an admin, learn how to easily update the billing information for your Cirrus Insight license.
-
For Admins: How do I add seats to our license?
As an admin, learn how you can easily add seats to your existing Cirrus Insight license.
- Account Management
- Activities+
- Add to Salesforce
- Attach (Document Tracking)
- Book Meeting
- Calendar Sync
- CI Tab for Google Calendar
- Contact Sync
- Email Campaigns
- Email Sync
- Email Tracking
- Flight Plans
- Follow Up
- Install
- Link Tracking
- Log In
- Reply Tracking
- Reports
- Signature Extraction
- Specifications
- Templates
- User Guide