Smart Scheduler Overview and Set Up
Table of Contents
- Overview
- Requirements
- Create a Smart Schedule
- Step 1: Smart Scheduler Workflow
- Step 2: Add hosts
- Step 3: Deploy
- Smart Schedule Home Tab
- Important Details About Default Attribute Behavior
Overview
Create a schedule workflow with multiple potential hosts that will automatically route bookers to the appropriate host and ensure the best match possible. Take advantage of our custom attributes and scheduling form for an even more accurate matching experience.
How Smart Scheduler will help teams book with more confidence and in much less time:
- Automate the scheduling process by matching bookers with the most qualified and available host.
- Eliminate manual lead assignment for Sales Managers and SDRs.
- Eliminate the back and forth common with coordinating meetings via phone calls or email.
Availability
Smart Scheduler is available in our Scheduling+ and Expert plans.Create a Smart Schedule
Smart Scheduler allows teams to create and save drafts of scheduling pages that can be published and distributed at any time. Get started here:
1. Create a New Schedule
- From the Smart Scheduler Home screen, click the
 button from the top right corner of the screen.
2. Choose your logic
The logic controls how meetings are distributed to the pool of hosts included in the schedule. There are three options to choose from:- Utilization - Optimizes distribution of meetings based on the number of bookings for each host and prioritizes availability of hosts with the least number of bookings.
- When meetings are booked to the host's calendar, Smart Scheduler will track the number of bookings for each host.
- Each subsequent meeting that gets booked, we will evaluate availability of matching hosts and the number of bookings for each host.
- bookers will be shown less available times to book.
- What will happen when a host is on vacation?
- Smart Scheduler will prioritize hosts with availability while others are OOO. When a host returns, their availability will be prioritized to help maintain an even distribution of meetings.
- What will happen when a host is on vacation?
-
- The logic will attempt to maintain distribution of meetings as evenly as possible.
- Customer Availability - Customer Availability gives bookers the most available times to conveniently schedule with members.
-
- When bookers visit the scheduling flow, they are presented with a greater number of available times to choose from for more scheduling flexibility.
- Smart Scheduler accomplishes this by populating a threshold of 80% availability of all host in the rotation to the scheduler.
- As each meeting is booked to a calendar, Smart Scheduler will present the next scheduler with availability from hosts with a lower count of bookings.
-
- Match Maker - Match Maker automatically adds a configurable form to the workflow that leverages Custom Attributes. When your bookers visit the scheduling flow, the first step will be to complete a form which filters availability of hosts most qualified to assist the scheduler.
Note: For all schedules, the default availability displayed is set to two weeks from access.
Step 1: Smart Scheduler Workflow
Smart Scheduler Workflow Step
Overview: After selecting your primary logic, the Workflow steps will appear on the left side of the screen. These steps are the backbone to set up your workflow and show you exactly how the scheduler will walk through the scheduling experience. Each step has customizable options you can choose to configure to control your scheduler booking experience.
Advanced: You can also choose to add or remove a Form at this step for each selection to further filter the best matching host. Please see Custom Attributes and Form set up for further details.
Availability and Utilization
- Confirm the distribution logic for your workflow. Select your default Meeting Buffers to show the correct availability in the booking calendar. Choose to add or remove a form from the workflow.
- Choose the first meeting and all meeting buffers.
- Earliest Bookable Time: sets the number of minutes or hours between the time a contact visits the workflow to book and the first available times that show to give your hosts lead time to phostare for the meeting.
- Choose whether no lead time is needed or up to 7 days.
- Meeting Buffer blocks off the number of minutes or hours set between meetings to prevent bookers from booking back to back meetings where that is not possible.
- Choose whether meetings can occur with no break between meetings or up to 8 hours.
- Booking Window controls many aspects of the smart schedule's availability. Use this section to set how far out availability can be shown or set date ranges to control ranges of availability.
- Days into the future uses rolling days logic so it will always be the number of days into the future that you set.
- Between gives you the option to define hard set start and end dates for when the smart schedule booking page will be available.
- Starting sets the date when the booking page will be available and uses a hard set date.
- Until sets the end date for when the booking page will be available and also uses a hard set date.

- Earliest Bookable Time: sets the number of minutes or hours between the time a contact visits the workflow to book and the first available times that show to give your hosts lead time to phostare for the meeting.
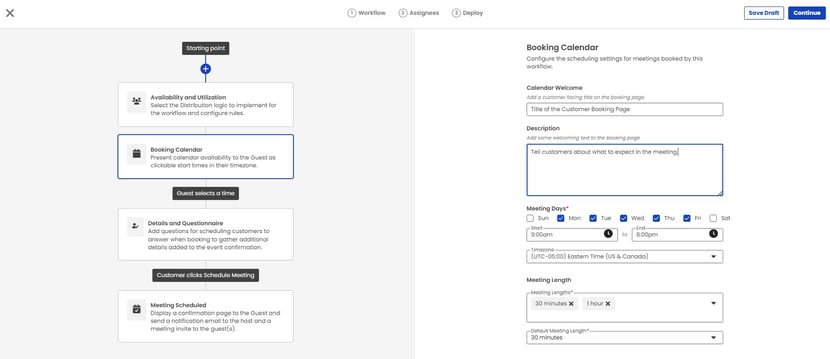
Booking Calendar
Overview: Click to customize the experience your bookers will see when selecting a time to meet with hosts in the schedule.
- Calendar Welcome: This is the title your bookers will see when visiting the booking page.
- Description: Add a greeting message visible to bookers when they visit the scheduling page for your team.
- Meeting Days: Choose the days of the week, Calendar Hours available to schedule for each day and the default timezone of the schedule
- Meeting Length: How long the meetings for the schedule can be.
- The default settings will reflect your Org calendar settings for Cirrus Insight. If there are customizations to make for your specific team, edit them here.
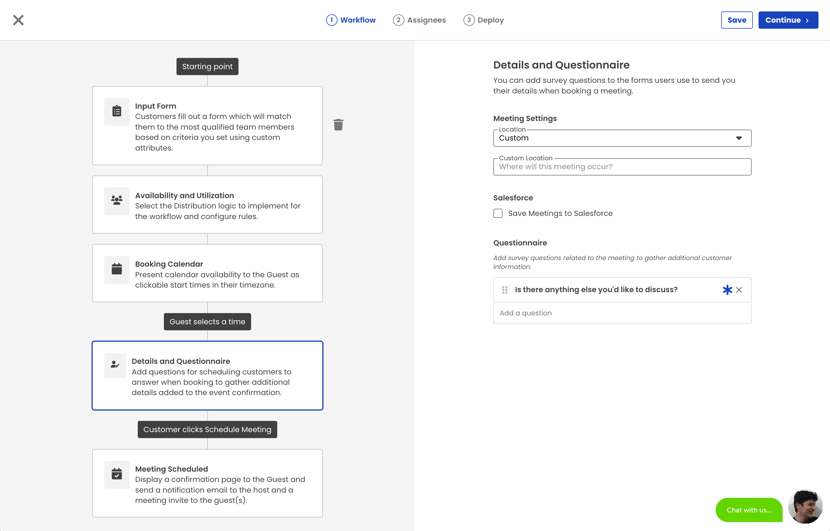
Details and Questionnaire
Overview: After bookers select a time for a meeting, the scheduler is matched with an host and can enter their contact information and view the details of their meeting. bookers can also be required to answer specific questions valuable to the team member hosting the meeting.
Meeting Settings:
- Location field allows you to set where the meeting will take place.
- Location Options:
- Custom
- Zoom
- Microsoft Teams
- Google Meet
- Custom allows you to add a specific location or phone number.
- For Virtual Meetings, select between Zoom, Google Meet, or Microsoft Teams and Cirrus Insight will generate a unique meeting link that will be added to the calendar event.
- NOTE: The integration of choice must be enabled for your org to view the virtual option in the dropdown and hosts must have a valid connection to the desired teleconferencing platform.
- Cirrus automatically connects Microsoft Teams or Google Meet from a hosts email connection.
- Zoom hosts must have a valid integration connection for the meeting link to be generated. If no integration connection is detected for an host, they will be sent an email asking to connect from the CI dashboard or sidebar. hosts can authorize Zoom from Manage Connections in the host portal.
- NOTE: The integration of choice must be enabled for your org to view the virtual option in the dropdown and hosts must have a valid connection to the desired teleconferencing platform.
- Location Options:
- Save to Salesforce checkbox automatically saves the calendar event to the hosts' Salesforce calendar when scheduled
- NOTE: This setting is only necessary if Salesforce is used to track events or if your Org has opted out of the Cirrus Insight automatic Calendar Sync.
- Questionnaire allows you to add optional survey questions for bookers to answer before confirming the meeting. (e.g. “What is the primary service you are interested in learning more about?”)
- Choose to make questions required or not required.
- All answers provided by the scheduler will be included in the confirmation email sent to the matched host.
Meeting Scheduled
Overview: After a scheduler confirms the meeting, they will see a confirmation of booking and receive an event invite.
Settings:
In the Meeting Scheduled workflow, customize the subject line of the scheduler confirmation email for a personal touch.
- Input your custom message to the scheduler when the generic email client just won't do.
- Send the Host confirmation email checkbox will send your hosts a copy of the scheduler facing invite.
Step 2: hosts
Overview: Add up to 50 hosts to your workflow to include their availability to your bookers and select the priority order for host in the workflow. The schedule creator will automatically be added by default to allow the workflow to be saved as a draft immediately to preview the scheduler facing scheduling experience. The creating host can be removed when at least one additional host has been added.
Requirements:
- hosts must be licensed Cirrus Insight hosts
- hosts should upload a profile picture from the host Portal in My Profile
Add hosts:
- Adding hosts to the scheduling workflow is easy. Using the search bar, search for licensed Cirrus Insight hosts your org by name ore email and select from the dropdown to add them to the hosts list.
Order hosts:
Overview: host Order allows customization of the workflow logic. When the scheduling flow is kicked off, Smart Scheduler will fetch the availability of the priority hosts first.
- Adjust the order of the hosts in the list using drag and drop to the left of each host.
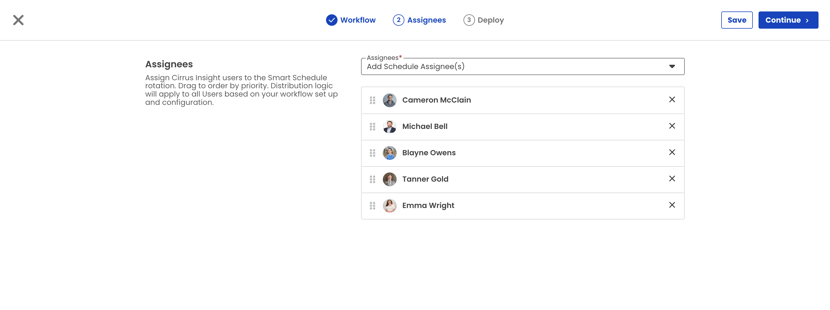
- As bookings are scheduled, availability will presented to bookers by the hosts next in the order.
- Available times presented to bookers will be prioritized for hosts with the least amount of bookings.
Step 3: Deploy
Overview: The Final Step to review a Smart Schedule allows you to customize your brand experience for your scheduler and permission schedule editors.
Settings to configure:
- Name the workflow (Internal Facing)
- Add a custom unique URL
- Add your branding
- Preview and test the scheduler facing experience before publishing.
Name field:
- This is the internal name as it will appear in the Smart Scheduler list and home tab.
- Search the Smart Scheduler list to locate your schedule when editing is required.
Custom URL field:
- Add a scheduler friendly URL to the scheduling page.
Owners field:
- Permission other Cirrus Insight hosts to edit and publish any specific Smart schedule. This field allows easy transfer of ownership or shared ownership.
- To Add owners, search by name and select any Cirrus Insight host from the dropdown.
- hosts listed in the field will automatically be granted access to the Smart Scheduler feature.
- hosts will have full edit and publishing rights for any schedule to which they are added.
Branding:
Overview: Upload your personal brand logo from a local file to appear in the booking experience for your bookers to add a professional touch to your page.
Requirements:
- The branding logo must be sized at 200x50 pixels.
Adding Branding:
- To upload an image, simply drag and drop or select from a file.
- The image will appear in the top left header of the booking page experience.
- NOTE: The Org branding set up by your Cirrus Insight Admin will appear by default. If no branding appears in this setting, please upload or consult with your Cirrus Insight Admin to apply Org wide branding to the Calendar Scheduling configuration.
- The Branding image will appear in the top left corner of the scheduler facing scheduling experience. Preview the flow to make sure the logo appears as intended.
Preview:
Overview: Before publishing your Smart Schedule, we give you the option to preview exactly how the scheduler experience will look and feel. This is your opportunity to make sure the Smart Schedule is customized precisely the way you want.
- Click the Preview button to walk through the entire live scheduling flow and even book a time with one of the hosts.
- NOTE: On the first run, you can expect hosts that appear at the top of the hosts list to be scheduled during the preview flow.
Smart Schedule Home Tab
Overview: When at least one Smart Schedule is created, the home tab will display a list of all created schedules. Schedules can exist in multiple states, from Draft, Published, to a mixed state with a Published and a Draft version.
You will notice different action controls depending on the status of a given Smart Schedule by hovering over the Smart Schedule name.
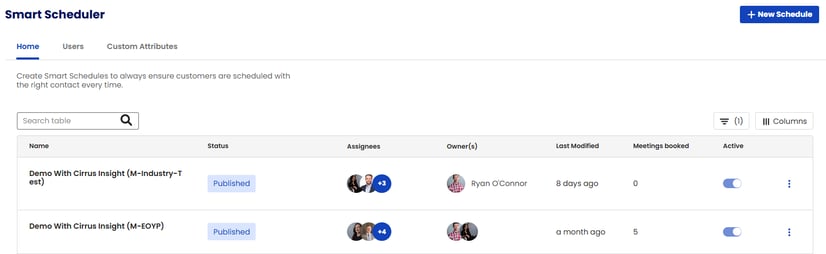
Draft Status
Drafts are unpublished versions of a schedule that are not yet active or visible in the scheduler experience.

Available Actions:
- Edit Drafts to update any set up or hosts to a schedule before publishing.
- View the current set up of the Smart Schedule as it would appear to your scheduler when booking a meeting
- Publish Draft will update the Status of a schedule and allow for deployment to your bookers
Published Status
Published schedules are ready for deployment to your bookers. A direct link is available to send via emails or embed behind a website button. Or choose to copy the HTML code and embed the booking experience directly in a web page.

Available Actions:
- Edit
- View
- Deploy allows you to copy the link to the active schedule
- Deploy also gives the option to copy the HTML code for embed on your website.
- NOTE: See the Deploy section below
- Deploy also gives the option to copy the HTML code for embed on your website.
Published and Draft Status
Overview: Smart Schedules can exist as a published, deployed version, and Draft version. The mixed status allows active scheduler-facing schedules to continue to drive bookings from the published version while edits are being made on the fly to a draft to be deployed later.
When edits to a draft are approved, Publish Draft will update the current published version of the schedule automatically without disruption to your bookers.

- NOTE: The best example for utilizing the mixed state - A new hire begins in one week. You want to be confident they will be inserted into the schedule at the start date. Once they are onboarded, publish the draft schedule to insert them into the published workflow.
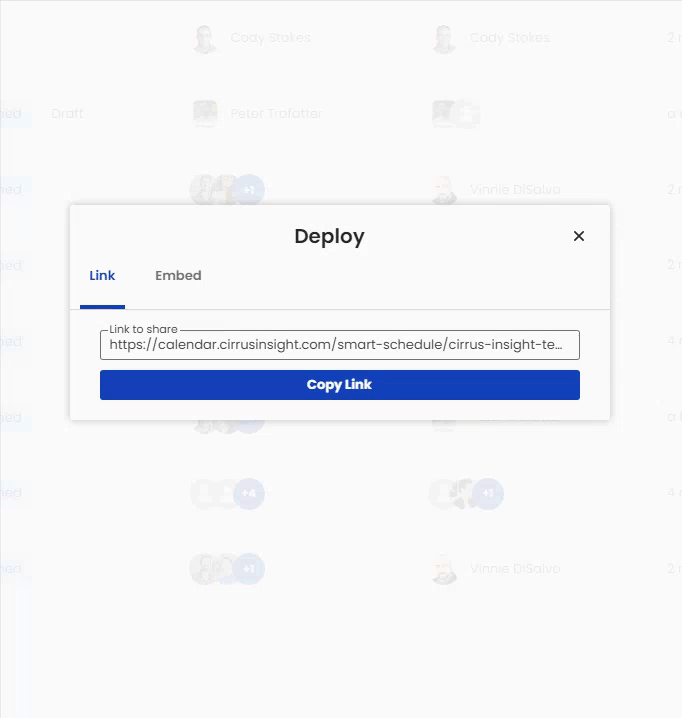
Deploy
Overview: The deploy action allows you to immediately obtain a link directly to the SMart schedule flow OR Embed allows copy of the HTML code which can be directly applied to any web page. This gives you flexibility when curating your scheduler scheduling experience.
Requirements:
In order to access the Deploy action, a schedule must have a status of 'Published'
Action:
- Clicking Deploy will open a menu and provide two options to share access to your scheduling workflow.
- Copy Link Tab:
- Just like personal scheduling pages, the Copy Link allows you to deploy your Smart Schedule efficiently to bookers.
- Example Uses:
- Add the link to marketing emails to drive bookers to your hosts.
- Mask the link behind a button in your website to kickoff the scheduler booking experience
- Example Uses:
- Just like personal scheduling pages, the Copy Link allows you to deploy your Smart Schedule efficiently to bookers.
- Embed tab:
- Clicking the embed tab will show you a preview of an iframe for your created schedule.
- Copy the Embed HTML code to add the actual scheduling experience directly to any webpage.
- NOTE: Send the code to your IT or Website specialist. They can customize the iframe to modify the iframe to match the color palette for any webpage.
Important Details About Default Attribute Behavior
Creating Custom Attributes with Default Values:
- When you create a custom attribute for hosts in a system, you can assign a default value. This default value is automatically applied to all hosts within the system, ensuring that every host has a value for this attribute from the start.
Manual Overrides:
- If you then manually change the value of this custom attribute for a specific host, this host’s attribute value will diverge from the default. The system records this manual change, and this host’s custom attribute will no longer automatically update with changes to the default value.
Updating the Default Value:
- Should you decide to change the default value of the custom attribute at a later time, this new default value will propagate to all hosts except for those whose attribute values have been manually edited. Those manually edited hosts retain their customized values, ensuring their specific settings are preserved.
Behavioral Principle:
- The key principle here is that the system distinguishes between hosts who retain the default setting and those who have been given a specific, manually-set value. Changes to the default setting do not affect hosts with manual overrides, which allows for both broad changes across the host base and individual customizations.
For details on creating custom attributes and forms within a Smart Schedule, view this Knowledge Base article.
Relevant Articles