 Gmail is one of the most popular free email platforms. But for all its value, there’s no denying that it can be tough to organize at first. Especially if you get dozens of emails every day. Fortunately, there are many ways to optimize and use folders in Gmail. Gmail folders can help you keep your inbox organized and ready to go each time you settle in for a workday.
Let’s take a closer look at how you can make that happen …
Why Bother Optimizing Your Gmail Inbox?
Simply put: It enhances your productivity.
When you sit down for a day of work and open your Gmail inbox, you might be greeted with dozens of emails, some of which are new and some of which you’ve already read and responded to. But if all those emails are collected in one place, your eyes will inevitably dart all over the screen; scanning information you’ve already read and skipping over the crucial emails you just received.
By default, your Gmail inbox does not foster productivity or peace of mind. As you optimize your Gmail inbox, think of it as organizing your desk. You put important things right where they need to go. You make sure you can always reach critical items or information. And you minimize distracting items so that you can accomplish your work tasks.
Even more than that, you should optimize your email inbox because it will prevent you from getting distracted. Say that you replied to an email yesterday – when you check your Gmail inbox, your eyes automatically scan the email one more time despite having three new emails you need to respond to.
Distractions can be quite costly in aggregate. Each time you get distracted, it may take more than 23 minutes to get back on track!
Lastly, you should consider optimizing your Gmail inbox using folders and other strategies because it’s easy. In fact, optimizing your Gmail inbox will only take a handful of minutes from start to finish. Once you’ve set up the right organizational systems, your inbox is more likely to stay organized too.
Adopt the Inbox Zero Approach
The first thing to do is adopt an “inbox zero” approach. This means having no distractions, no unread emails, and no inbox clutter by the time you’re done.
An “inbox zero” approach involves categorizing all of your emails into three buckets:
- Follow-up: These are emails that you need to act on immediately
- Waiting: These are emails that you are waiting for a response to, or that require some waiting on your part before you can write a response. Examples of waiting emails include sales emails and product queries.
- Read Through: These are emails that you may wish to read through again despite having read them already due to their complexity or valuable information. Pro-Tip: You can set up a filter that will automatically label your newsletter subscriptions, if you have them, as Read Through. Then, you can set up some time at the end of the week to review them without being distracted by them.
Each of these three big buckets will serve the vast majority, or all, of the emails you receive in a given workday. When leveraged correctly, the inbox zero strategy will keep your inbox looking organized and productive 24/7, plus make it less likely that you’ll accidentally miss an important email or key information. If your business has a dedicated domain name, which is actually very affordable and won’t cost your business more than $15 per year, you may also have a custom email address. Although we’ll only discuss Gmail optimization here, the inbox zero strategy can be applied to your custom email or any other email platform, for that matter, as well.
Make Gmail Folders
Now it’s time to get into the details. You need to know how to create folders in Gmail; luckily, this is very easy. Gmail calls all of its folders “labels;” remember that to avoid getting confused.
To create a new folder, go to the left side of your inbox screen and click “More.” At this point, you’ll see an option to “Create a new label.” Click on that and name your label whatever you choose. We recommend starting with the label names mentioned above, but you can name them other things like Inbox, New Emails, etc.
That’s it! It’s that easy to make Gmail folders. Note that you’ll also find an option called “Nest label under.” That option allows you to create new subfolders within folders, helping you to organize your email inbox further. This can be advantageous if you want to divvy up your emails by month, type, sender, and more.
You can also create new labels or folders by:
- Clicking on the “Settings” icon
- Going to the “Labels” section
- Clicking on “Create new label” at the bottom of the drop-down menu
- Naming the label
- Then clicking “Save”
Use Gmail Folders with Messages
What if you want to put messages already in your Gmail inbox into one of the new folders or labels you created? You can do that with a very basic step-by-step email management process:
- First, open the message you want to categorize or label.
- Then click the “Label” button indicated by the tag icon.
- Then check off each of the labels you want to add.
At that point, the message will show up in any of the labels you selected. This should automatically work with Gmail integrations with software like Salesforce, as well.
Automatically Filter Incoming Emails Into Folders
Even better, Gmail allows you to automatically filter any incoming emails and stash them into the appropriate folders or organizational categories. That way, you don’t have to manually sort out incoming emails you receive after reading through them; they’ll just show up in the right categories by themselves. To do this, click on the filter icon in Gmail’s search bar (located on the right). You can then pick different criteria from the drop-down list, then click “Create filter with this search.” At this point, apply the label by choosing the “Choose label” drop-down option.
Then, when you receive an email with the appropriate criteria, it will automatically have the right label applied to it. For instance, if you want to funnel all emails regarding subscription costs into the “Budget” label or folder, you can do just that. Then, any emails that have “subscription” in the title or contents will be funneled into that folder automatically. This is a huge timesaver and one of the major tricks that will prevent your email inbox from getting cluttered.
Keyboard Shortcuts For Labeling and Archiving Emails
Keyboard shortcuts are an incredibly helpful way to help save you time as you are sorting through your inbox.
To start, make sure that keyboard shortcuts are enabled:
- Go to “Settings” in Gmail
- Go to “Keyboard Shortcuts”
- Turn “Keyboard Shortcuts” On and then Save
To label your Gmails using keyboard shortcuts, use ‘L.’
Archiving your emails will move them out of your Inbox that you see when you first open up Gmail, but it won’t delete them. This is a good action for emails that you want to view later but that you also don’t want cluttering your inbox. To archive emails, use ‘E.’
To undo either action, press ‘L.’
Adjusting or Editing Email Labels/Folders
From time to time, you may need to change one of the labels or folders you’ve already made. Gmail allows you to do that without having to delete them entirely.
For instance, when you need to rename a label, simply go to the “Labels” tab of the “Settings” control panel. You can find this by clicking “More” on the left-hand side of your inbox, then clicking “Manage labels.”
On this screen, you’ll see your various labels and sub-labels, each of which will be listed with the option to show, hide, or edit them. This allows you to remove labels or folders you no longer need or edit and rename folders that you want to adjust for more accuracy or for different categorical emails.
Setting Up Multiple Inboxes
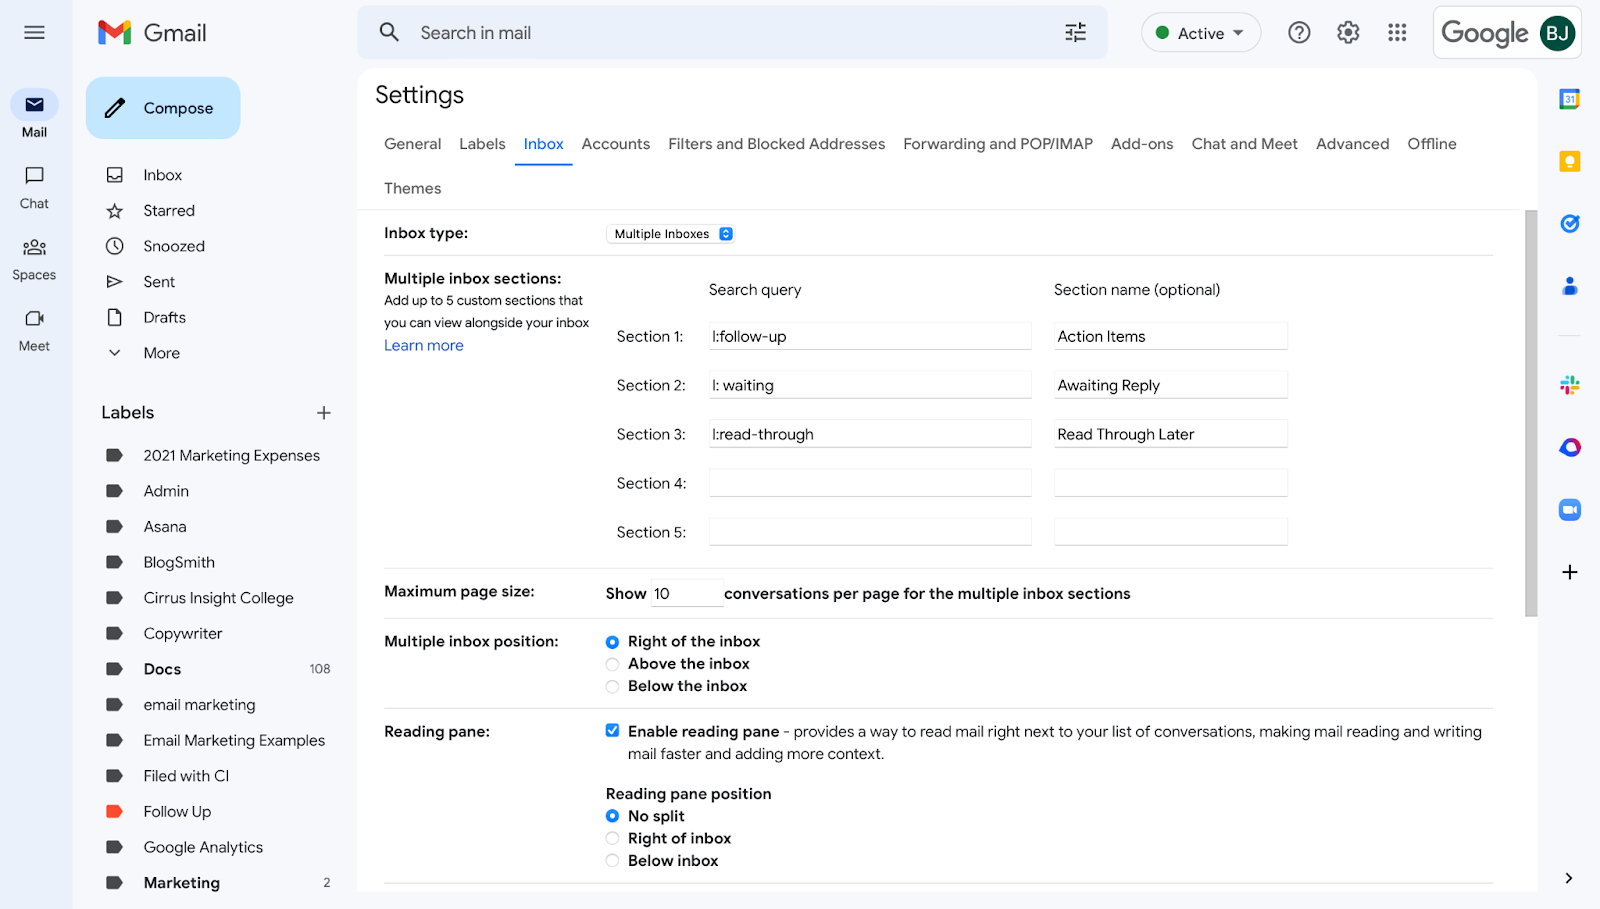
You can do this by going into Settings and change your inbox type to “Multiple Inboxes.”
We recommend setting up three inboxes. One for the emails you need to act on, which we have labeled in the example above as “Action Items.” One for emails you are waiting on, which we have labeled “Awaiting Reply.” And finally, one for your Read Through emails, which we’ve labeled as “Read Through Later.” Again, you can call these inboxes whatever you’d like.
The important thing here is the search query, which should be an l followed by a colon and looks like this l:
You then follow the l: with the name of your new labels that we have created here in this article. So l:follow-up, l:waiting, and l:read-through.
You can copy and paste those into the search query box.
Then, you’ll select how many emails you want to have displayed, as well as how you want the inboxes themselves to appear.
When finished, make sure to click on Save Changes.
Once you’ve acted on your emails and no longer need to reference them, we recommend removing the label in order to archive them and keep your inbox(es) looking clean.
Just a quick note: When there are no emails labeled, these inboxes will appear empty. Congratulations if you see this. You are now an inbox zero master!
Conclusion
As you can see, making, labeling, and leveraging folders in Gmail is the best way to keep your inbox neat, tidy, and easy to navigate. The right folders will help you keep track of critical emails you need to respond to ASAP. Plus, they can help you prioritize your efforts and stay focused throughout the workday. Try taking these tips into account today and see the productivity gains for yourself.