Picture this: You’ve logged out of your email for a crucial Zoom meeting. When it’s over, you hop back to your inbox and find a brand new slog of emails waiting to bog down your workday.
Imagine something like this. You've logged out of your email for a crucial Zoom meeting. When it's over, you hop back to your inbox and find a ton of notifications and a brand new slog of emails waiting to bog down your workday.
How could this be possible?
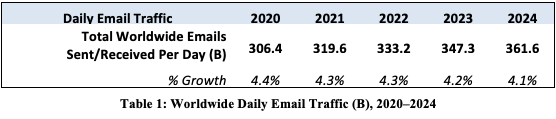
Well, emails pile up by the hour, whether you want them to or not. People send a lot of emails every day. In their 2020-2024 Email Statistics Report, Radicati projects that the total number of business and consumer emails sent and received per day will exceed 361 billion by the end of 2024.
As remote work becomes a mainstay for businesses, so do email communications. Finding ways to improve workflow efficiencies for the work-from-home employee remains a top priority. You need to organize email communication properly so that no important email gets missed.
Here's the good news. Your Google Workspace (formerly G Suite) has excellent native Gmail capabilities you can use to organize your inbox for improved sales productivity. To help you get started, we'll be going over the following sections:
- The importance of learning how to organize your Gmail inbox using labels
- How to create custom labels in Gmail from your desktop and smartphone
- How to add a label to a message you're sending
- How to manage your custom Gmail labels from your desktop and smartphone
- How to create custom Gmail filters from your desktop and smartphone
- How to create Gmail filters from specific messages
- How to manage Gmail filters from your desktop and smartphone
- Advanced tips on how to organize Gmail for improved sales productivity
The Importance of Learning Gmail Organization
Adobe's 2019 Email Usage Study found that workers spend an average of 209 minutes checking work email threads and 143 minutes checking personal emails each workday. That's more than five hours a day spent on email alone.
Assuming you work an eight-hour workday, that leaves less than three hours to focus on selling and moving essential deals through the pipeline. However, when you organize your email with labels and Gmail filters, you can remove some of the busy work to improve sales productivity and hit your quota.
Keep Your Inbox Clean with Custom Labels in Gmail
Labels are like folders. Therefore, you can think of labels and folders as one and the same since they function similarly. Below, we'll show you a tip on top email organization. Let's learn how to create labels in your Gmail account from your desktop and smartphone.
Note: The steps listed for the smartphone version apply only to iPhone users. The Gmail app for Android doesn't have the option to apply labels to emails. If you have an Android device, you need to use a computer.
From Your Desktop
Here's how to apply labels to emails from your desktop:
1. Log in to your Gmail on your desktop. Most of you will be logged into your Gmail automatically.
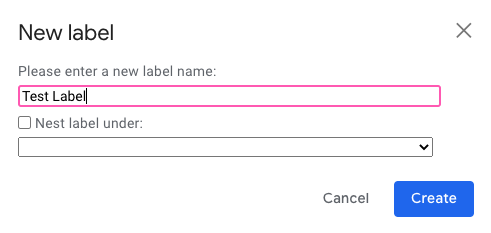
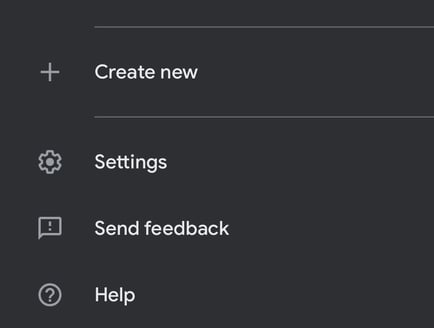
2. Click More in the left side panel, then scroll down and select + Create new label.
3. Type the label's name in the pop-up window and click the blue Create button.
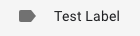
You should now see the label on the left side panel of your inbox. You can move emails into the folder using the "Move to" feature or by clicking on the folder icon with the arrow. You have successfully added one label to an email.
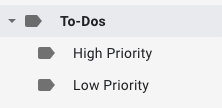
Note: When creating custom labels, you'll notice an option to add a label to a "parent folder." In this case, the new labels work like subfolders.
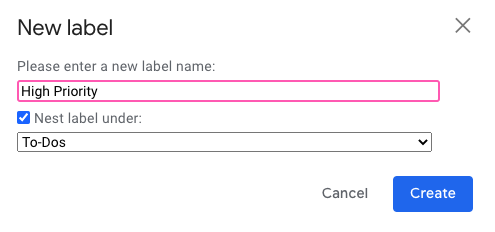
For example, you could create a label for "To-Dos" and organize the subfolders by high and low priority.
From Your Smartphone
Here's how to categorize emails with labels in the app on your iPhone.
1. Log in to the Gmail app on your iPhone.
2. Tap the three-dash icon at the top left.
3. In the pop-up side panel on the left, scroll down to Labels and press + Create new.
4. Type in your label's name and tap Done in the upper right corner of your screen.

You should now see your new label in the app's left side panel. You can now move the corresponding messages into the folder.
Managing Your Custom Gmail Email Labels
There are a few different ways to manage your labels once created. Let's take a look at some options from both your PC and iPhone (where applicable).
Note: The app for Android doesn't allow you to manage labels within the app — you must use a computer.
How to Add a Label to a Message You're Sending
Here is a simple Gmail hack if you want to preemptively label an outgoing message.
1. Log in to your Gmail account from your desktop.
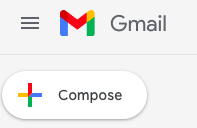
2. Click on the + Compose button in the left side panel.
3. After you've added the contact, subject line, and body copy, tap the three vertical dots icon near the bottom right of the message composer. This will open a pop-up window.

4. Hover your mouse over the Label section and select the name of a folder from a list of pre-existing options.
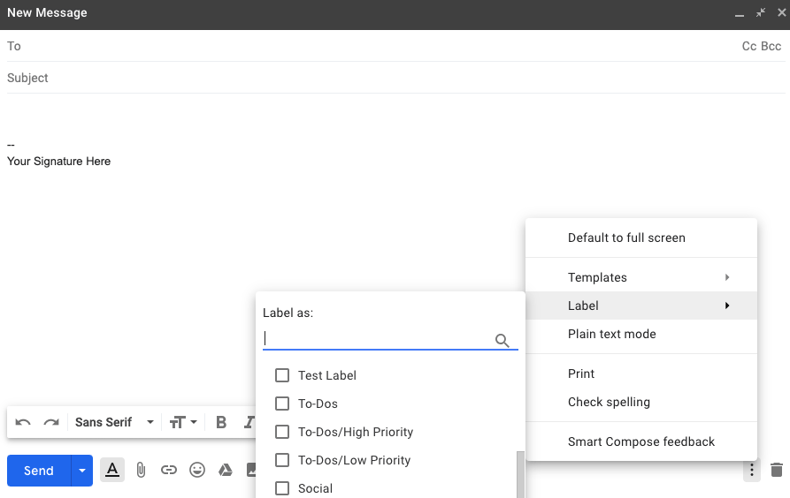
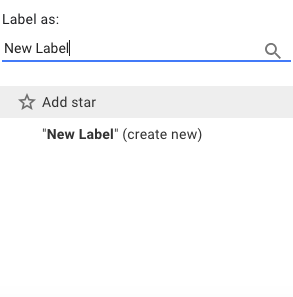
You can also use the search function to find a label or type in something new to create a unique folder.
How to Edit Labels in Gmail on Your PC
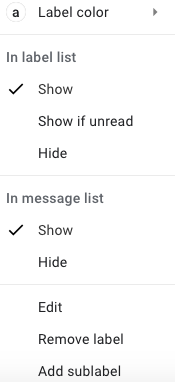
1. From your desktop, scroll down to the label you wish to edit in the left side panel of your inbox.
2. Hover over the desired label, and click on the three vertical dots icon.
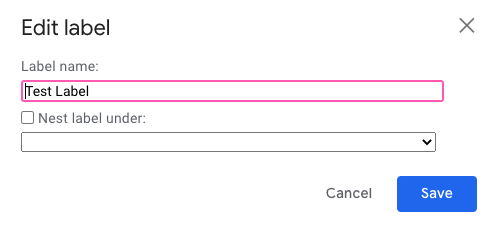
3. From the pop-up, scroll down and select Edit.
4. Change your label name and click on the blue Save button.
The above steps explain how to edit Gmail labels from a computer. You can also edit your labels from the Gmail app on iOS devices.
How to Edit Gmail Labels from Your iPhone
1. Open the Gmail app on your iPhone.
2. Tap the three-dash icon at the top left of your screen.
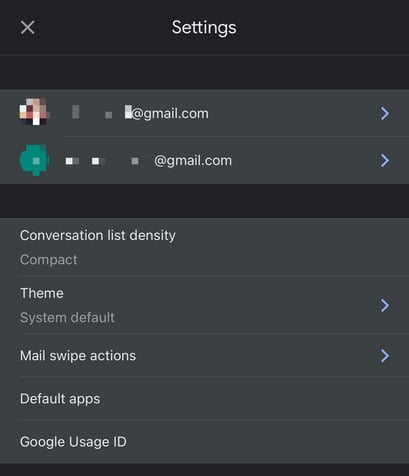
3. Scroll down and tap on Settings.
4. If you have more than one Gmail account connected to the app (i.e., business and personal), select the correct account at the top of your screen.
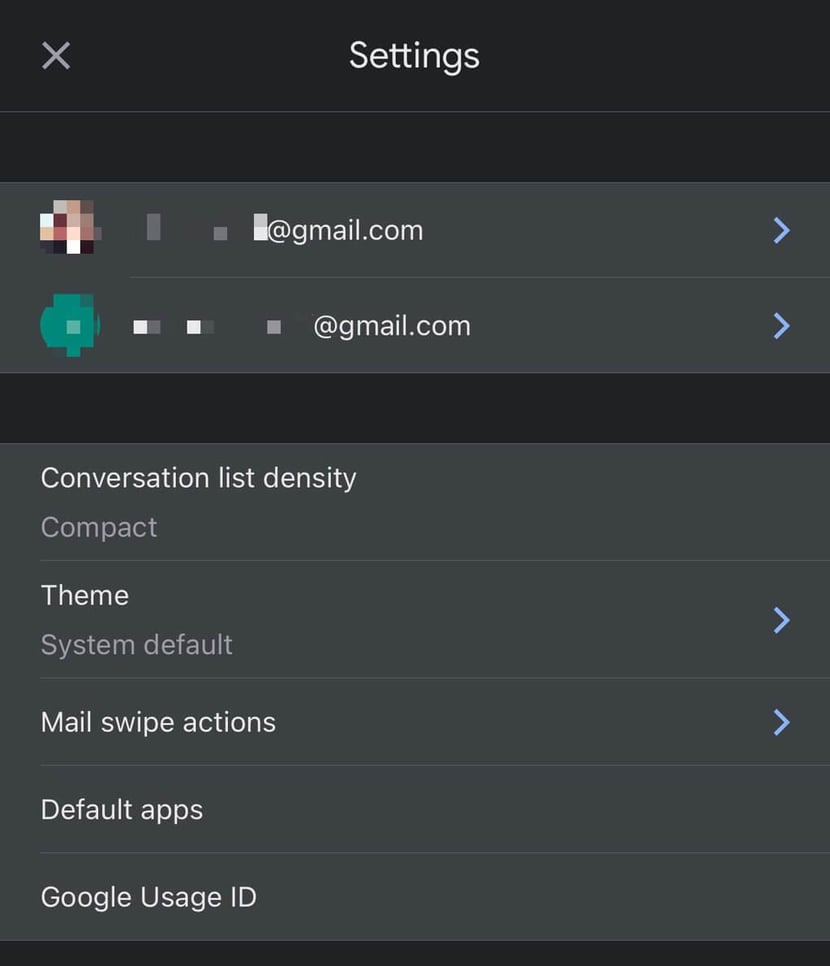
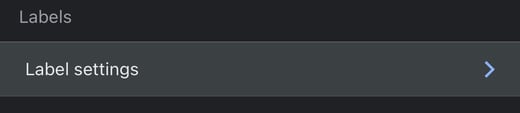
5. Under Labels, tap on Label settings.

6. Select the name of the label you wish to edit.
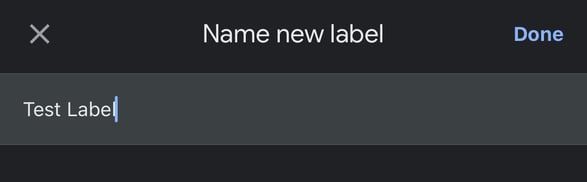
7. Tap on Name.
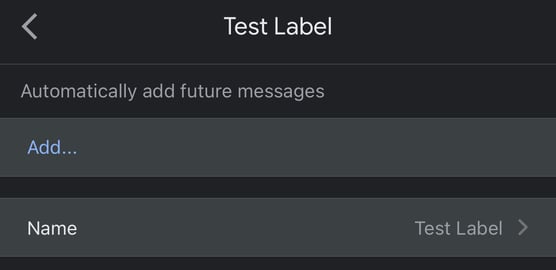
8. Edit the name of your label, then tap Done in the upper right corner of your screen.
How to Delete Labels in Gmail
1. Log in to your Gmail on your desktop.
2. Scroll down and hover over the label you wish to delete in the left side panel.
3. Click on the three vertical dots icon.
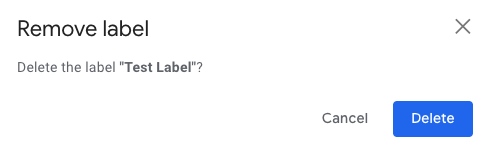
4. From the pop-up window, click on Remove label > Delete.
The above steps list how to delete a label in Gmail from your computer. You can also delete Gmail labels by using the app on your iPhone.
To do so, follow the same steps as if you were going to edit a label from your smartphone, then press the red Delete button.

It's important to note that deleting a label does not mean you'll automatically archive emails within the folder. They will simply reappear in your primary inbox.
How to Create Custom Gmail Filters
Creating labels is an excellent start to organizing your email conversations and your entire Google Workspace. However, to truly improve sales productivity and overall sales success, you need to consider some inbox automation practices.
Custom Gmail filters allow you to automatically apply labels to incoming emails based on predefined search criteria you've chosen to implement. Below, we will teach you how to use these filters from your desktop and your smartphone.
Create Custom Filters From Your Desktop
Here's an easy guide to creating filters from your desktop.
1. Log in to your account on your computer.
2. Click the down arrow next to the search box at the top of your screen.

From here, you'll find a variety of functions that you can use to create a filter, including:
- From: This will filter messages from a specific email address.
- To: This will filter messages sent to a particular email address.
- Subject: This will filter messages based on the subject of future emails (depending on what you type in).
You can also select whether you want the filter to include attachments or exclude chats.
3. Once you've entered your search criteria, click the Create filter button. A new pop-up window with additional options will appear.
4. Select Apply the label, then click on the Choose label button to reveal your custom labels.

Of course, you can also choose to create a new label.
Pro Tip: Once you've selected the folder, we recommend a few additional tips for optimal organization.
To declutter your primary inbox, select Skip the Inbox (Archive it).
If you already have matching conversations, check the box at the bottom of the pop-up to apply the filter to all matching messages. This function will ensure that all relevant emails in your inbox automatically move to the correct label after you create each new email.
5. After customizing your filters, click the blue Create filter button near the bottom right of the pop-up.
All future emails from your inbox that match the criteria will now be funneled into the specified folder.
Create Custom Filters From Your Smartphone
To create new filters from your iPhone (Android users must use a desktop device), follow the steps for creating a label on your smartphone.
Once you've created the label, follow the ordered list below:
1. Tap on the three-dash icon at the top left.
2. Scroll down and tap on Settings.
3. Select the correct account.
4. Under Labels, tap on Label settings.
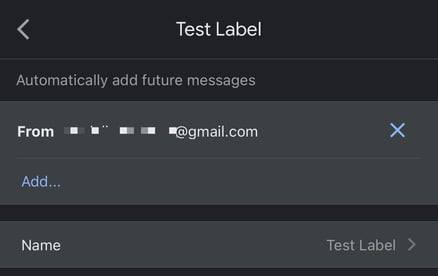
5. Select the label where you want to add a filter.
6. Tap on the blue Add button.
7. From here, you can enter the email addresses of all contacts from which you wish to filter messages.
To use additional search functions, tap on the blue And button.
8. After you've tailored your filter, tap Save in the upper right corner of your screen.
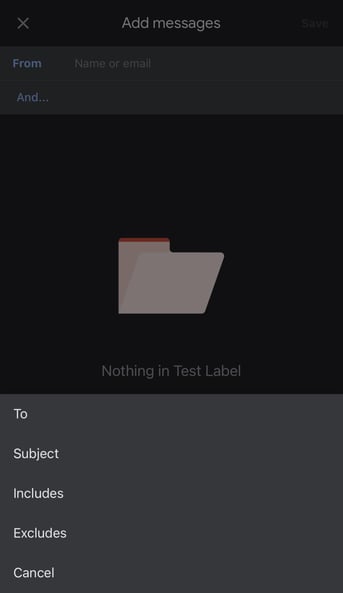
In addition to the methods above, you can create a filter from a specific email message.
How to Create a Filter from a Message
There are a few different ways to create a filter from a conversation.
Here's the most straightforward process.
1. Log in to your account on your desktop.
2. Check the box next to the email you wish to create a filter with.
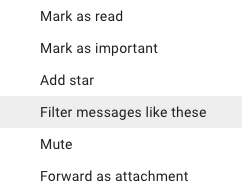
3. Once selected, click on the three vertical dots icon in the message toolbar at the top of your inbox.
4. From the pop-up, click on Filter messages like these.
5. Enter your specified search criteria, then click Create filter.
6. From the pop-up with additional options, check the box next to any desired search functions.
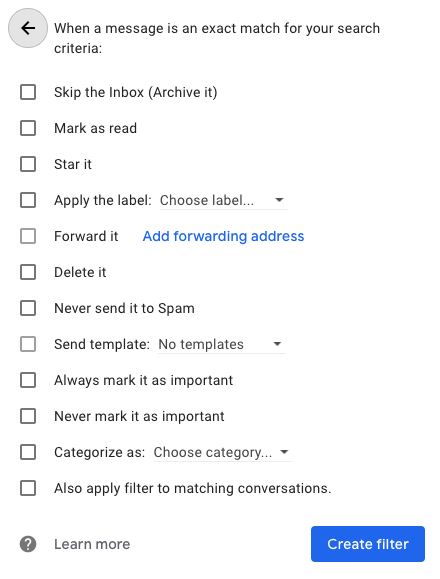
7. Click the blue Create filter button.
The message you've filtered will serve as the main template.
Managing Custom Filters
Google allows you to edit, mute, snooze, or delete email filters in your inbox. Below, we'll teach you how to do this from your computer and iPhone.
Note: Again, the Android app doesn't allow you to manage filters within the app, so you'll need a computer.
How to Edit Custom Filters
1. Log in to your account from your computer.
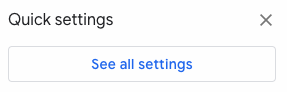
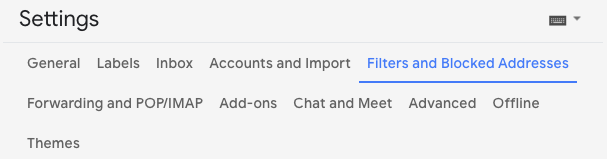
2. Near the top-right of your inbox, click on the gear icon.
3. Click the See all settings button from the Quick settings pop-up window.
4. Once all the settings features are displayed, click the Filters and Blocked Addresses tab.
In addition to managing filters from your desktop, you can also do this on your iPhone app.
5. Find the filter you wish to edit from the displayed list and click edit.
You’ll see the search criteria pop-up where you can make any necessary changes.
5. Once all changes have been made, click Continue > Update filter.
In addition to managing Gmail filters from your desktop, you can also implement changes from the Gmail app on your iPhone.
4. Select the correct account at the top of your screen.
5. Under Labels, tap on Label settings.
6. From here, you can add specific email addresses to automatically filter messages into the label or remove addresses by tapping on the blue X icon.
How to Delete Custom Gmail Filters
1. From your computer, log in to your account.
2. Near the top right of your inbox, click the gear icon.
3. Click the See all settings button.
4. Once the full settings feature is displayed, click the Filters and Blocked Addresses tab.
5. From the displayed list, find the filter you want to remove and click Delete.
6. When the Confirm delete filter window pops up, click the blue OK button.

The above steps list how to delete filters from your desktop. You can also delete them by using the app on your iPhone.
To do so, follow the same steps as if you were editing a filter from your smartphone. Then, press the blue X to remove selected filters.
The label will remain, and you can continue to move messages there manually.
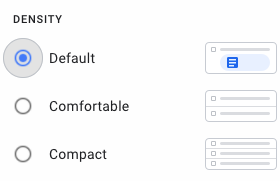
1. Change Your Inbox Density to Default
Google offers three different display densities to personalize your inbox view.
- Default
- Comfortable
- Compact
The option you choose will determine how much white space you see between emails. While it may be tempting to select the "compact" option to view more emails within your browser, we recommend setting the display density to "default."
The default option allows you to preview attachments and directly click on those attachments without opening the message itself. This makes searching and finding essential documents a breeze, and you can get more done in a shorter time.
To change the density of your Gmail, follow these simple steps:
1. Log in to your Gmail from your desktop.
2. Click the gear icon at the top right of your inbox.
3. Under Density from the Quick settings pop-up window, select Default.
2. Display Your Most Important Messages First
Beyond the standard "default" layout that organizes your inbox based on the date and time an email was received, there are four additional layout options to take advantage of. This is a very easy way to filter emails as soon as you open your inbox. You get to decide which emails take priority.
- Important First: Your inbox will be split into two sections, with those marked as "important" appearing at the top and "everything else" appearing below when you check your email.
- Unread First: Your inbox will be split into two sections, with all unread emails appearing at the top as they arrive and "everything else" appearing below.
- Starred First: Again, you will get two sections, and "starred" messages will appear at the top and "everything else" will be below below.
- Priority Inbox: Your inbox will be split into multiple sections based on your preferences (i.e., Important First and Unread First). You can choose the order.
Here's how to change your layout in three simple steps:
1. Log in to your account on your desktop.
2. Click on the gear icon next to the search in Gmail.
3. From the Quick settings menu, scroll down to Inbox Type and click on the desired layout.
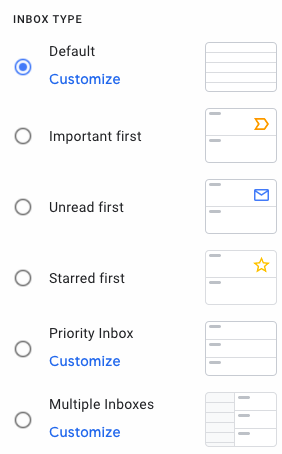
You can also customize the layout further by selecting the blue Customize button beneath the layout option. Choose something that suits your workflow.
3. Take Advantage of Multiple Inboxes
Another advanced Gmail hack for improved organization and efficiency is to set up multiple inboxes.
Multiple inboxes allow you to see labels as separate "inboxes" within one Gmail account. Create custom labels or use Gmail search operators like text or symbols to filter your search results and categorize each section.
For example, you could create a label for "To-Dos" to view the folder simultaneously with your primary inbox.
The main difference between "priority inbox" and "multiple inboxes" is that the former will allow Gmail to automatically assign priority to your messages for you, while the latter offers more flexibility for customization.
4. Use Gmail Search Operators to Create Custom Filters
As mentioned above, Gmail search operators allow you to search for messages in your inbox seamlessly.
Google recognizes an extensive list of operators, so we did the heavy lifting for you and selected the top search functions you should use.
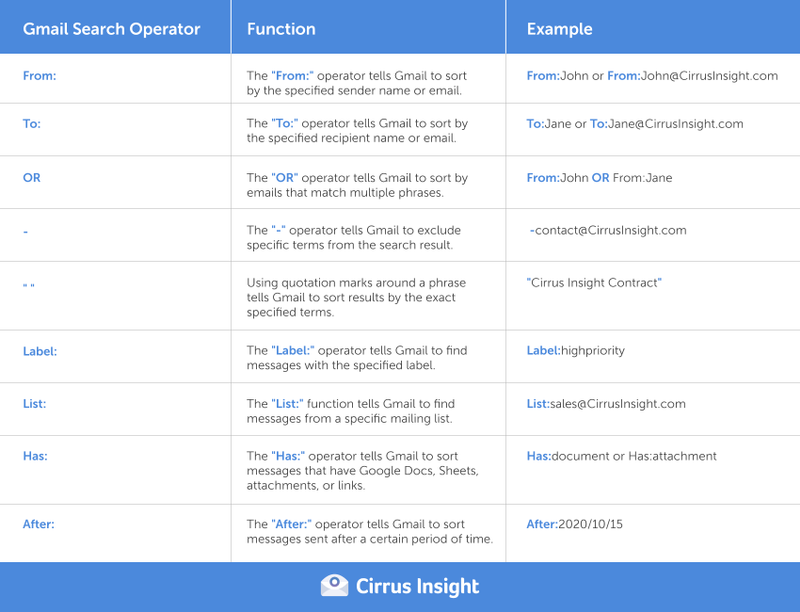
In addition to searching for specific messages, you can use search operators to create more precise custom filters.
Simply type in the operator you wish to search by (i.e., from:johndoe). Once the results have loaded, click the down arrow to the right of the search bar and follow the steps to create a Gmail filter from your desktop.
5. Enable Templates for Easy Message Creation
From commonly asked questions to cold email outreach, templates allow you to save frequent messages to reduce the time spent on redundant emails. Simply select the template when composing a new message or responding to the sender. Don't forget to personalize key elements.
To enable templates in your account, follow the steps below:
1. Log into your Gmail account on your desktop.
2. Click on the gear icon near the top right of your browser.
3. From the Quick settings pop-up window, select the See all settings button.

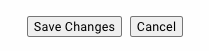
4. Once the full settings feature is displayed, click on Advanced > Templates > Enable.
5. Scroll down and click on Save Changes.
6. To save a new template or insert a saved template into a message, go back to your primary inbox view.
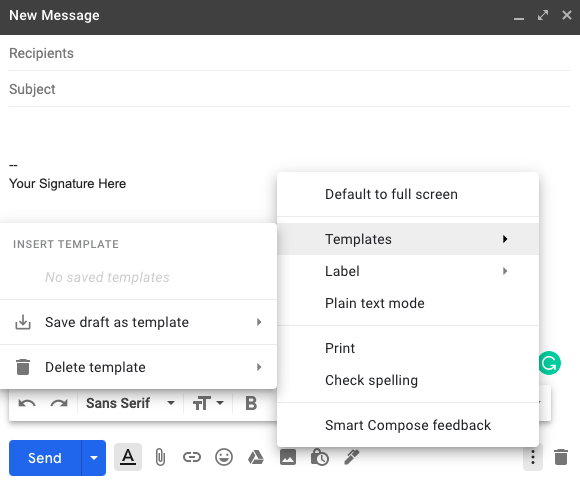
7. From the message composer pop-up, click on the three vertical dots icon near the bottom right. You should now be able to see a section called Templates.
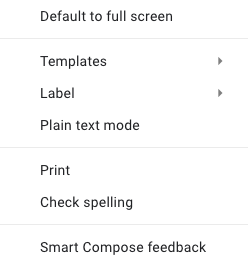
8. Hover your mouse over the Templates section and select whether you want to insert a pre-saved message or save the draft as a template.
6. Add Colors to Your Labels for Easy Differentiation
For easy differentiation within your inbox, Gmail has an add-on you can use to color-code your labels.
From your computer, simply hover over the label you want to color and click on the three vertical dots icon. At the top of the pop-up is an option to change the color. 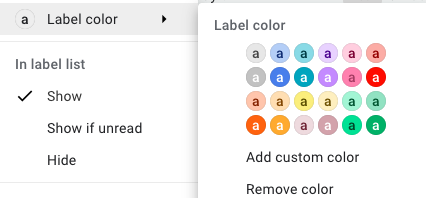
As an example, you could add different colors for separate client folders.
7. Integrate Your Business Gmail with Salesforce
Are you still wondering how to organize Gmail for sales productivity?
Cirrus Insight's Salesforce integration allows you to bi-directionally sync information from your Salesforce customer relationship management (CRM) platform to your Google Workspace.
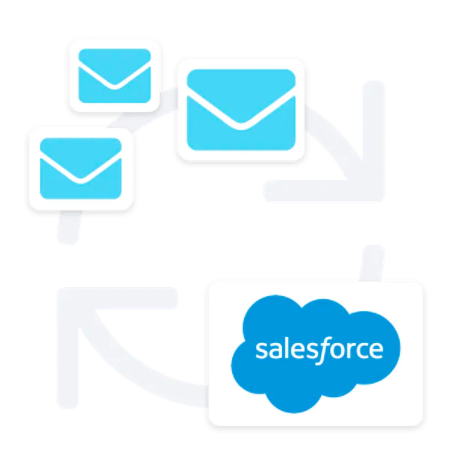
Get easily access your email templates from Salesforce, see Salesforce contact information next to an email in Cirrus Insight's Side panel, and update Salesforce records from your inbox.
Think of this as Gmail organization 2.0.
Final Thoughts: How to Organize Gmail for Improved Sales Productivity
Email is only growing stronger as a form of communication, especially for remote workers. As such, the amount of time spent in inboxes is draining businesses of valuable employee work time. With our organizational tips, you can ensure that everyone acknowledges emails as they arrive.
Gmail is a powerful tool within the Google Workspace. The key is to know how to organize Gmail using labels efficiently to ensure you're meeting your sales goals. There are endless hacks to improve sales productivity, from adding an email to a label and filters to every email. All this leads to you improving your workflow.
Are you looking for a more experienced organization that works with your Salesforce CRM? Start your Free 14-Day Trial with Cirrus Insight.