Admin Overview Guide
Table of Contents
- Using the Admin Dashboard
- My Organization
- License and Checkout
- Manage Users
- Salesforce Sync
- Org Settings Management
- Sidebar
- Scheduling
- Smart Scheduler
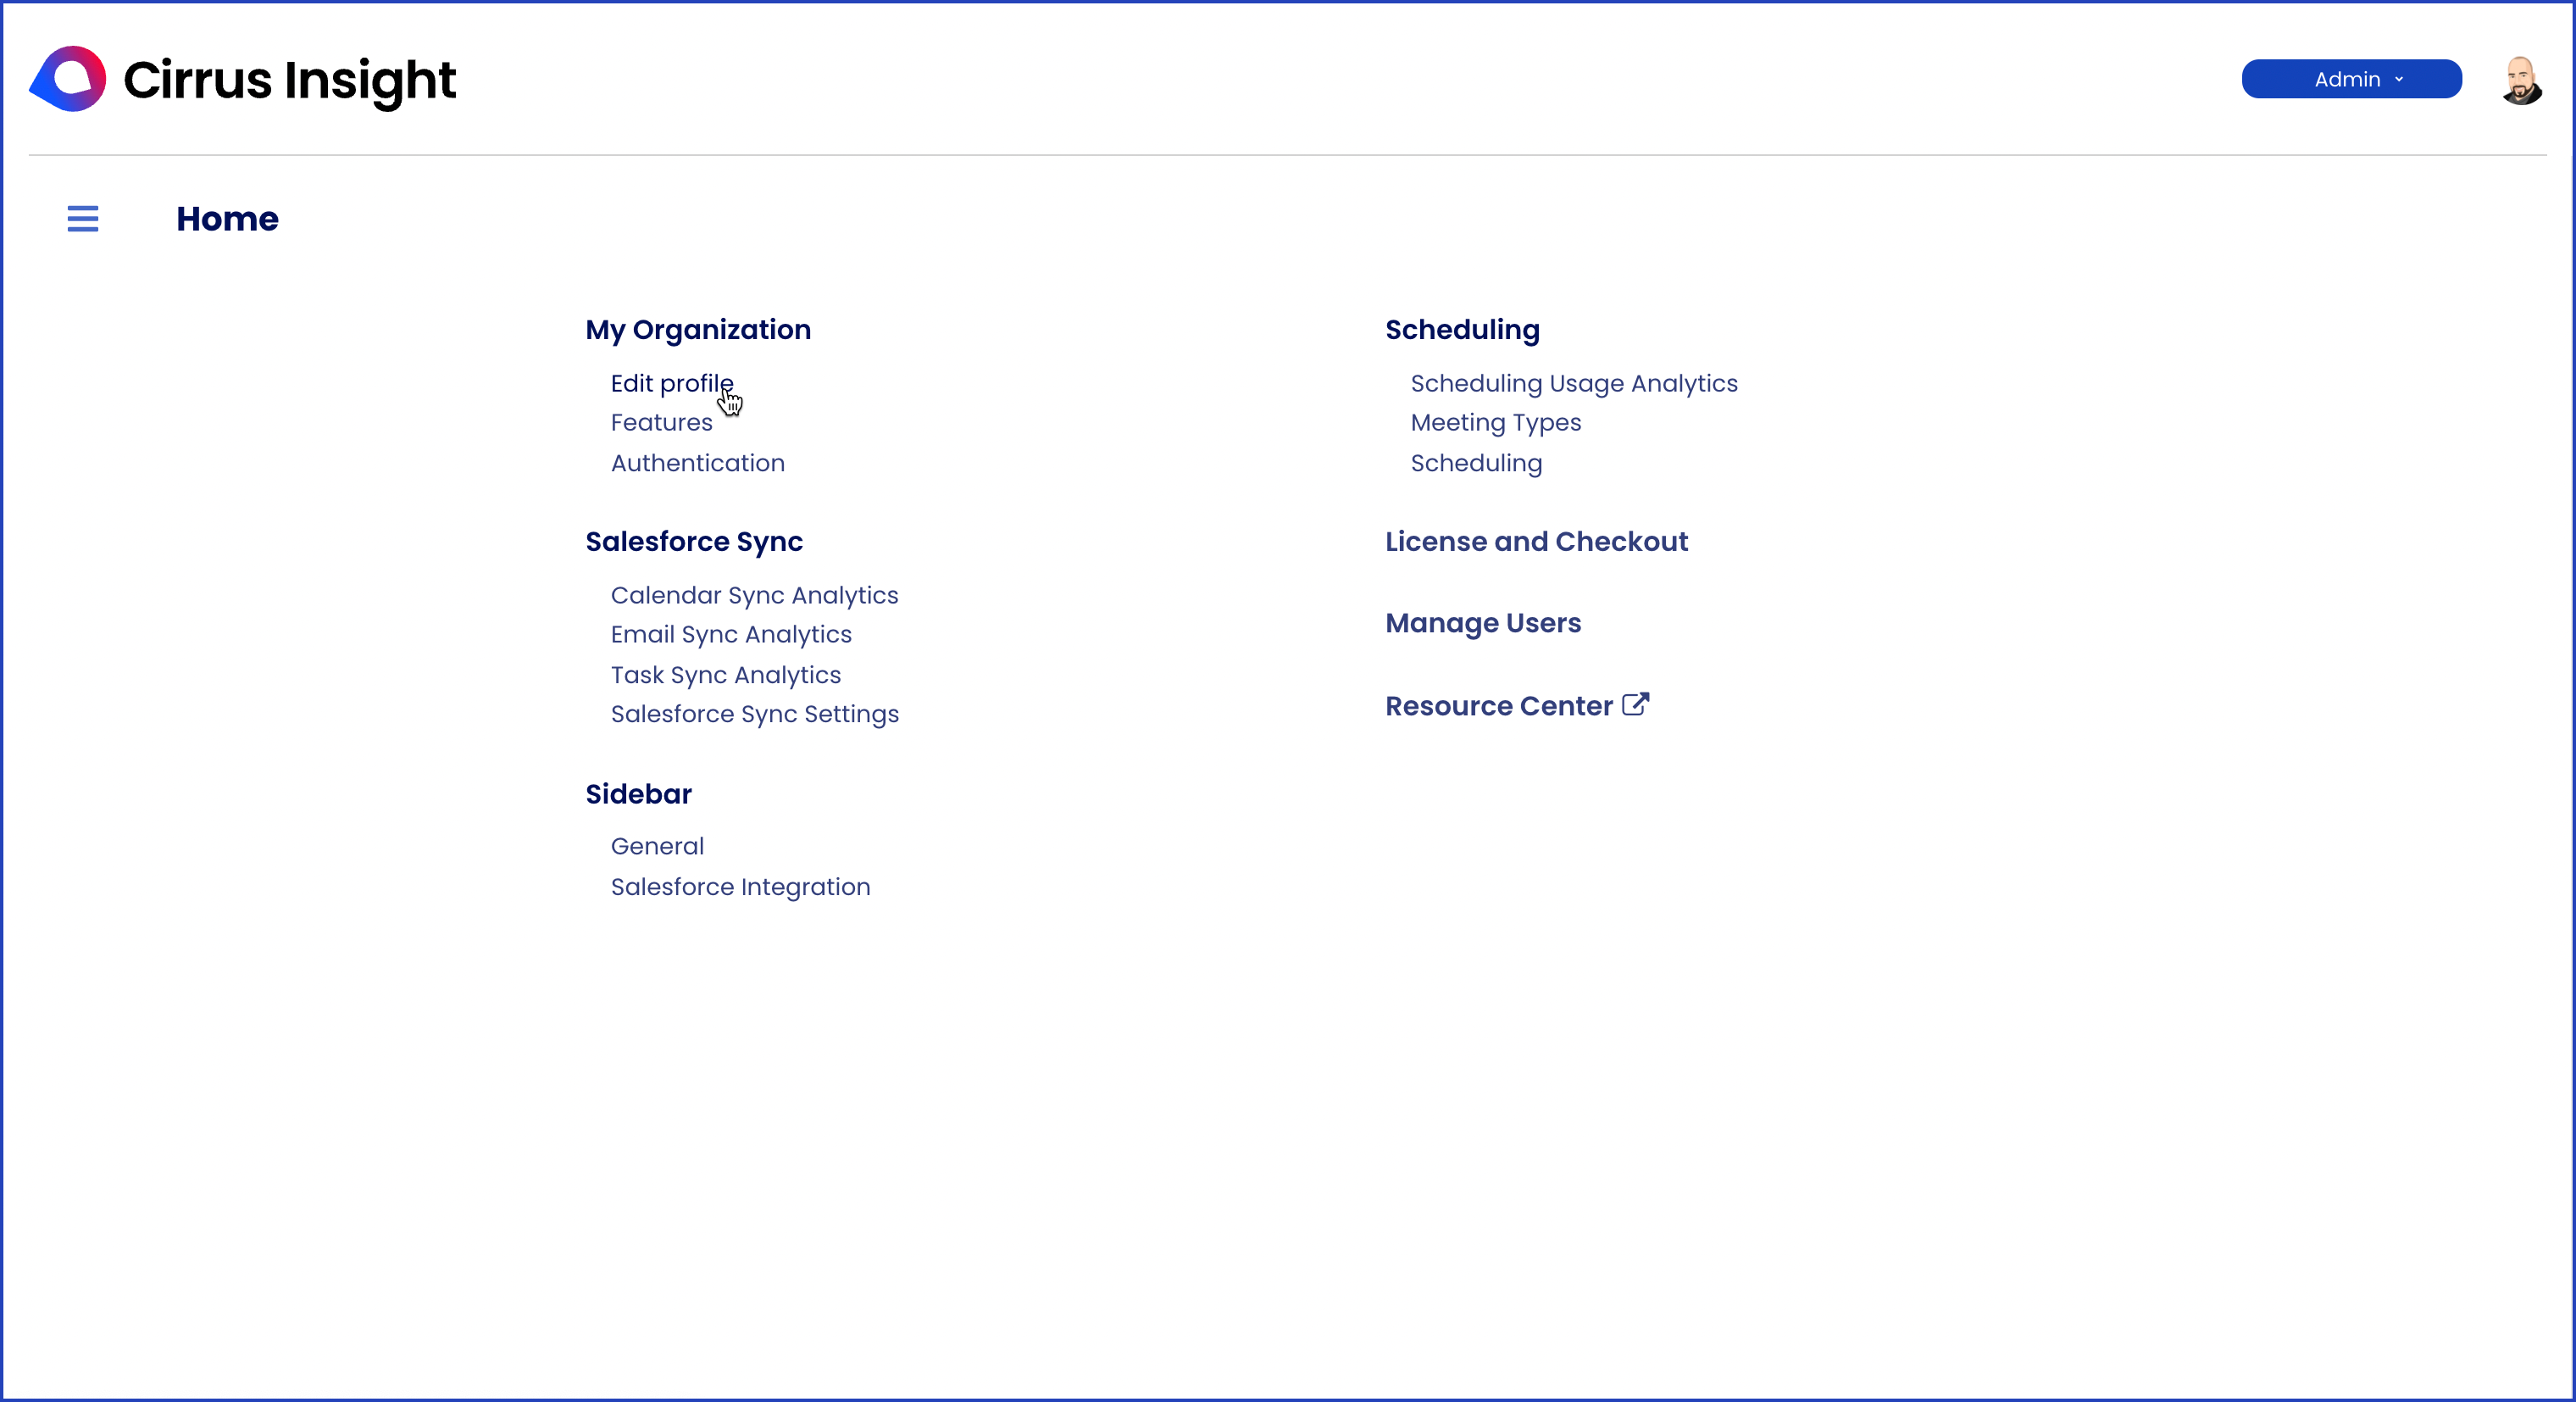
Using the Admin Dashboard
Cirrus Insight's Admin Dashboard is your portal to manage users, configure settings for your organization, update account information, review subscription details, and more.
This guide will help you navigate the Admin Dashboard to set up your organization for success.
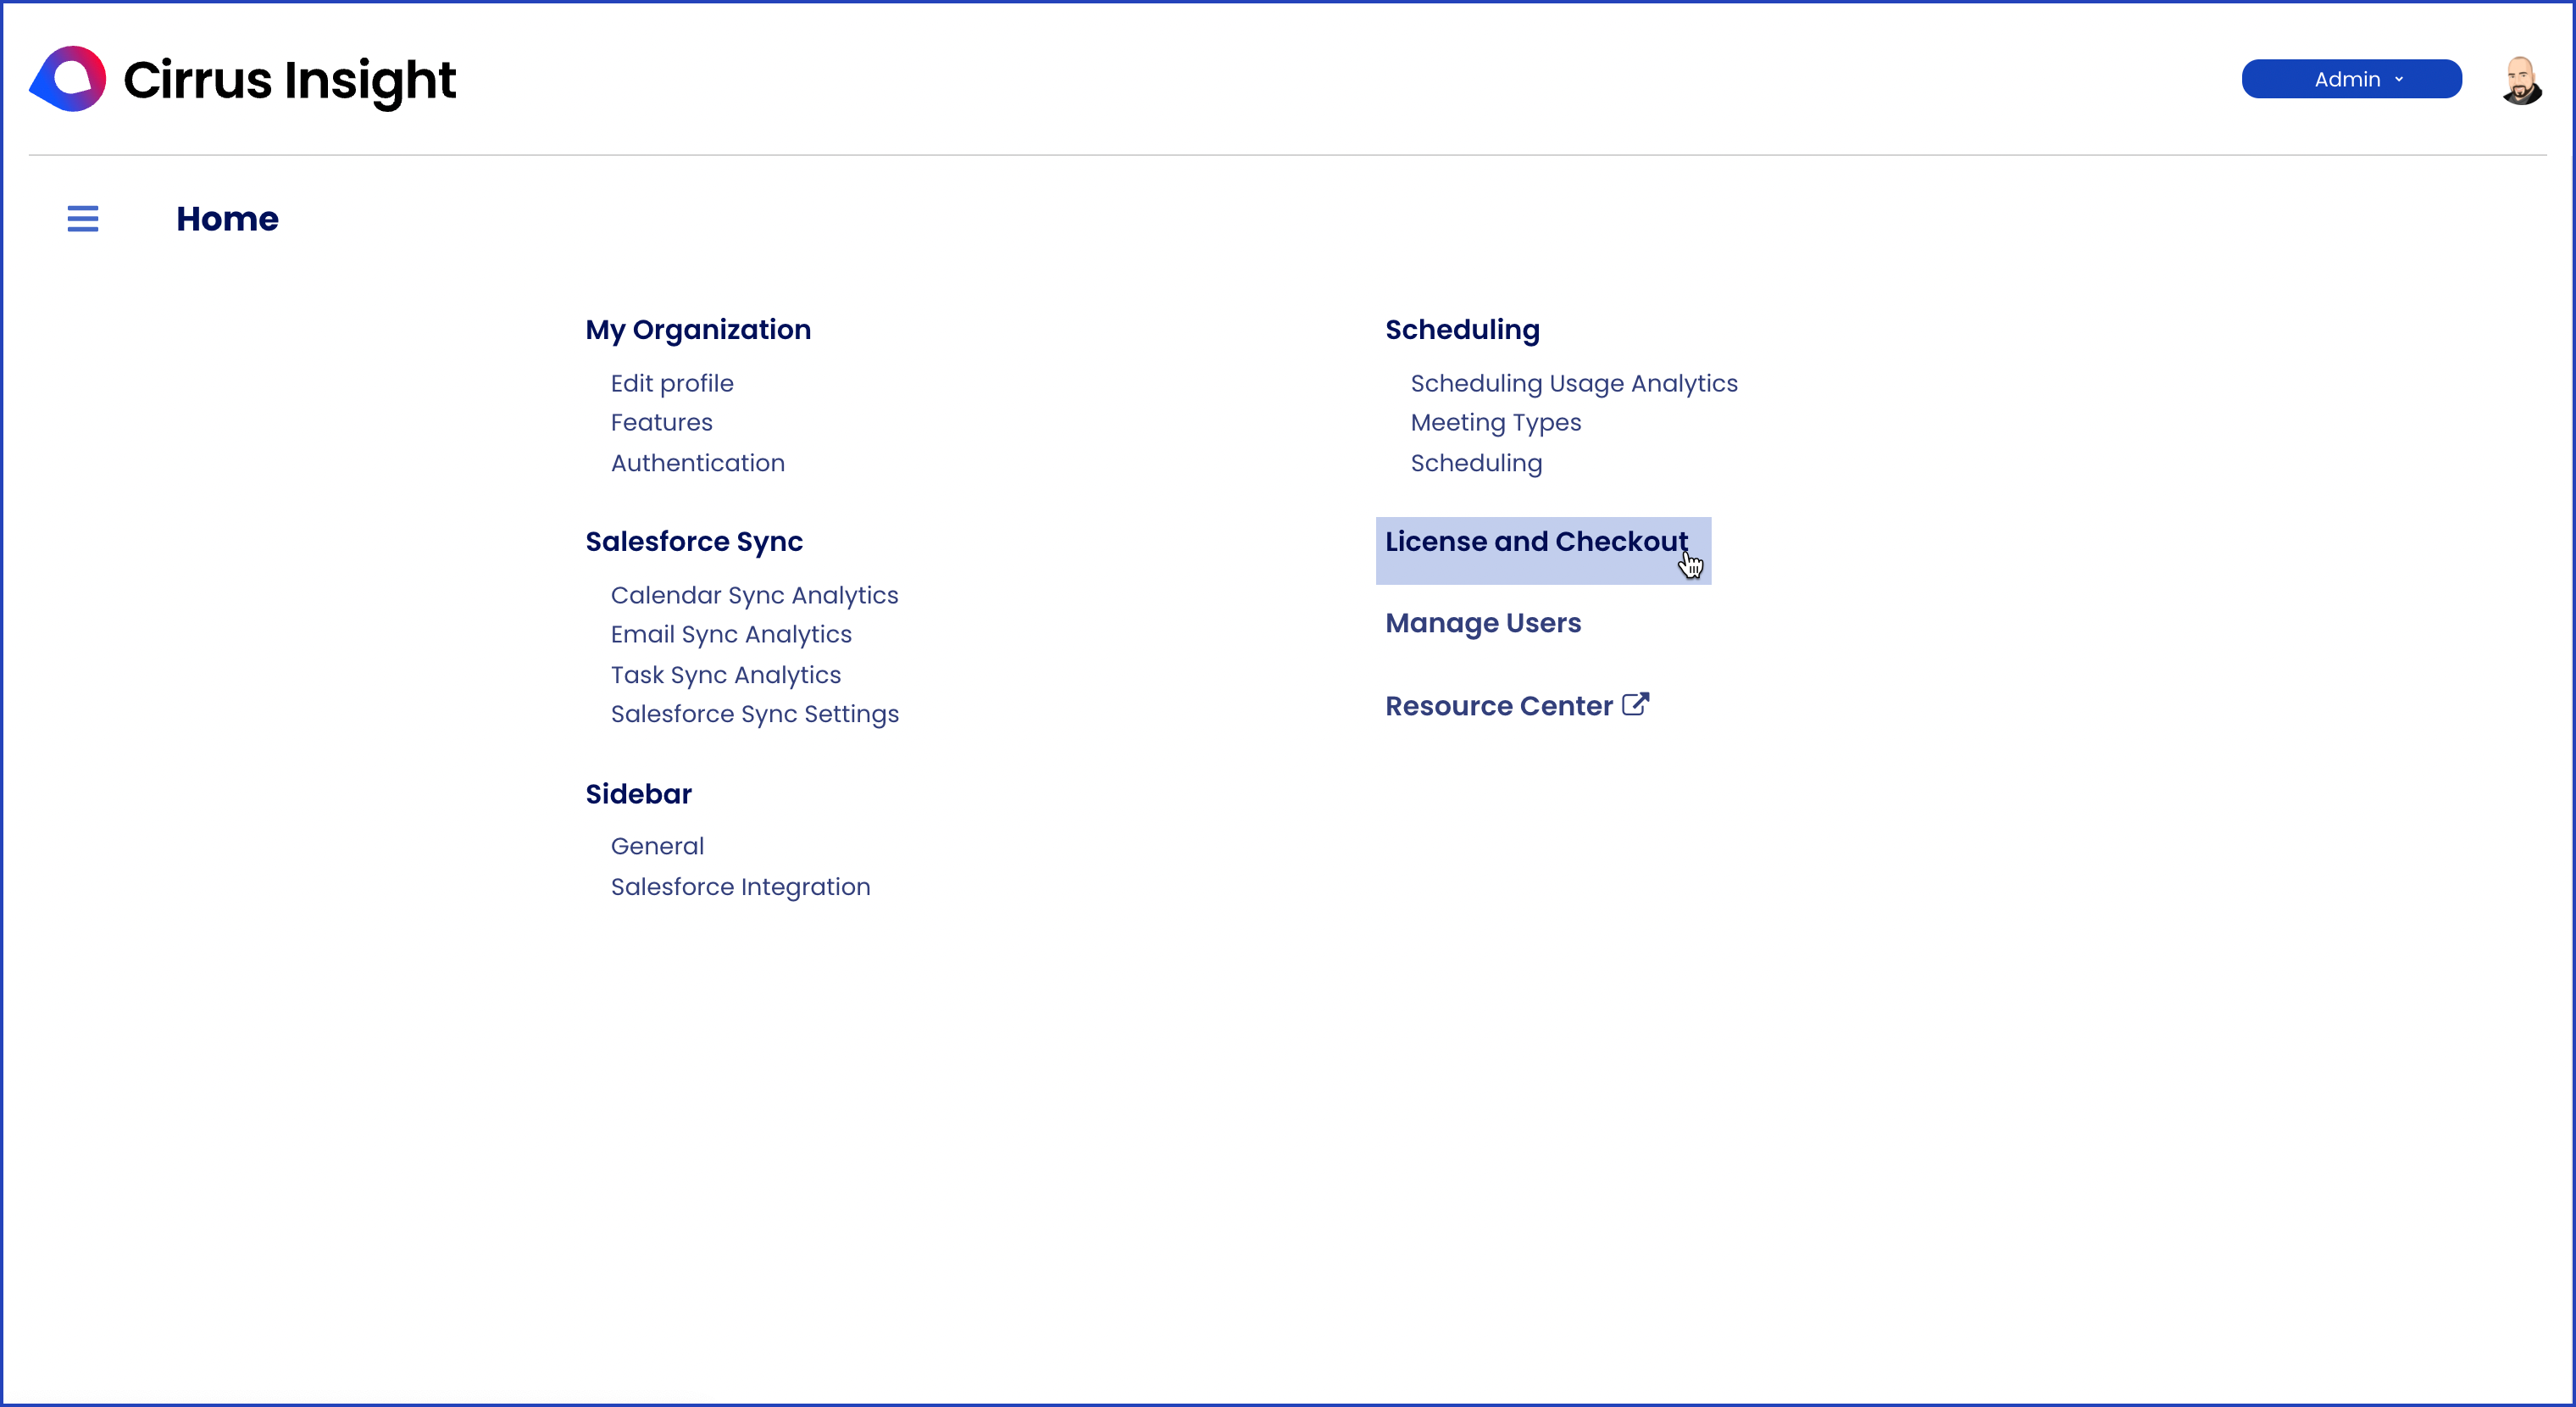
My Organization
Edit Organization Profile
- Edit your company information.
- Set Company Name and Web Address.
- Set password reset requirements.
- Review or email the Primary Admin.
- View subscription plan and renewal date.
- View current user count.
- Upload company logo (click camera icon).
- Click Update to save changes.

- Specify email domains for your organization.
- Click the Domains icon
 in the top right to specify all the email address domains with which your users will be accessing Cirrus Insight.
 - This setup ensures new users are correctly added to your existing org.
- Click the Domains icon
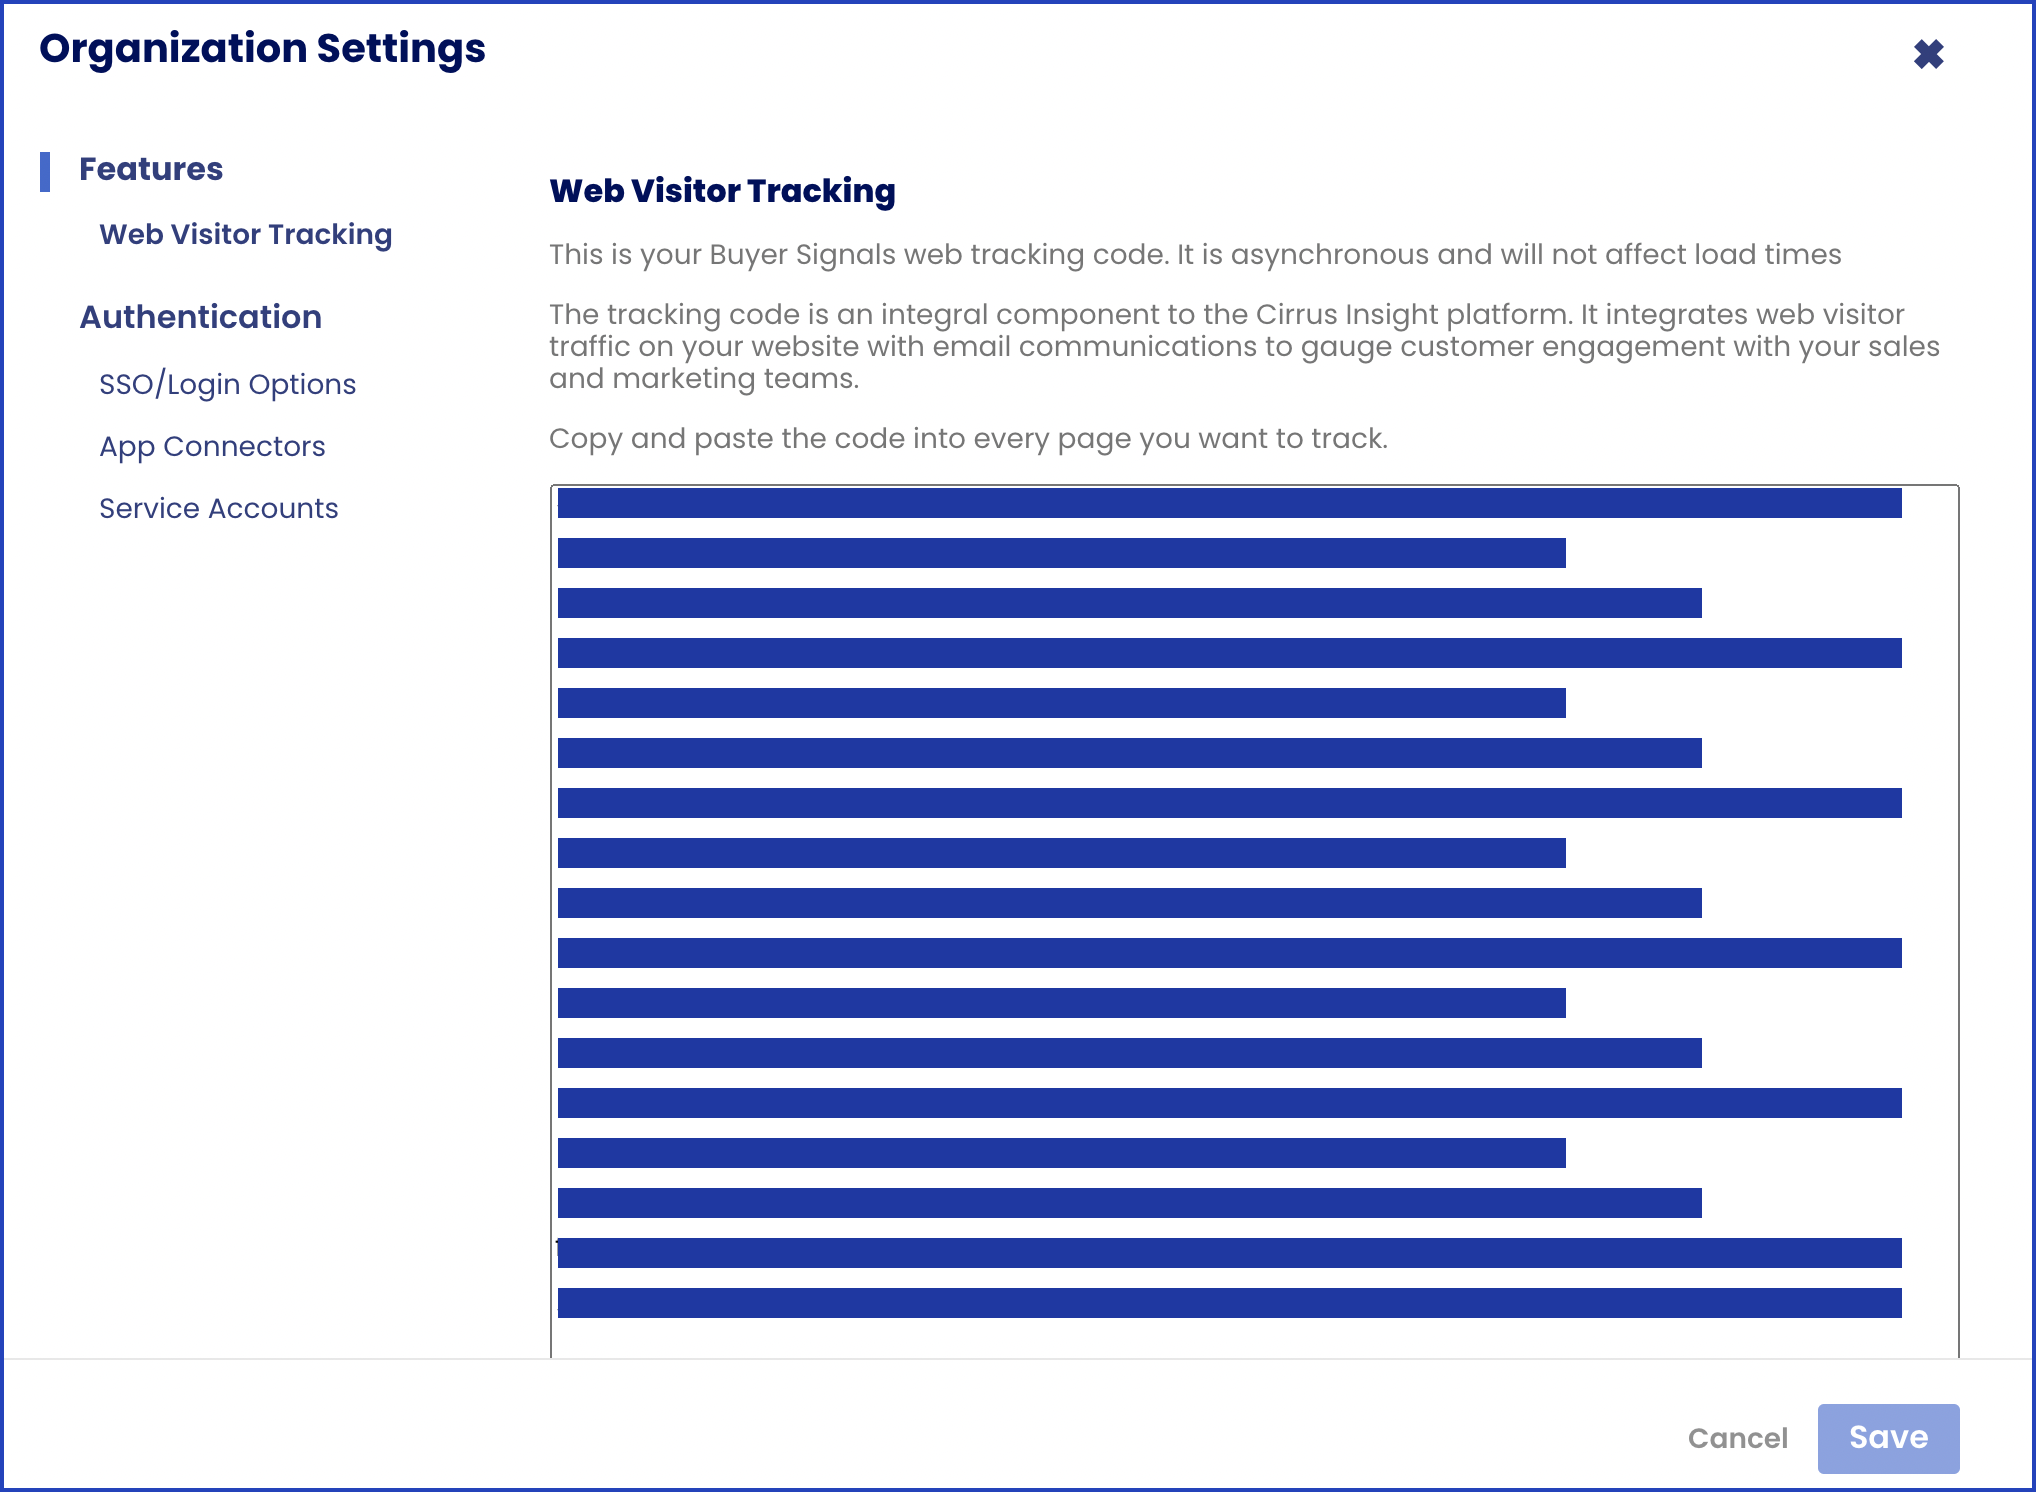
Features
Gauge customer engagement by using the Web Visitor Tracking code to integrate your website's visitor traffic with email communications.
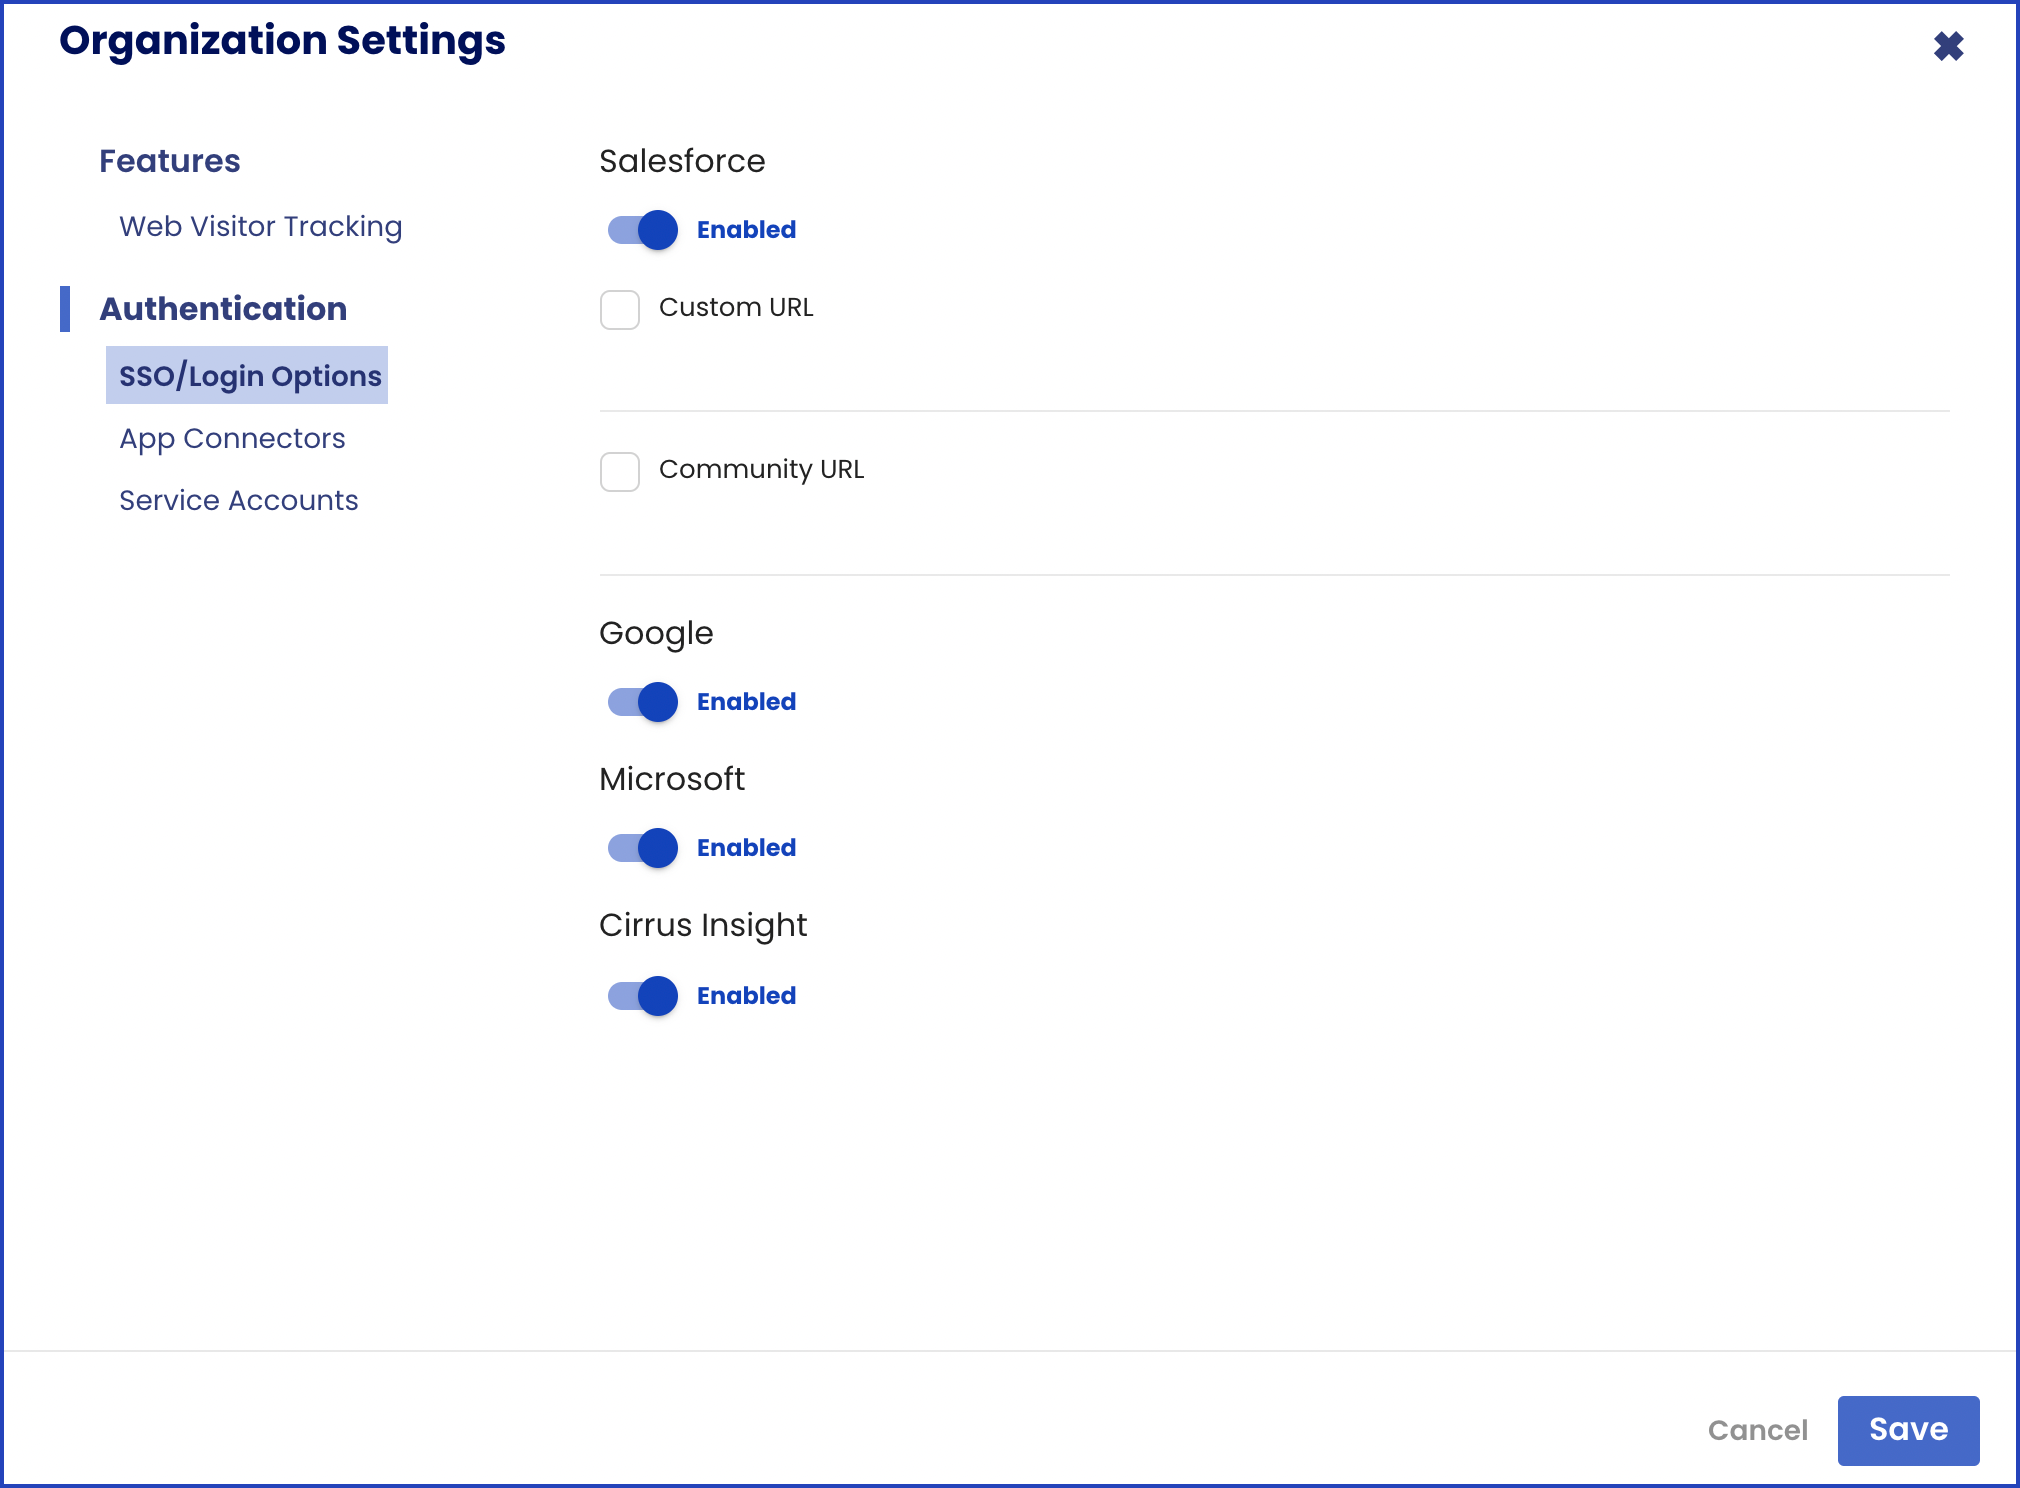
Authentication
SSO/Login Options
- Specify if users can log in to Cirrus Insight with these types of accounts:
- Salesforce is the most common way to log in.
- Custom URL: Additional Salesforce log-in option
- Community URL: Additional Salesforce log-in option
- Google, Microsoft, and Cirrus Insight (dedicated credentials) are other ways to log in.
- Salesforce is the most common way to log in.
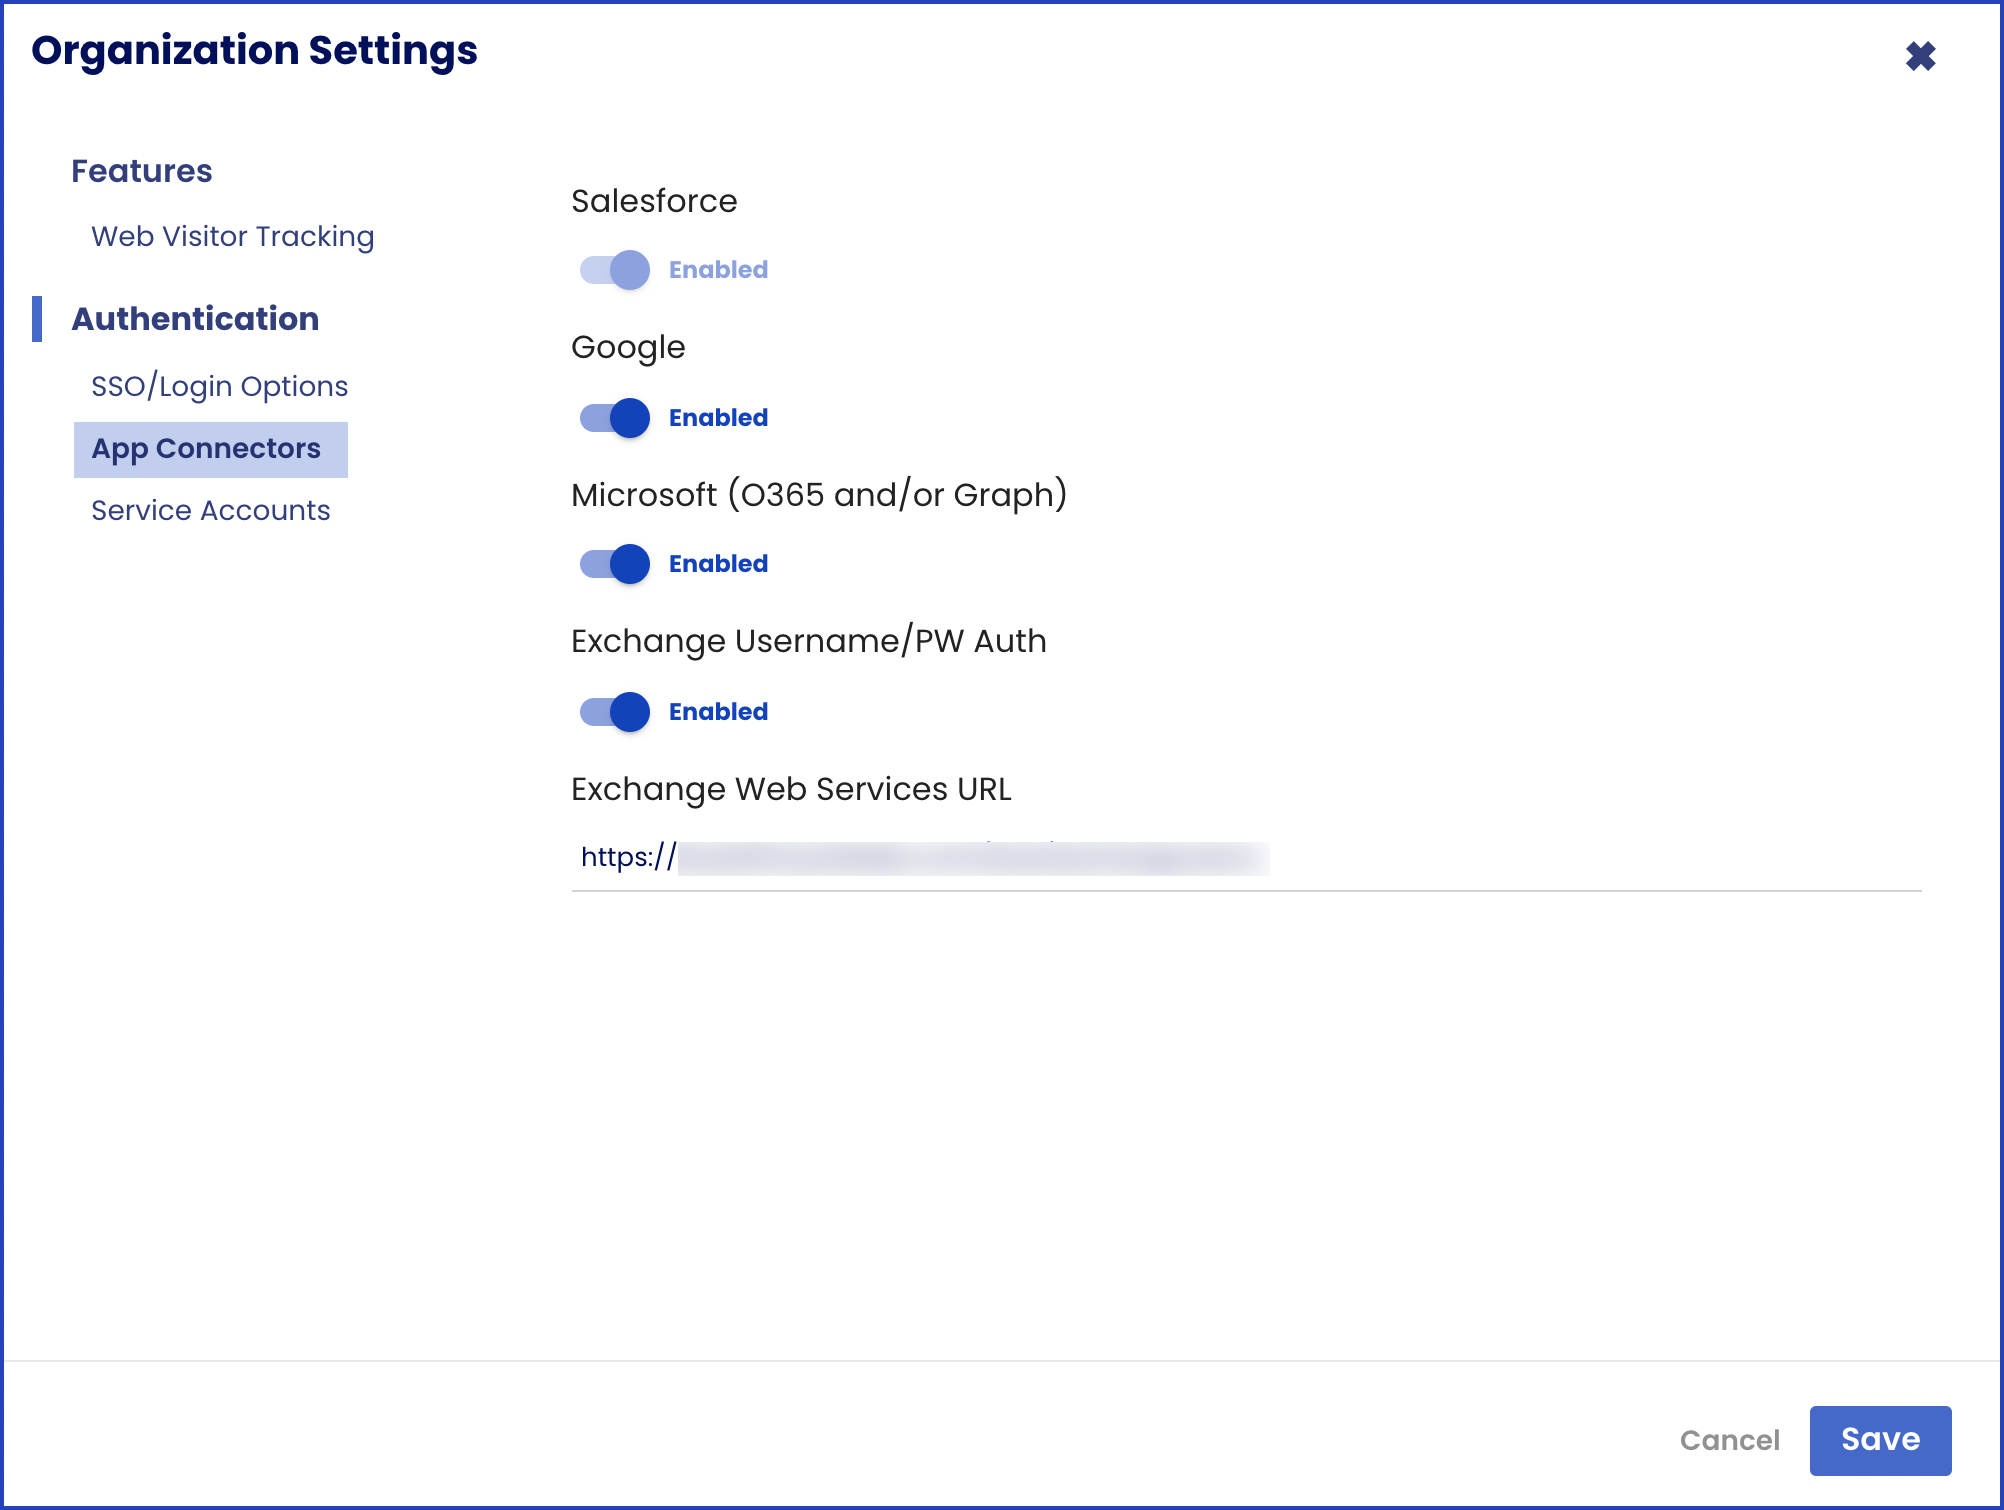
App Connectors
- Decide if authentication should be disabled for any of the available connectors (Salesforce, Google, Microsoft O365/Graph, Microsoft Exchange).
Service Accounts
- A service account acts on behalf of your users. This helps Admins add new users and manage or monitor users’ syncs.
- Salesforce
- Email (Google, Exchange, or Office 365)
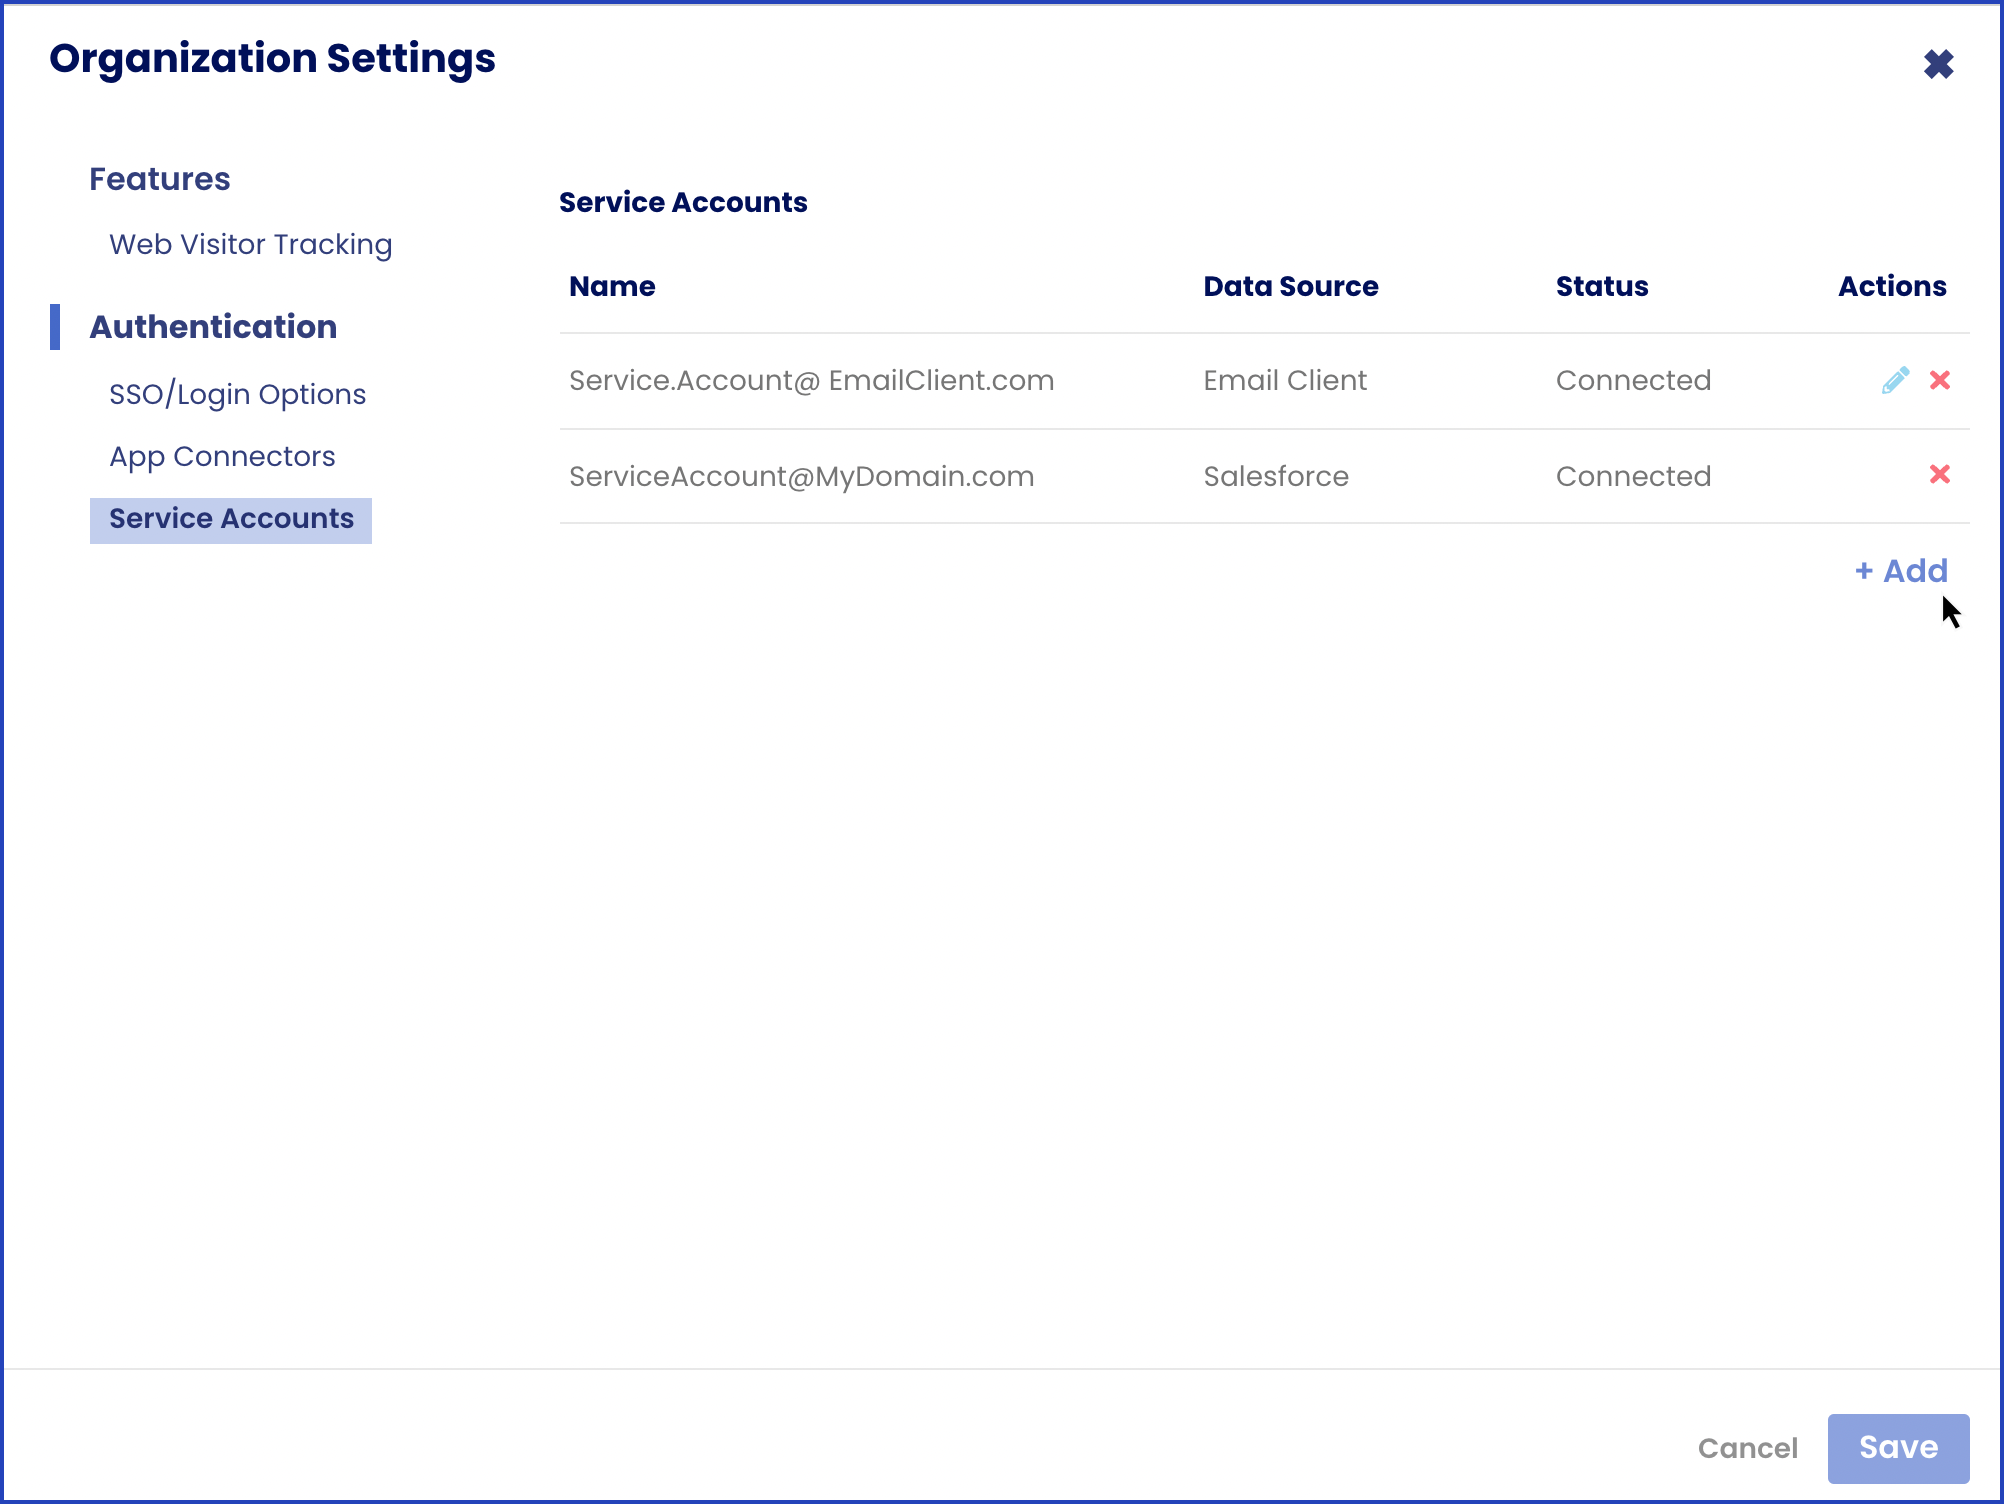
Learn more:
- Admins | How do I set up a Salesforce Service Account?
- Admins | How do I set up a Google Workspace Service Account?
- Admins: How do I set up an Exchange Service Account?
License and Checkout
- Review and update information regarding your license and billing.
- Plans tab: Display current plan and features included.
- Billing tab: Purchase additional licenses and update payment information.
- History tab: See your transaction history over your account tenure.
Learn more: Admins | How do I use License & Checkout?
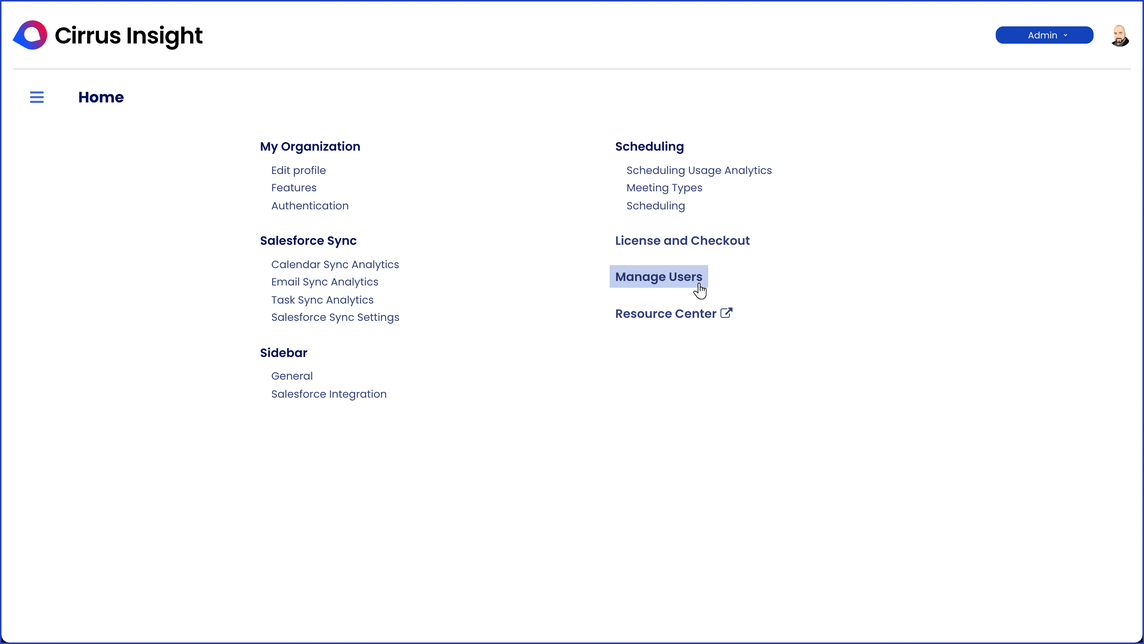
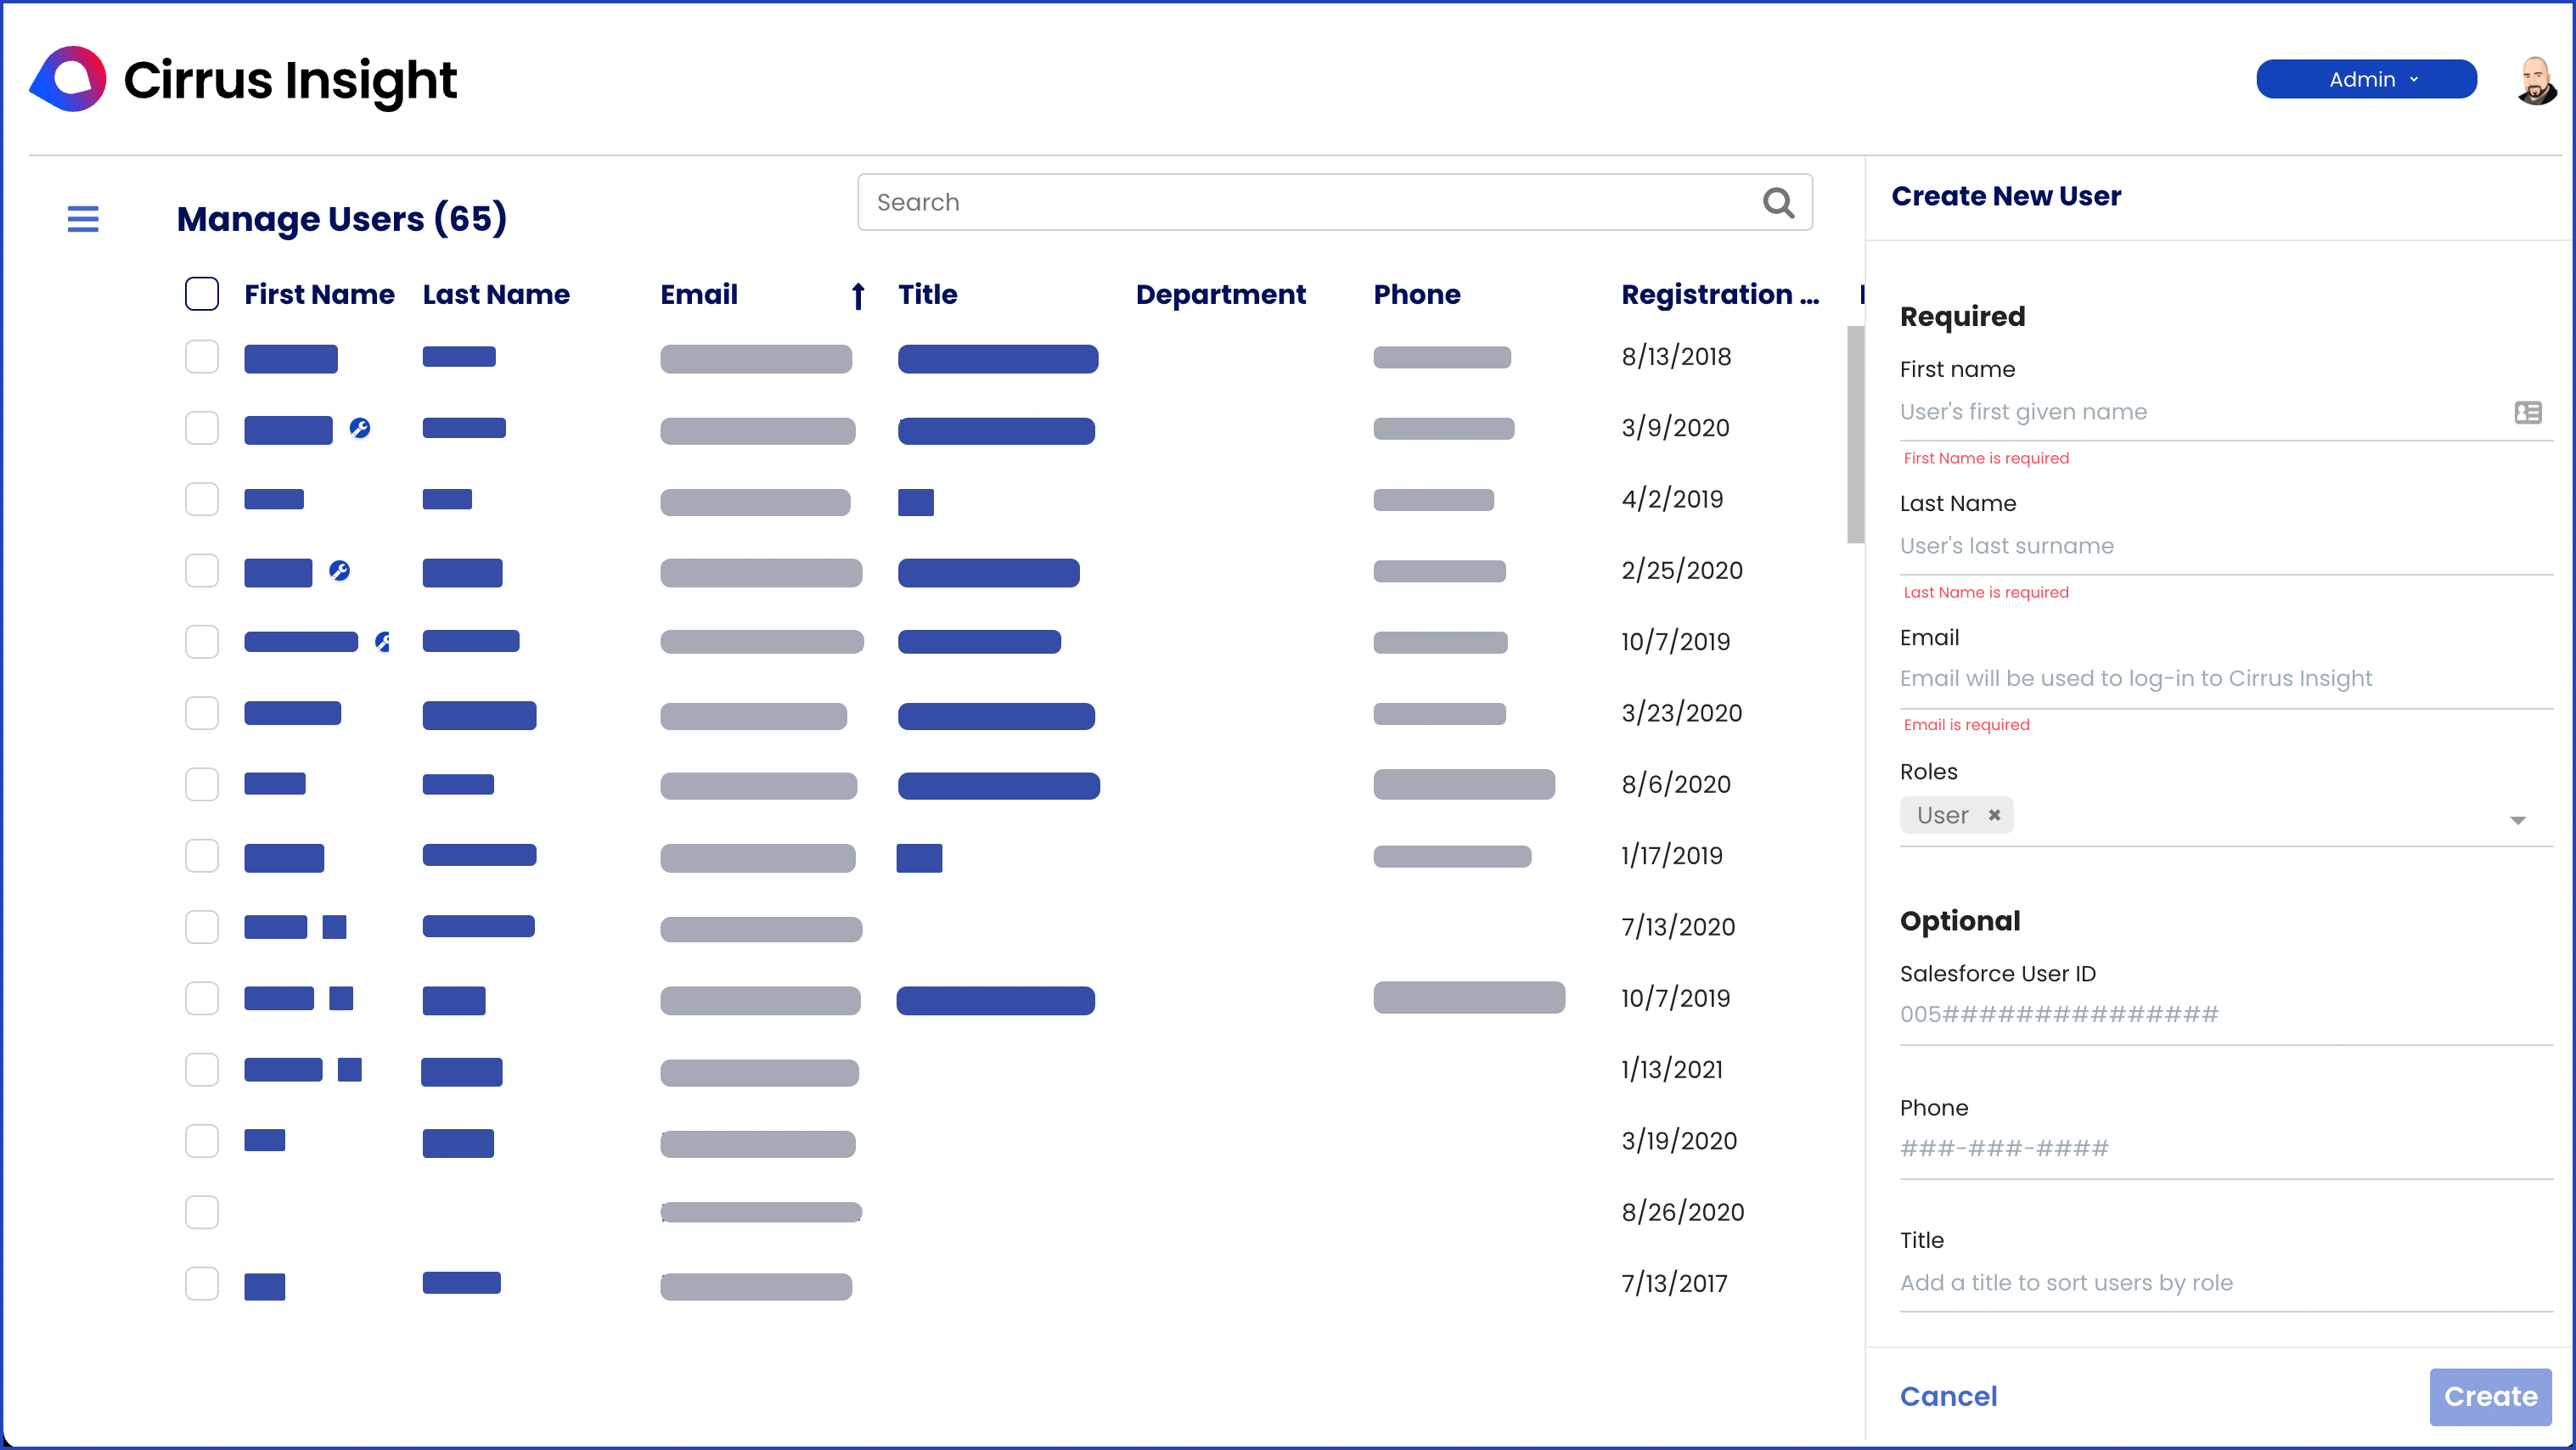
Manage Users
When you’re ready to onboard, create new users.
Learn more: Admins | How do I create new users?
-
Use Single User to manually add one user at a time.

-
Use Salesforce Import to bulk import multiple users simultaneously.


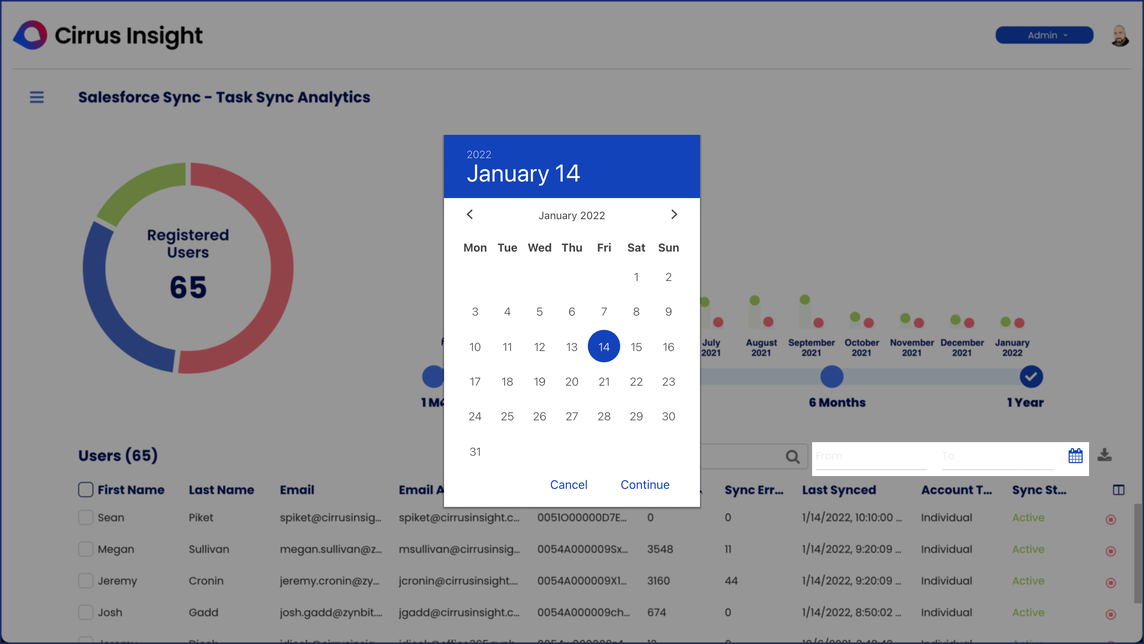
Salesforce Sync
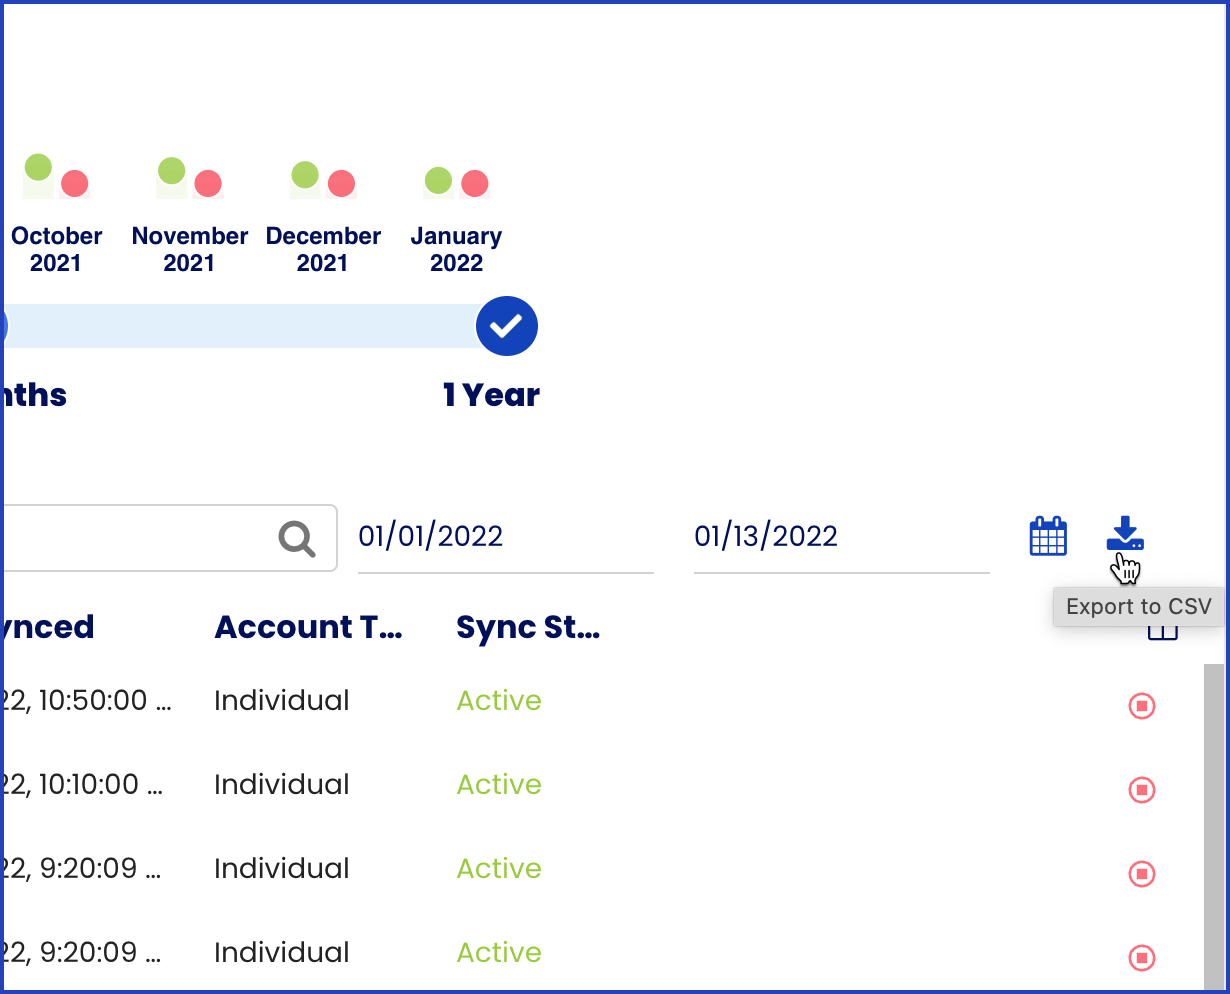
Sync Analytics
-
After connecting your service accounts (see above), you can view org or user statistics and track how many events/emails/tasks have synced over time.
-
View all items that have synced and if any encountered errors.
-
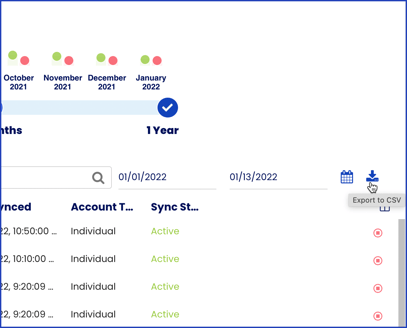
View all information regarding your users and their sync activity.
-
Search for specific dates using the calendar icon and even export a CSV file with all the data for your records.
Stopping or starting individual or mass user syncs:
- Check a user or group of users to Start or Stop a sync process.
-
Once selected, the Bulk Actions box will prompt you to pick an action.

- Choose Stop Selected to disable a User’s sync process.
- Choose Start Selected to enable a User’s sync process.
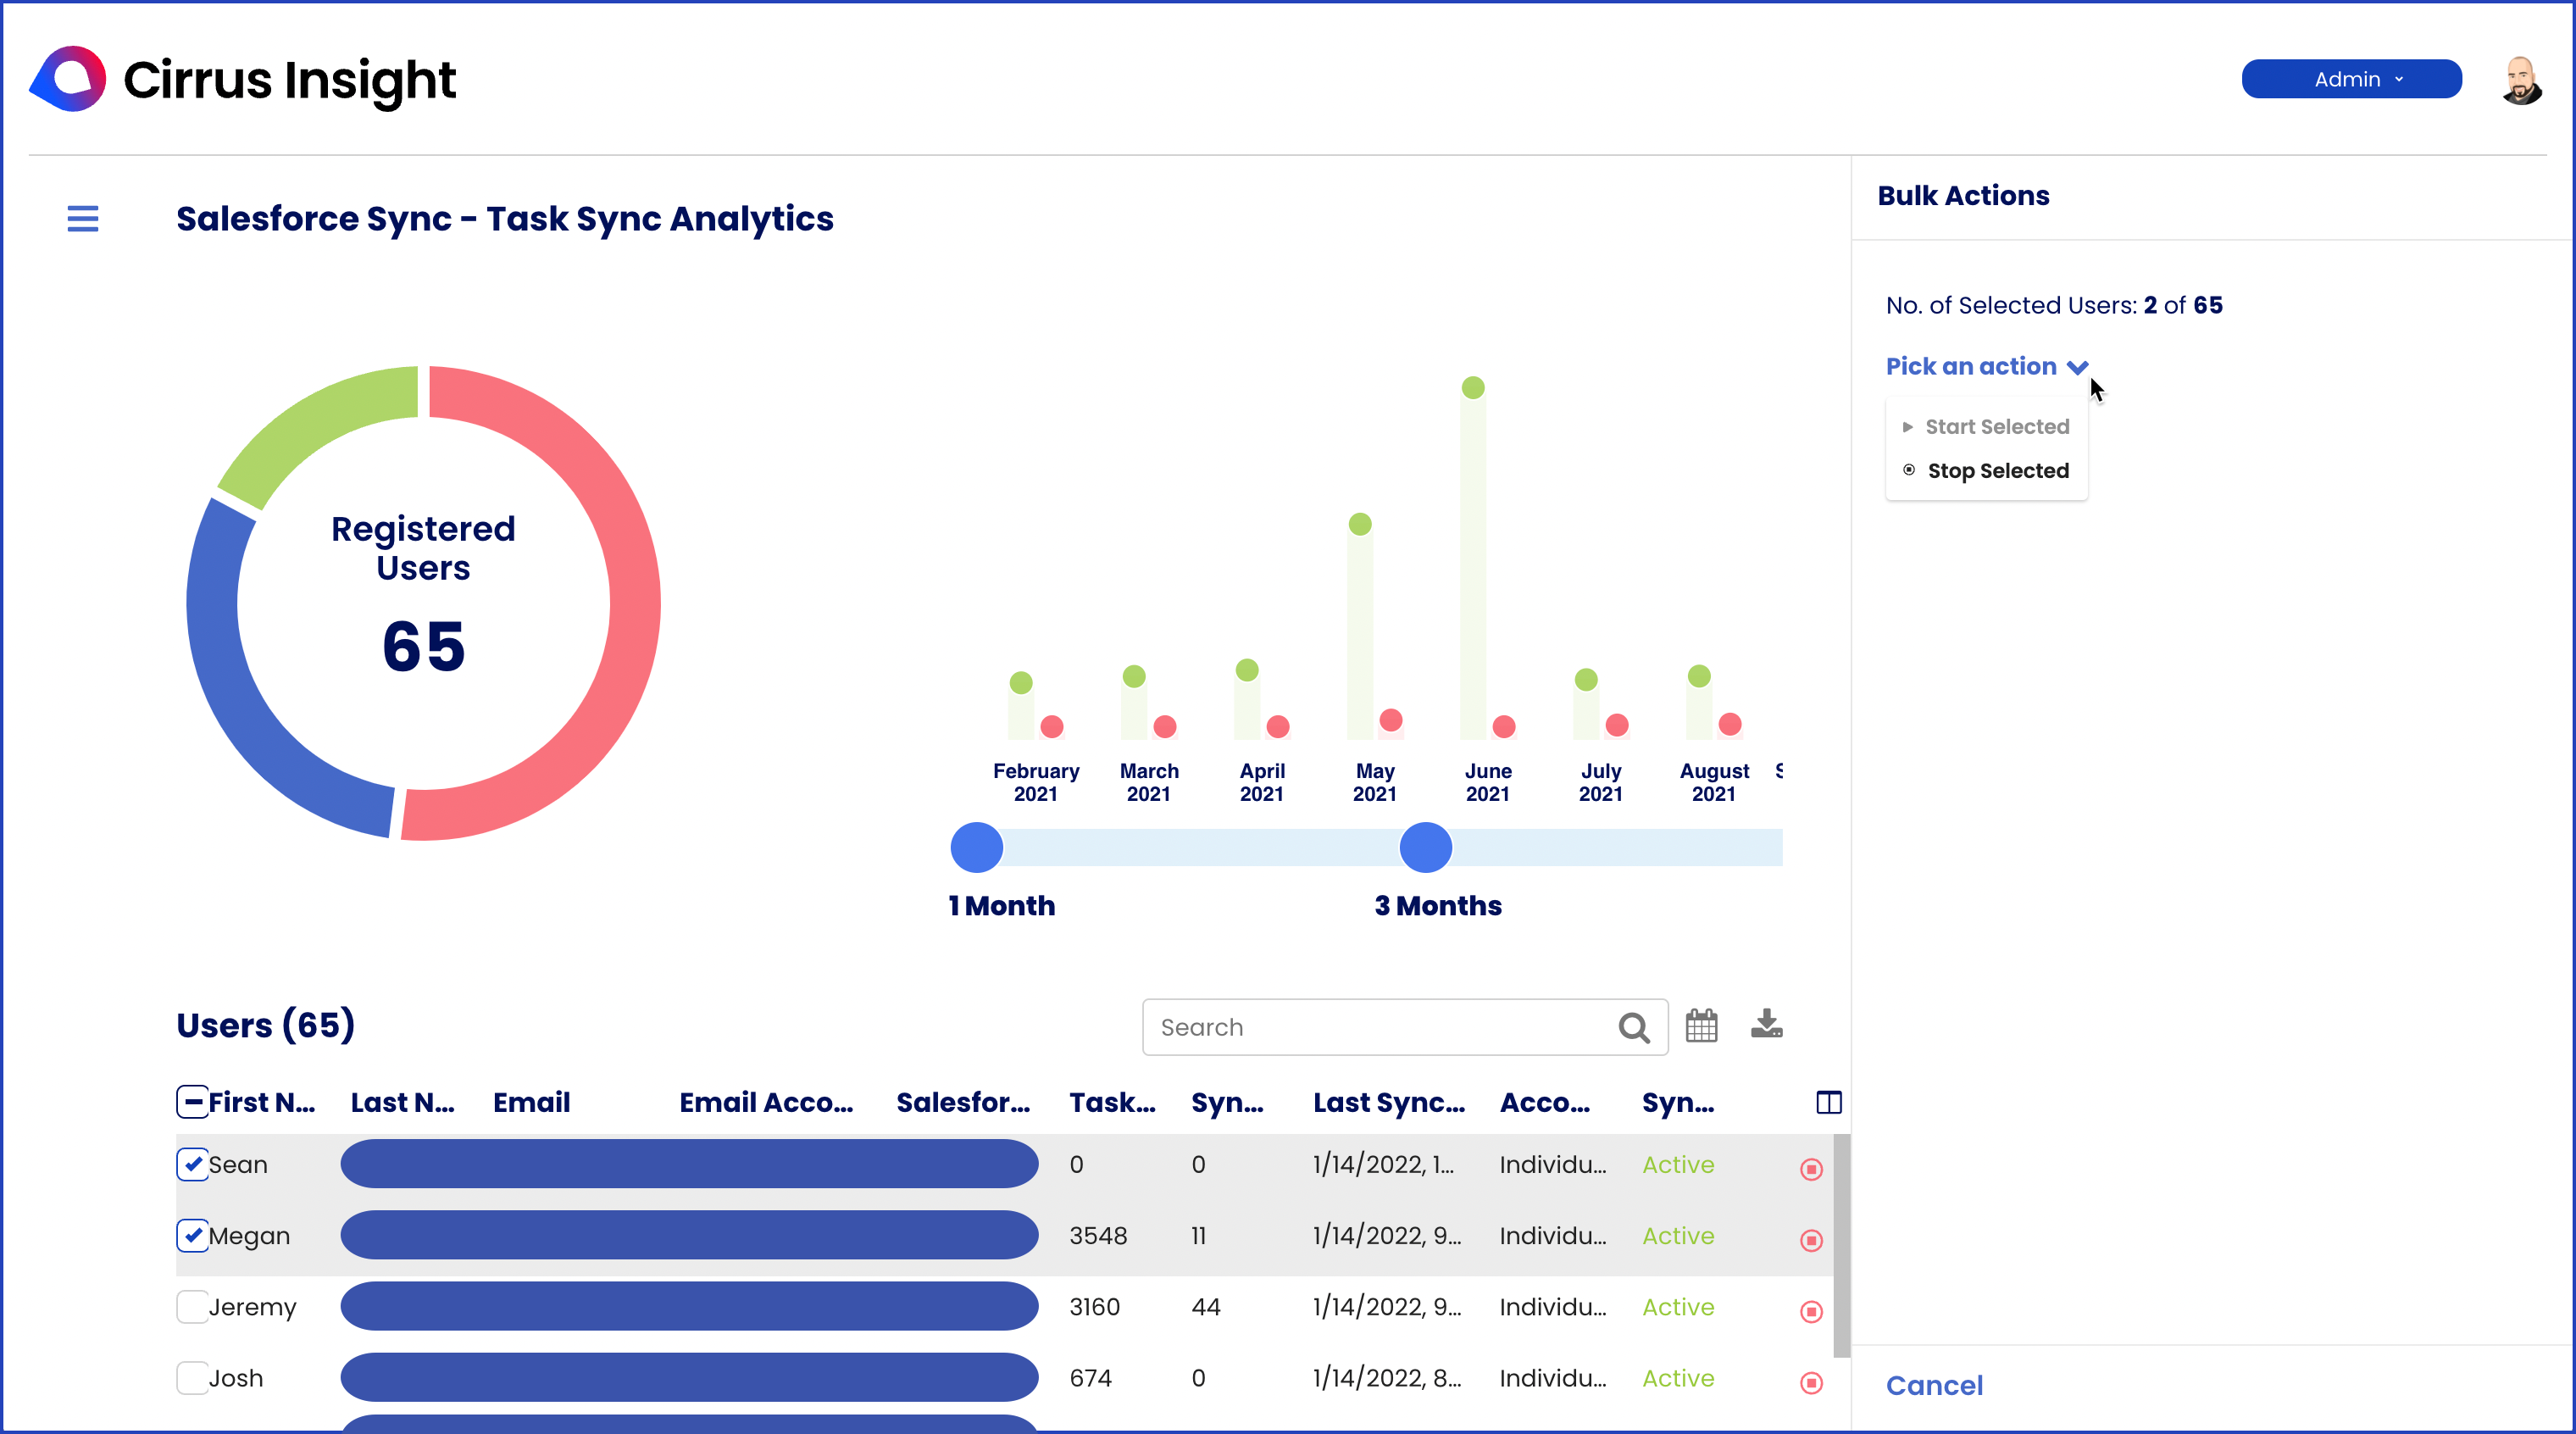
Export Data:
-
Like the Manage Users settings, all Calendar, Email, and Tracking Analytics can be exported for record keeping and reporting statistics.

Org Settings Management
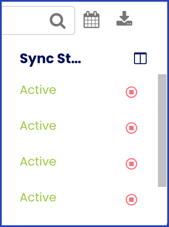
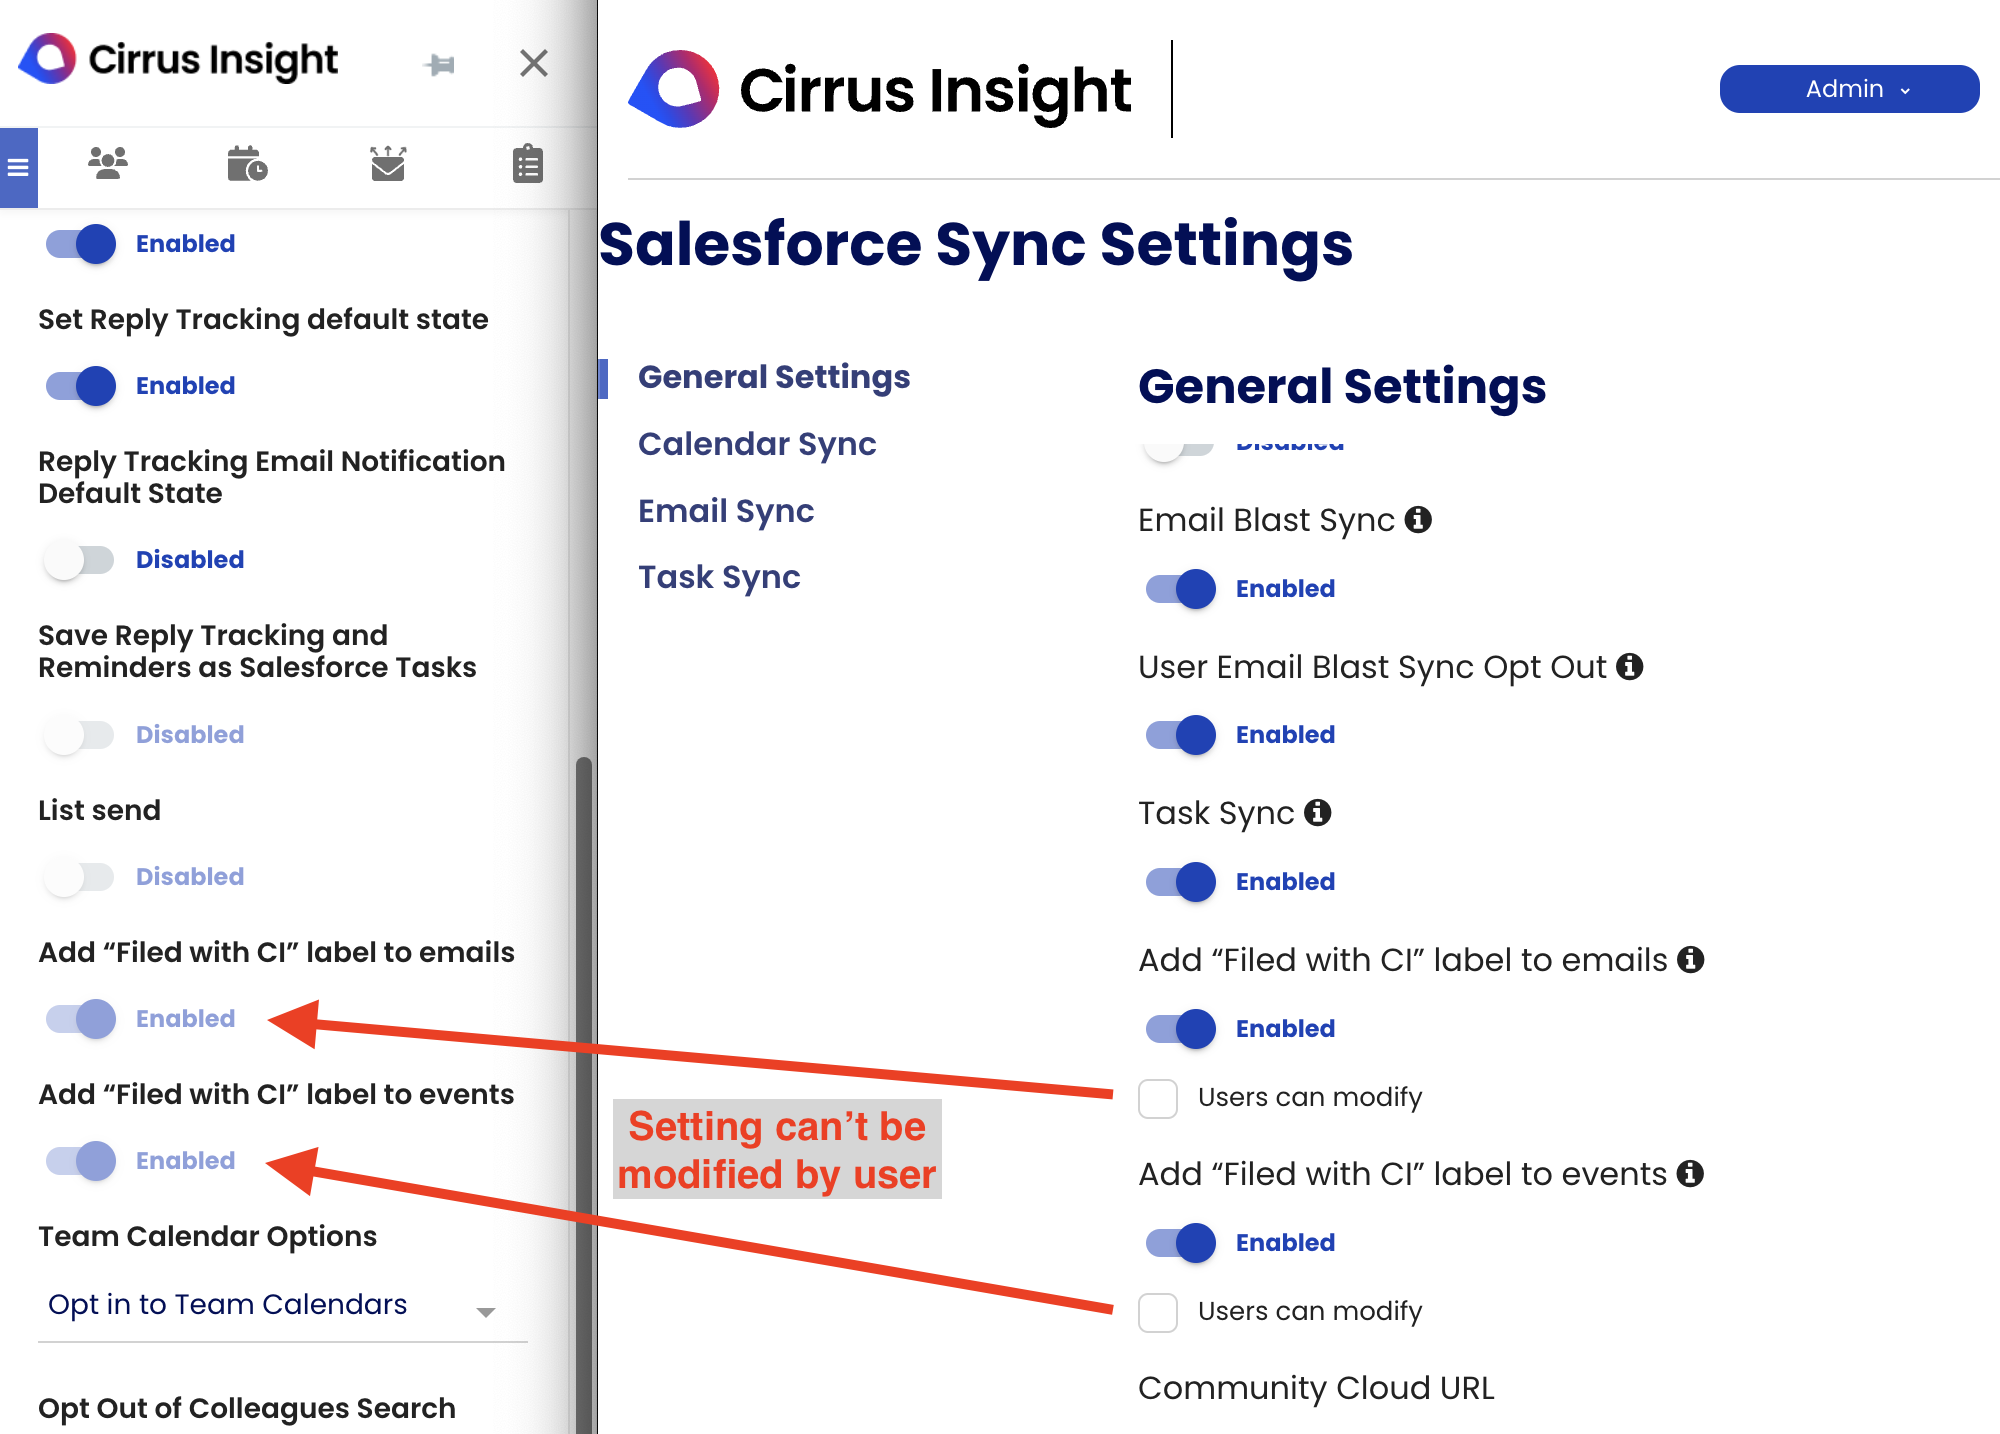
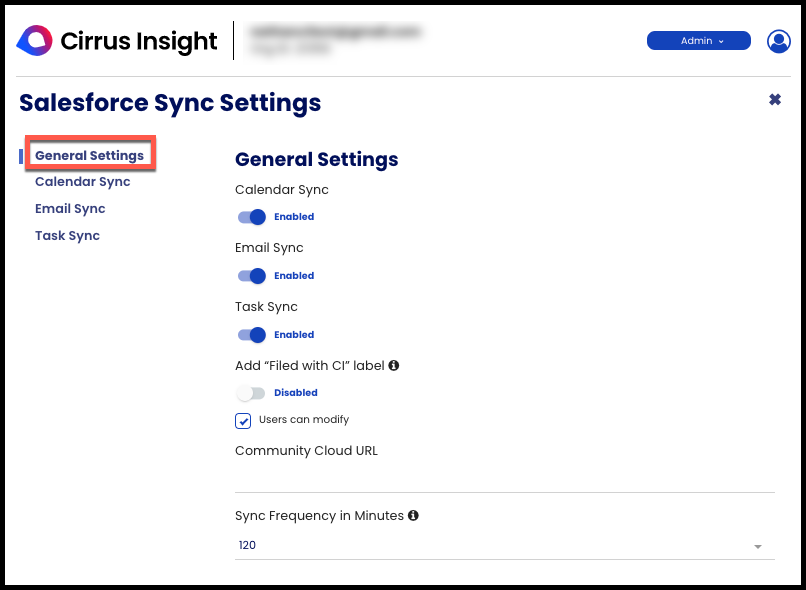
When managing your organization's settings, it's important to note that many of these settings include a "Users can modify" checkbox underneath. When this box is checked, it becomes available to the user as a setting they can choose how to configure.
Important Note: When "Users can modify" is unchecked, any changes made by the admin will propagate to the user's account.
Below is an example of what users see when Users can modify is unchecked vs checked:
| User can modify is unchecked, user cannot edit | User can modify is checked, user can edit |
|
 |
Salesforce Sync Settings
General Settings
- Choose which Syncs that users should be able to use by disabling or enabling the feature.
- Identify filed emails/events with a “Filed with CI” label in the email platform after using Sync or File Email.
- Set how often the sync processes runs. Running sync more often will generate more API requests to Salesforce. (Note: this setting controls the frequency for Calendar, Email, and Task Sync.)
Calendar Sync Settings
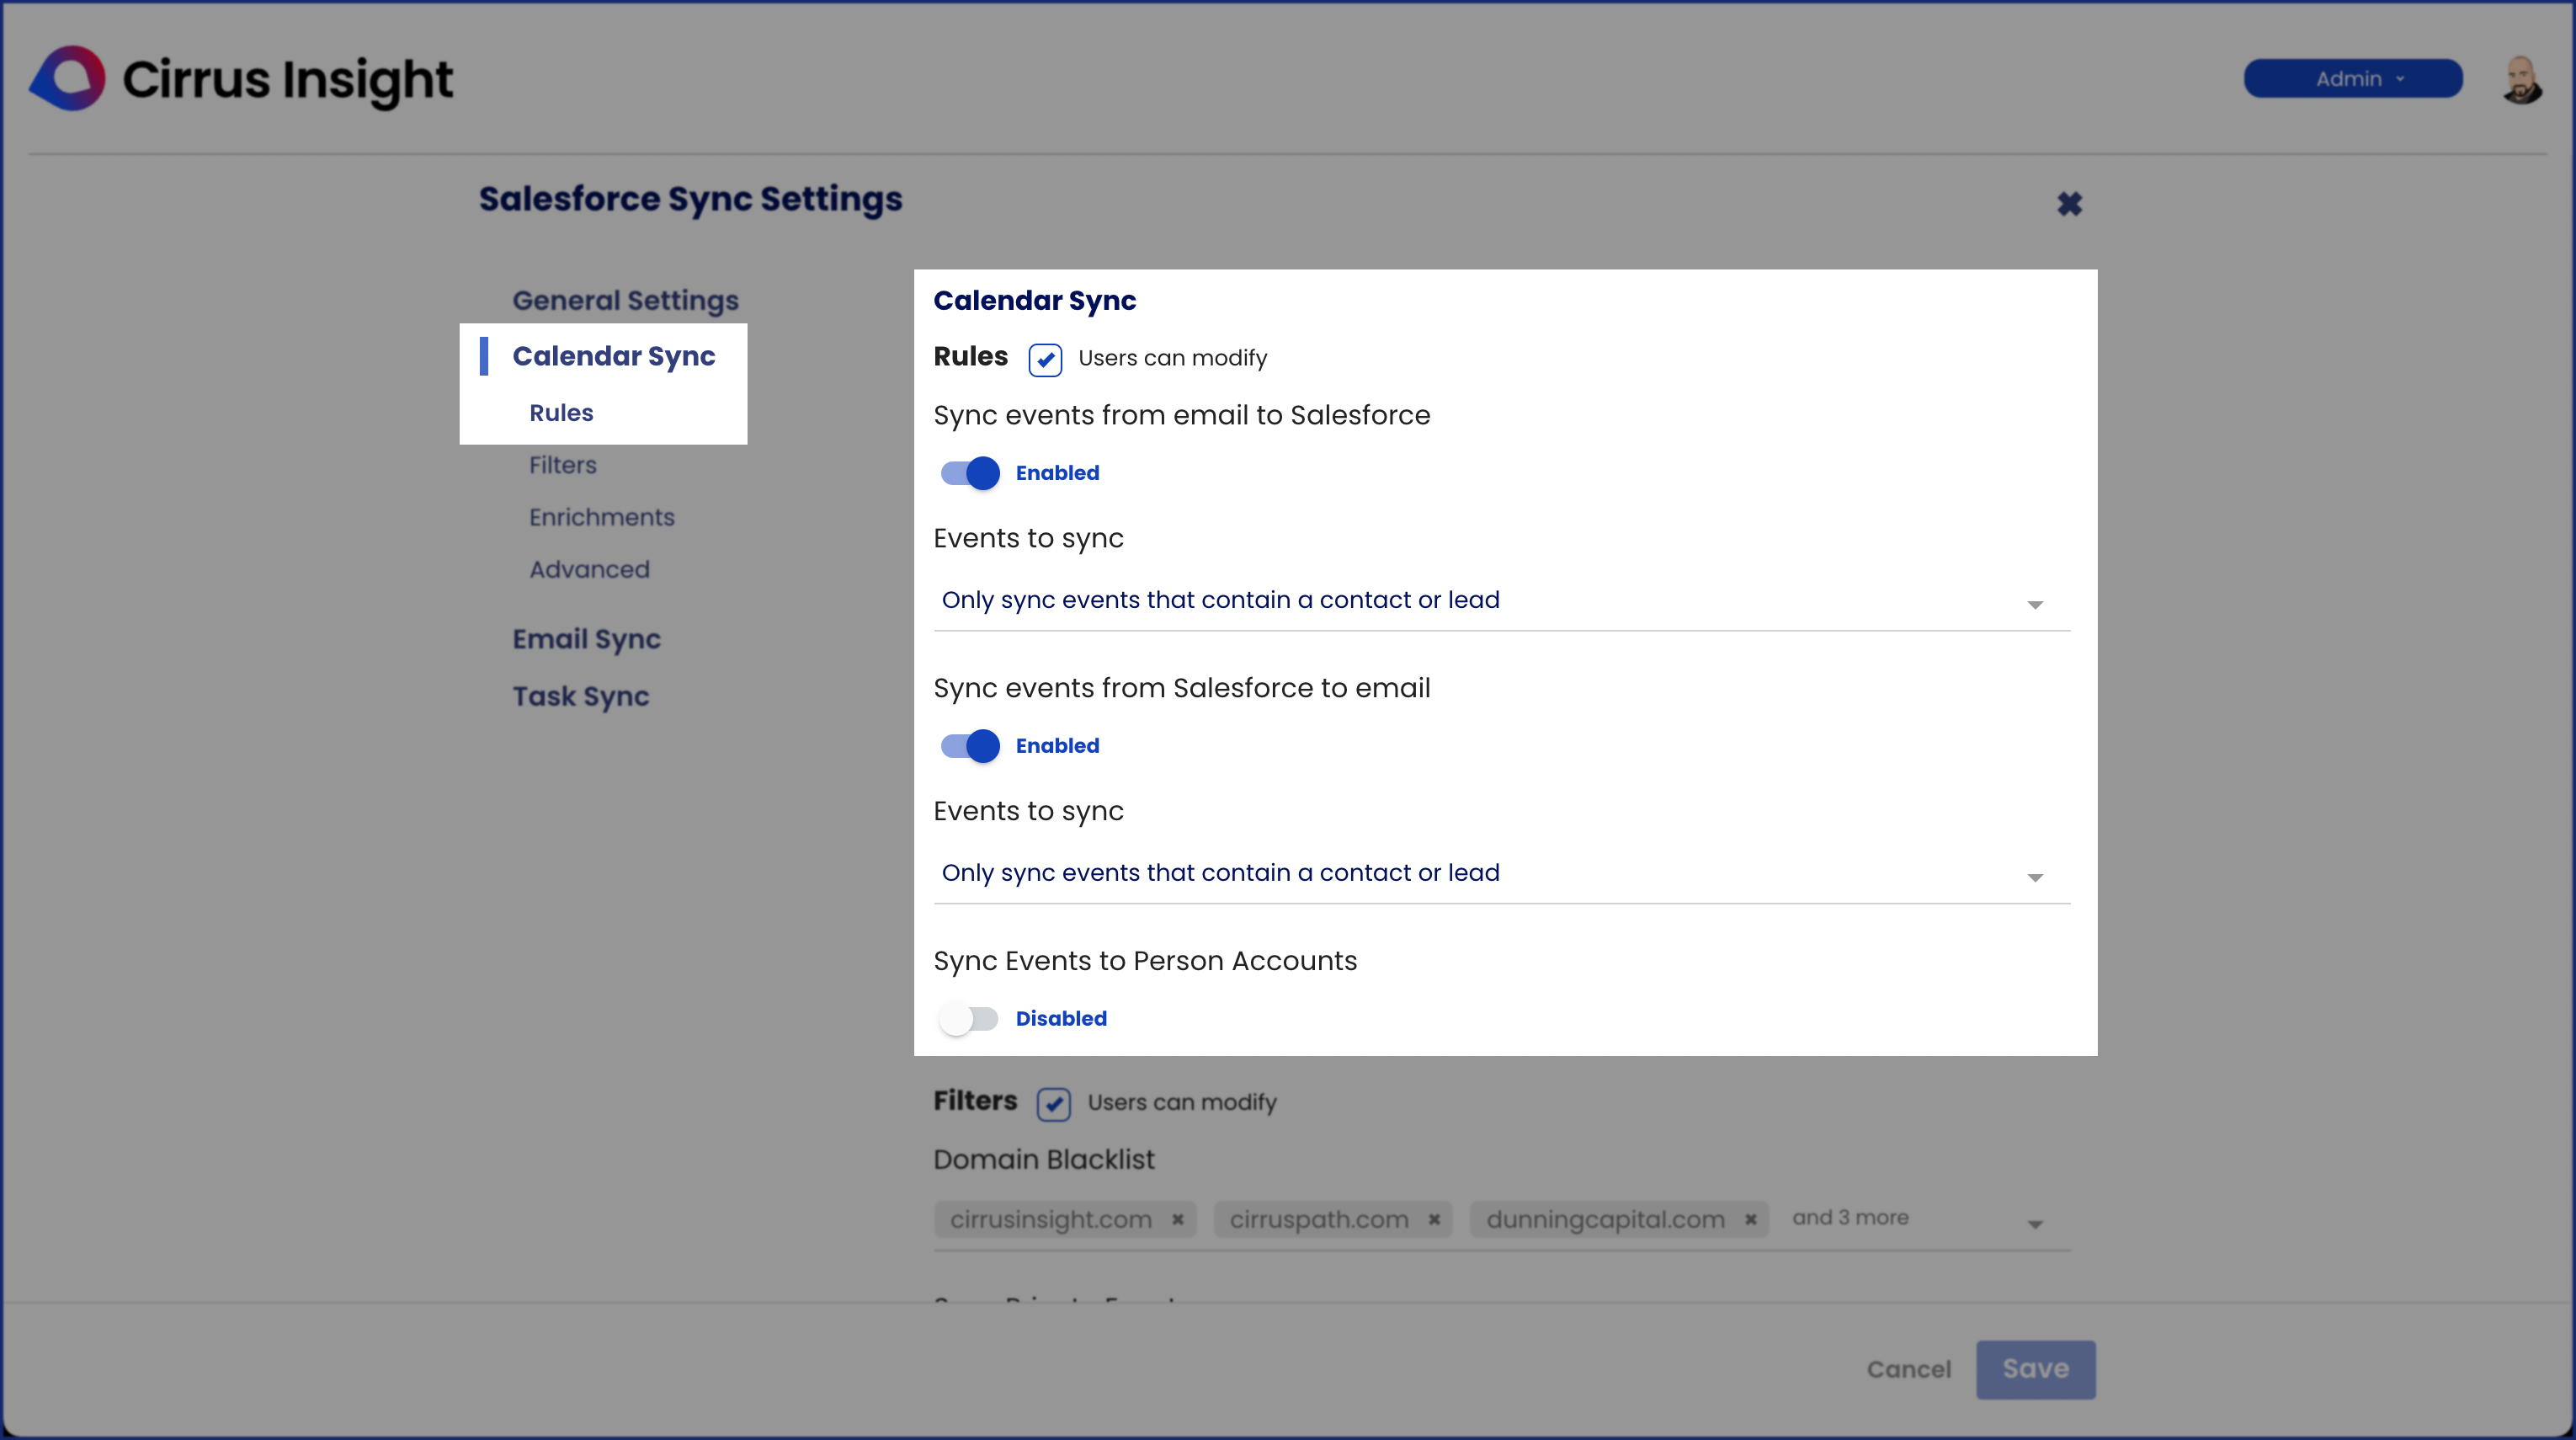
Rules
- Sync events from email to Salesforce - When enabled, Salesforce Sync will capture events/appointments residing in your email calendar and synchronize them against your Salesforce calendar.
- Sync events from Salesforce to email - When enabled, Salesforce Sync will capture events/appointments residing in your Salesforce Calendar, and synchronize them against your Email calendar. Outlook orgs should review Why does Outlook send event invitations when Calendar Sync is enabled?.
Each of the above settings can be configured independently with its own set of sub-rules:
|
- When both matching events have changes - If your org uses bi-directional Calendar Sync, decide which event should be updated if both the Salesforce and the email versions of a synced event have been updated since the last Sync.
- The Rules “Sync events from email to Salesforce” AND “Sync events from Salesforce to email” (see above) must both be enabled for this setting to apply.
- Sync Events to Person Accounts - Salesforce Sync can relate synced records to Person Accounts if your Salesforce org uses this object instead of Contacts.
Filters
-
Blocked Domains - Any events with blocked email address domains will not be synced. Users cannot adjust this setting.
-
NOTE: If you chose “Sync All Events” in the Rules setting (see section above), events from blocked domains will be synced but will include no identifying details other than date/time.
-
If you chose any other Rule setting except for “Sync All Events”, events from blocked domains will not be synced at all.
-
- Blocked Email Addresses - Adding specific email addresses here ensures that any events with blocked email addresses will not be synced. Users cannot adjust this setting.
- For events with multiple attendees, only the blocked email address will be skipped and the other attendees will be synced.
- Only Sync to Organizer - If enabled, events with multiple internal invitees will only be synced by the event organizer’s (creator's) Salesforce account.
-
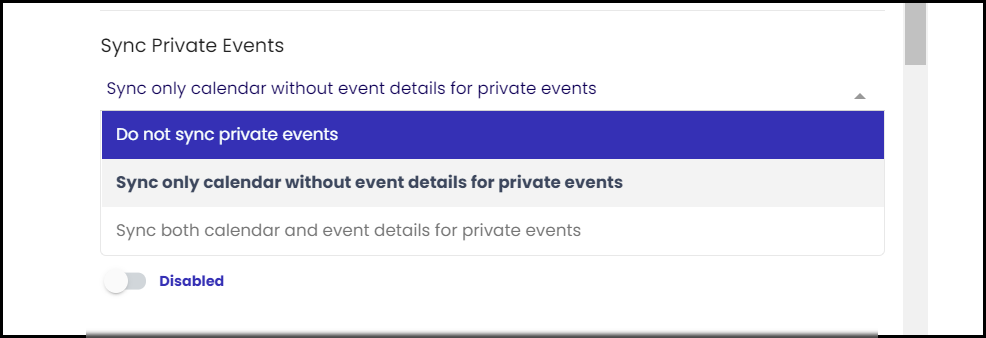
Sync Private Events - Control how Calendar Sync handles private events with one of the following settings:
-
Do not sync private events
-
Sync only calendar without event details for private events
-
Sync both calendar and event details for private events
-
-
Sync Partner Contacts (For Community Environments Only) - If your organization uses a Salesforce Community environment, you can configure Calendar Sync to relate synced events against Partner Contact records with this setting enabled.
-
Filter Google events by color (For Gmail Only) - This filter setting allows you to decide which color(s) of Google Calendar events should be synced to Salesforce, and how events synced from Salesforce get colored in Google Calendar.
Enrichments
The Enrichments section provides you with the following parameters:
-
Relate Synced Events to Accounts - By default, Calendar Sync will relate events synced to Salesforce to Contact/Lead records. With this setting enabled, synced events will also relate to the Account record that the Contact/Lead record is tied to.
-
Smart Link - Smart Link will automatically relate synced events to an additional Salesforce record based on the rules that you set up.
-
Enable Salesforce Invitees - When enabled, event invitees will be handled as follows:
-
Salesforce to Email – All Contacts and Leads on the event that has a populated email address will be included as invitees on the email version of the event.
-
Email to Salesforce – All invitees on the event will be checked against Salesforce Contacts and Leads. If the invitee exists as a Contact or Lead, they will be included as an Event Relation invitee on the Salesforce event.
-
Response Status – If the user has access to the response status tracking of an email event, then the sync will update the invitee response status in Salesforce. (In Office 365, the user must be the meeting organizer to have this data.)
-
-
Add User records to synced events using SF User Lookup - If this setting is enabled, Calendar Sync looks for attendees that exist as Users in Salesforce and adds those User Records to synced events.
Advanced
The Advanced section provides you with the following parameters:
-
Sync full event description - If enabled, the Salesforce event's plain text description will overwrite the HTML formatting in the email calendar event’s description.
-
Delete events from email if deleted in Salesforce - If enabled, deleting an event in Salesforce will cause the corresponding event in the email calendar to also be deleted.
-
Reset sync window for syncing future events - This setting will scan future events. Choose the number of months to sync events and events will appear in Salesforce according to the time window chosen.
- Reset sync window for syncing past events (days) - This setting scans past events. Choose the number of days in the past (between 0 and 7) to sync events.
| Notes on Functionality
Limitation on required custom fields:
Match criteria and duplicate detection:
|
Learn more: How do I set up and use Calendar Sync?
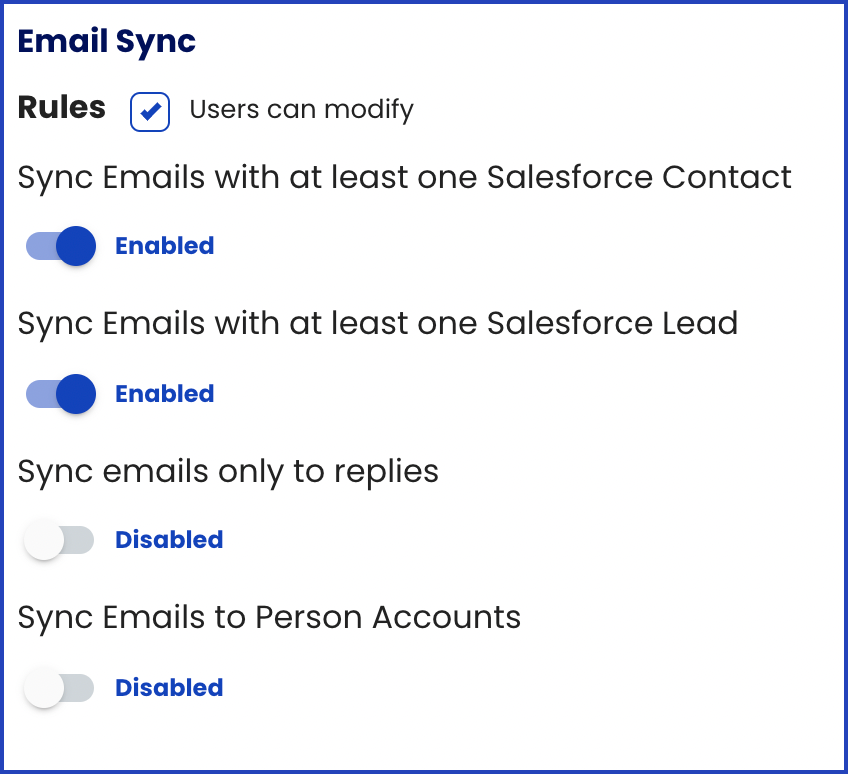
Rules
Learn about Email Sync Rules below:
-
Sync Emails with at least one Salesforce Contact: If enabled, any email correspondence with a Salesforce Contact will be synced into Salesforce under the Contact’s activity history.
-
Sync Emails with at least one Salesforce Lead: If enabled, any email correspondence with a Salesforce Lead will be synced into Salesforce under the Lead’s activity history.
-
Sync Emails only to replies: If enabled, you can use the File Email feature in the sidebar to sync all subsequent replies to that specific thread. You should use this if you do not want to sync all emails but still want the benefits of automation on selected threads.
-
Sync Emails to Person Accounts: If enabled, any email correspondence with a Salesforce Person Account will be synced into Salesforce. You should use this if your org uses the Person Account object instead of Contact.
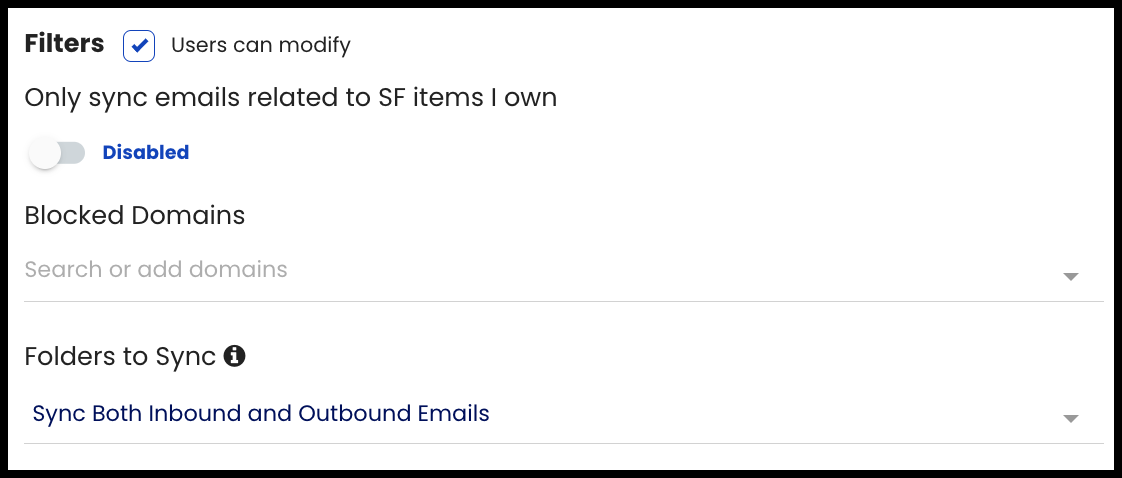
Filters
The Filters section provides you with the following:
-
Sync all emails related to Salesforce items I own - If enabled, this will only sync emails with Contacts/Leads that you own in Salesforce. Any correspondence associated with Contact/Lead records owned by a different Salesforce user will be filtered out.
-
Blocked Domains - Any emails with blocked email address domains will not be synced. Users cannot adjust this setting.
- Blocked Email Addresses - Adding specific email addresses here ensures that any emails with blocked email addresses will not be synced. Users cannot adjust this setting.
- For emails with multiple recipients, only the blocked email address will be skipped and the other recipients will be synced.
-
Email Folders to Sync - This allows you to select which email folders (Inbound, Outbound, or Both) you want Cirrus Insight to automatically sync from. You can choose to sync from one or the other, or both folders.
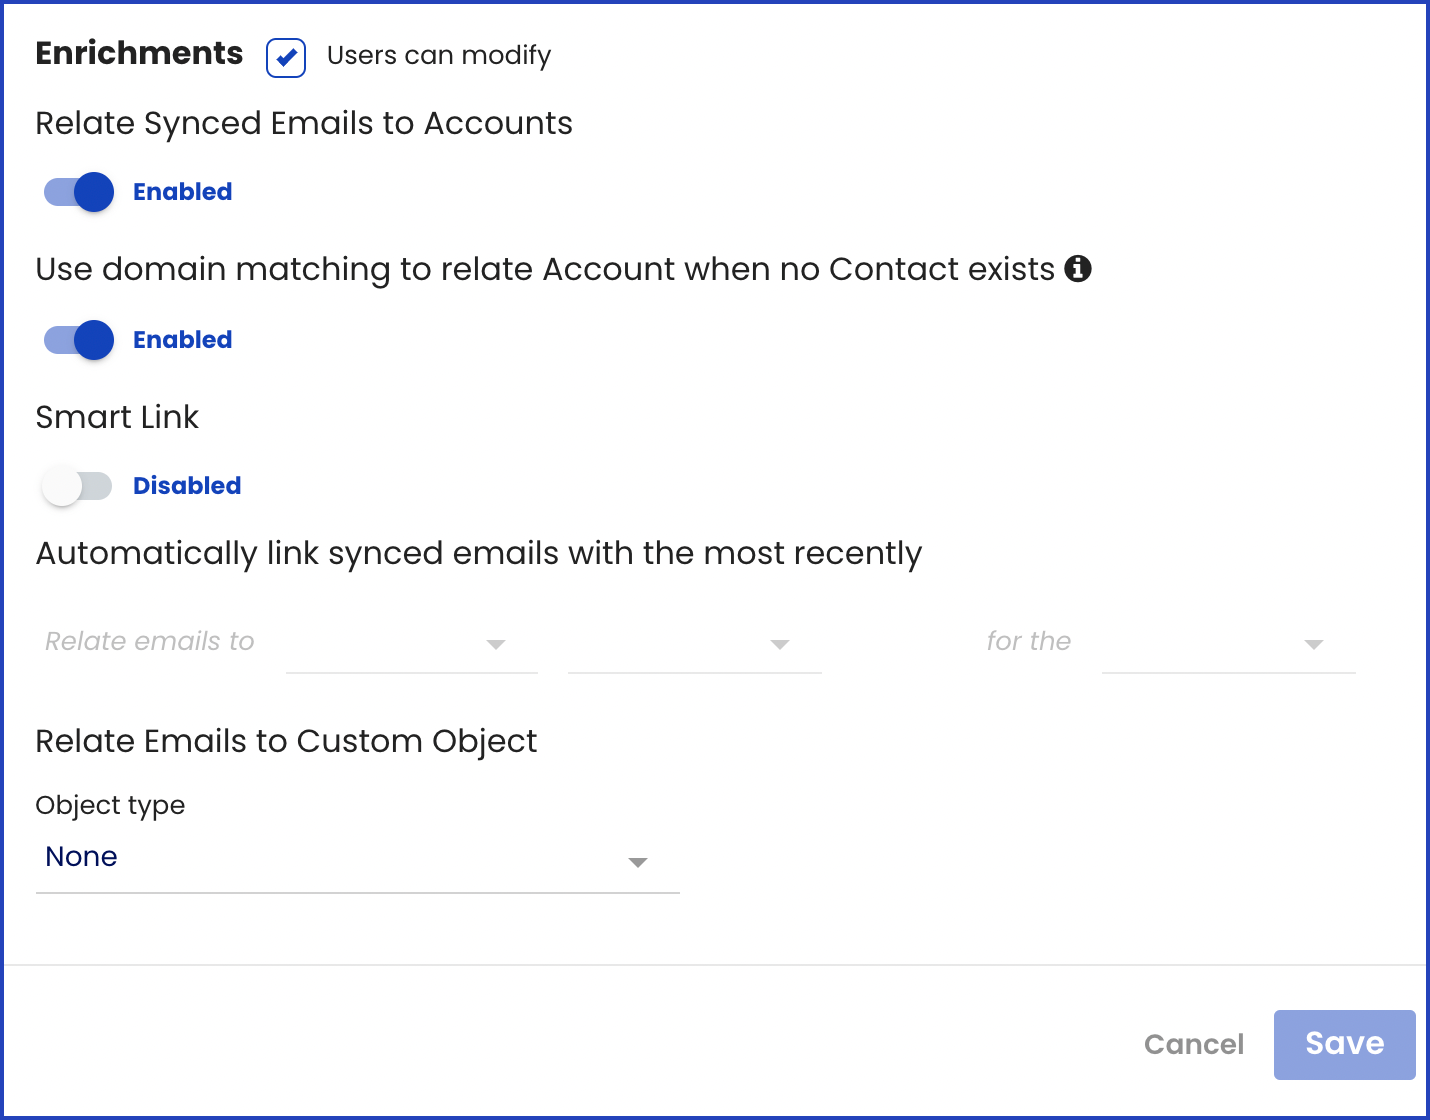
Enrichments
The Enrichments section provides you with the following:
-
Relate Synced Emails to Accounts - If enabled, synced emails will relate to the Account records (Parent records) housing the Contact or Lead in addition to the Contact/Lead records.
-
Use Domain Matching to Relate Account when no Contact exists - If enabled, synced emails will relate to the Account if the email address is not yet tied to a record in Salesforce by matching the email address domain to the Account.
-
Smart Link - If enabled, synced emails and events will relate to the most recent Salesforce objects. You can select from:
-
Asset, Campaign, Case, Contract, Opportunity, Order
-
-
Relate Emails to Custom Object - Automatically relate synced emails to any custom object that contains an Email field.
Learn more: How do I set up and use Email Sync?
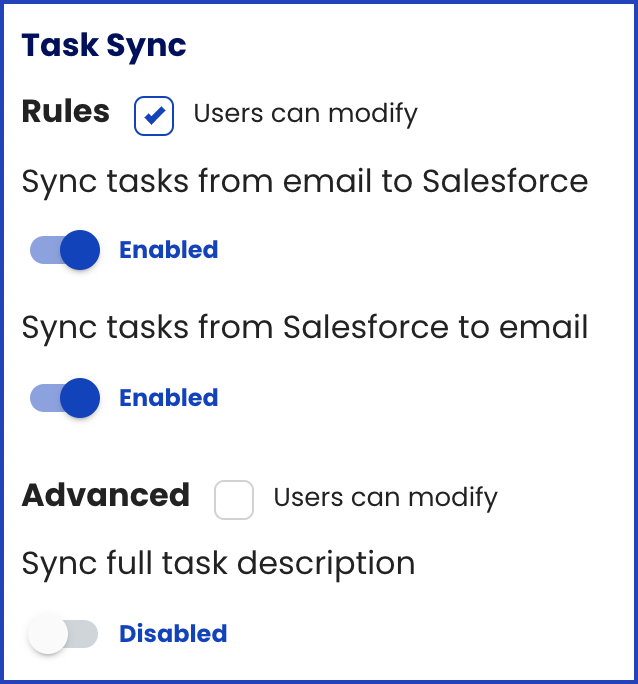
Task Sync Settings
Rules & Advanced
-
Sync tasks from email to Salesforce - When enabled, Task Sync will capture tasks residing in your email platform and synchronize them against your Salesforce tasks.
-
Sync tasks from Salesforce to email - When enabled, Salesforce Sync will capture tasks residing in Salesforce, and synchronize them against your Email platform.
-
Sync full task description - Choose whether to sync the full task description or just the subject.
Learn more: How do I set up and use Task Sync?
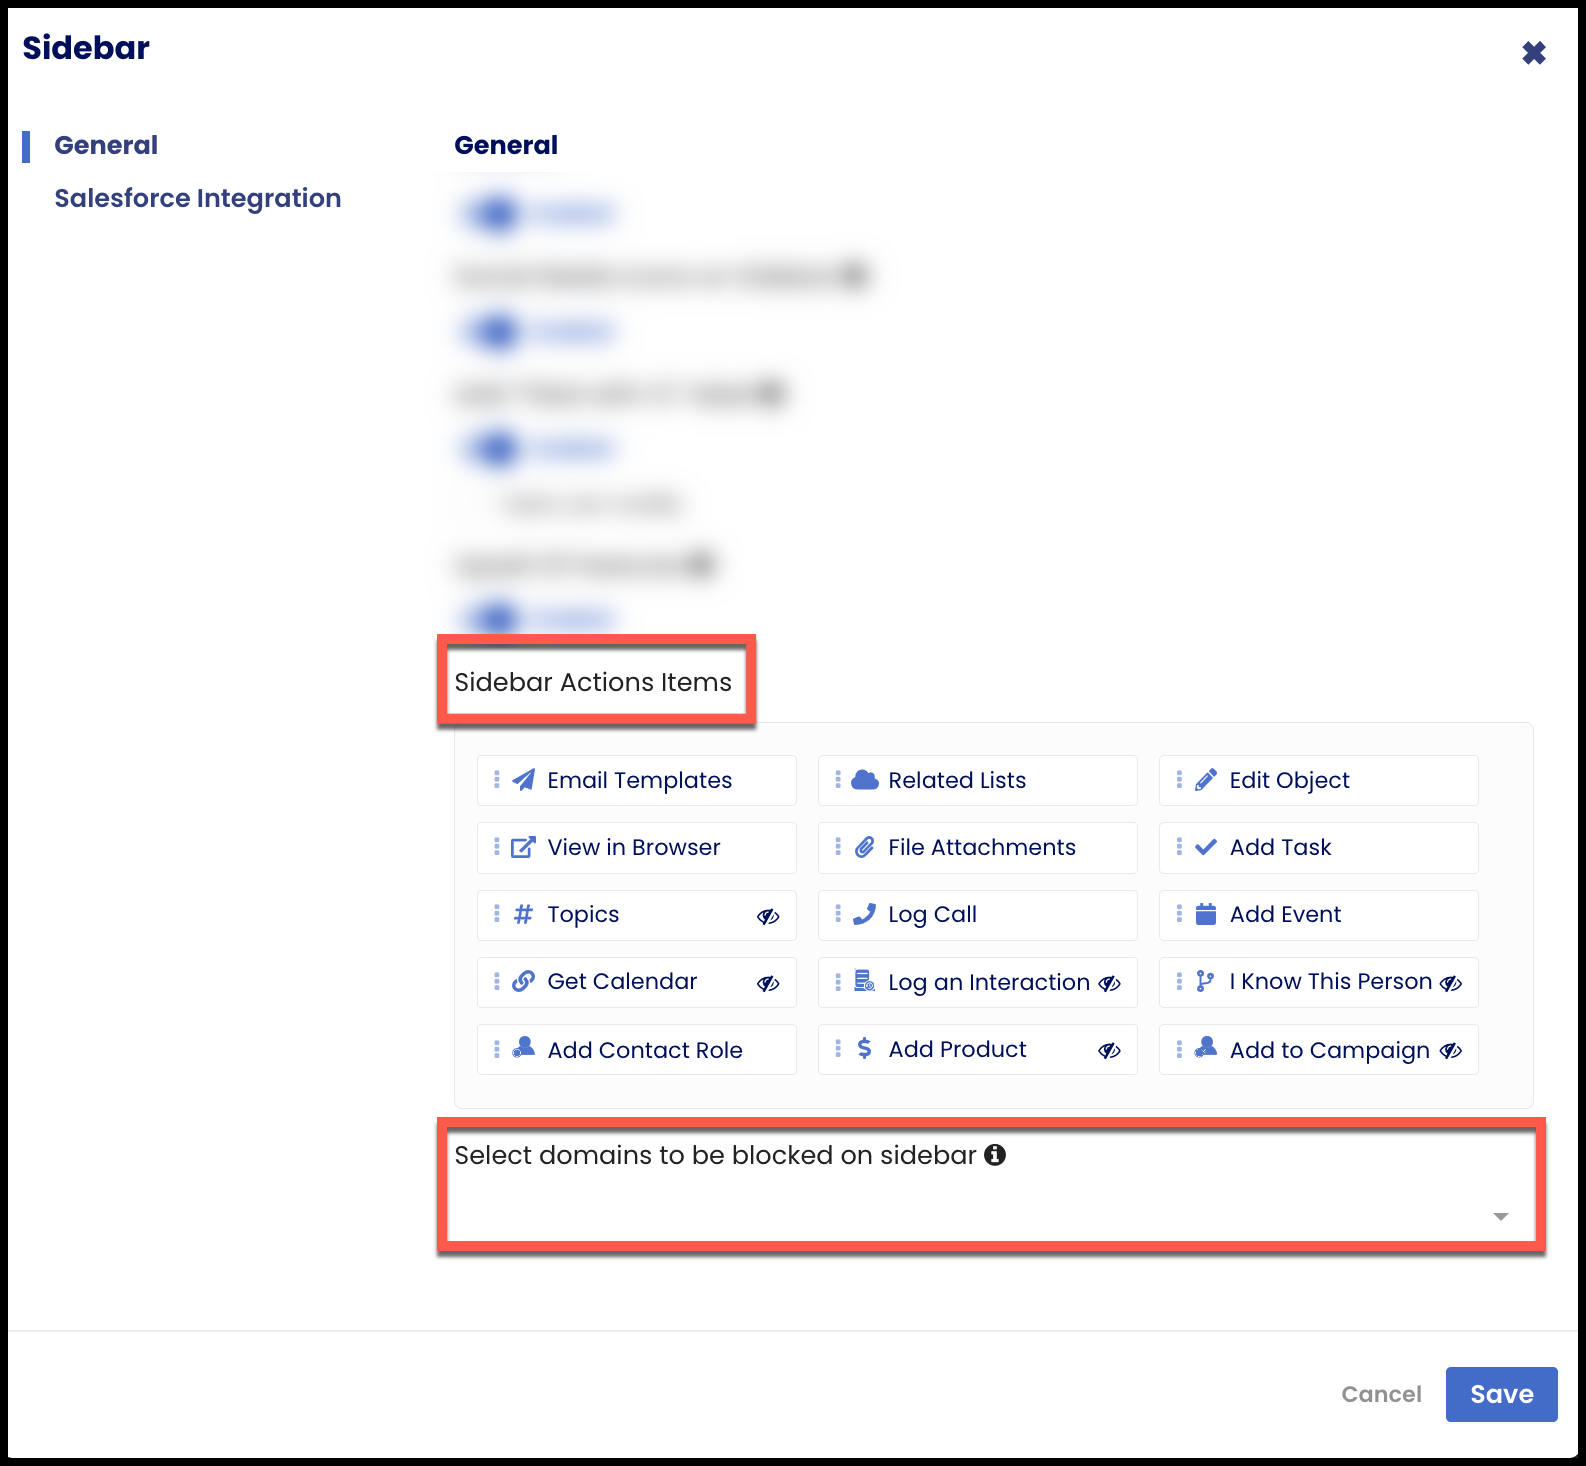
Sidebar
Admins can customize the Sidebar experience for their org, including whether certain features and functionalities are available or not.
General
From General settings, you can enable or disable features so they're either visible or hidden in the Sidebar including Email Tracking (plus if it’s enabled by default or not), Email Templates, Tabs, Email Blast, Buyer Signals, and the following customizations:
-
Social Media Icons on Sidebar: Disabling this setting will remove the social media icons from the sidebar for all users in your org
-
Add “Filed with CI” label: Identify filed emails/events with a “Filed with CI” label in the email platform after using Sync or File Email.
-
Upsell Of Features: Display overlays of enhanced features on the Sidebar which can be unlocked by purchasing.
-
User Downloads in Dashboard: If disabled, Downloads section is removed from the User Dashboard home page, preventing users from downloading the Sidebar from there.
-
The Sidebar Action Items positioning can be re-ordered by simply dragging & dropping them into the area you wish them to appear. They can also be made hidden/visible by clicking.
-
To avoid loading records for accounts/contacts/leads that are tied to a specific email domain, you can block the domain from the Select Domains to be blocked on sidebar field.
Salesforce Integration
-
Search and Visibility: customize how the search function works and adjust the Sidebar UI based on the objects your Salesforce org prioritizes.
-
Refined Search: Limits record search to primary Salesforce fields (e.g. Name, Title, Subject)
-
Search Contacts Using All Email Address Fields: Cirrus Insight usually attempts to use all email fields in the contact record to identify contacts. In some databases, this can cause poor performance and is disabled by changing this flag from false to true.
-
Search for Person Accounts Before Contacts: If enabled, email address search order is Person Account, Contact, Lead
-
Always Search Leads (Even If Matching Contact Found): When searching for email recipients, by default Leads are not searched if an email address matches a Contact.
-
Object Visibility
-
Related List Display: Add all related lists for your Users to search across from the Sidebar.
-
Search Results Object List: Add all objects from your SF instance for Users to have visibility from the Sidebar.
-
Object list with topics enabled: Enable to use topics on records of a specific object type (must be enabled in Salesforce).
-
-
-
Email: Customize Email Filing and List Send features.
-
Attachments: Customize how Email Filing handles attachments.
-
Calendar: Customize Event Filing behavior.
-
Creating Records: Fine-tune the process of how users create new records from the Sidebar.

Learn more: Admins | How do I customize Creating Records settings for my org?
Scheduling
To better understand what Scheduling can do, check out the feature page.
Scheduling Usage Analytics
-
View org or user statistics and track how many meetings have been scheduled over time.
-
Search for specific dates using the calendar icon and even export a CSV file with all the data for your records.
- Enable and disable calendars for your users.
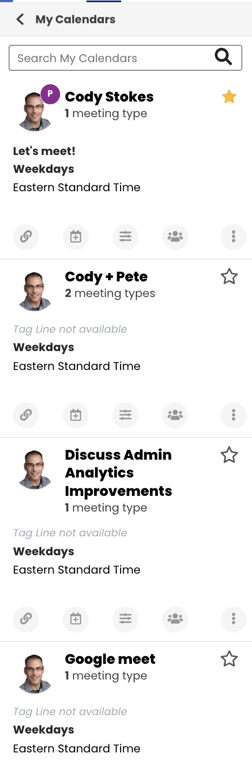
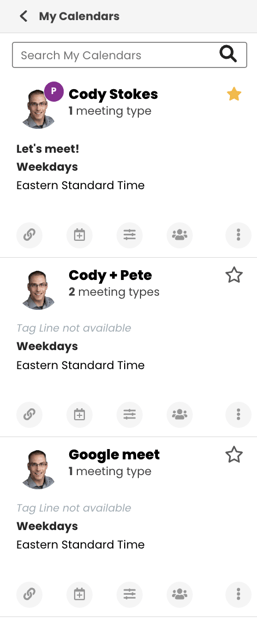
Note: Users can have more than one calendar associated to their account as shown in this screenshot: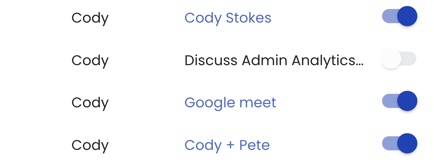
Disable User Calendars (non service account connection):
If user's calendar shows "User" in the Credentials column, admins can only disable user calendars directly from this screen. Admins cannot enable calendars from this screen, but admins and the user can enable calendars by accessing the user's dashboard, navigating to the Calendar Views section and toggling the calendar on.
Enable and Disable User Calendars (w/ service account connection):
If the user's calendar shows "Service Account" in the Credentials column, the admins can enable and disable a user's calendar from this screen.
To disable or enable a user's calendar, perform the following steps:
- Navigate to the Scheduling Usage Analytics page.
- Find the toggle to the far right of the user's calendar you wish to modify.
- When the toggle is blue and to the right, the calendar is enabled.
- When the toggle is grey and to the left, the calendar is disabled.
Disable multiple calendars:
- When on the Scheduling Usage Analytics page admins can check the box next to any active calendars, which will pop out a blade with the option to Disable the calendars.
- When you disable a calendar it will no longer be shown in the user's My Calendars section.
Before Disabling:
After Disabling:
Enable multiple calendars (w/ service account connection):
- When on the Scheduling Usage Analytics page admins can check the “Select All Users” toggle on the top left of the user list.
- After selecting all users, a Bulk Actions screen will appear on the right.
- Double-check to make sure that the entire user group is selected by reviewing the “XX of XX calendars selected” message.
- If all users are selected properly, select the “Enable Selected” button.
- After Enabling the Calendar Views for your users, all users will display “Service Account” under the Credentials column.
- Users can now begin customizing and sharing the Calendar views.
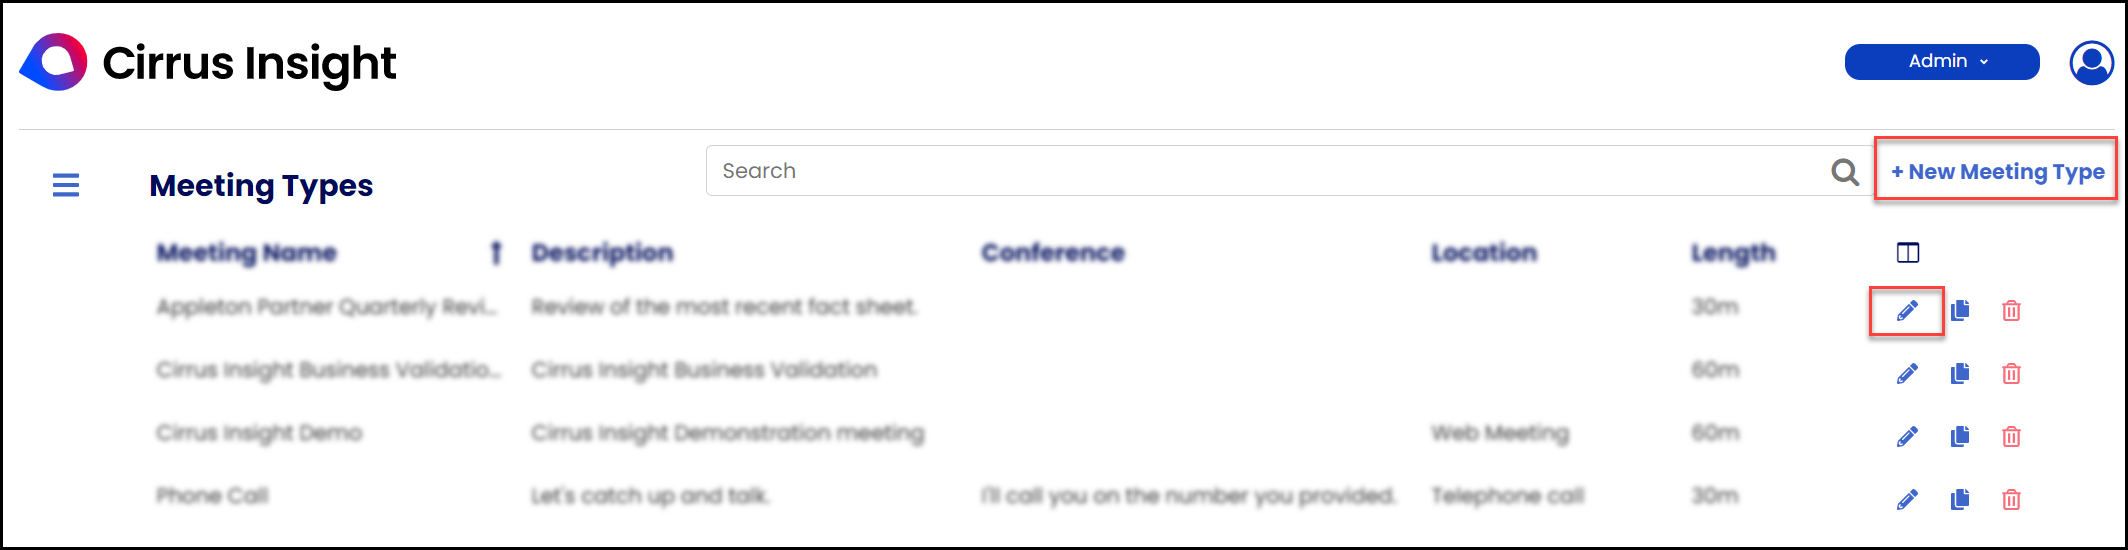
Meeting Types
Navigate to Meeting Types to create and manage Meeting Types for the entire org.
-
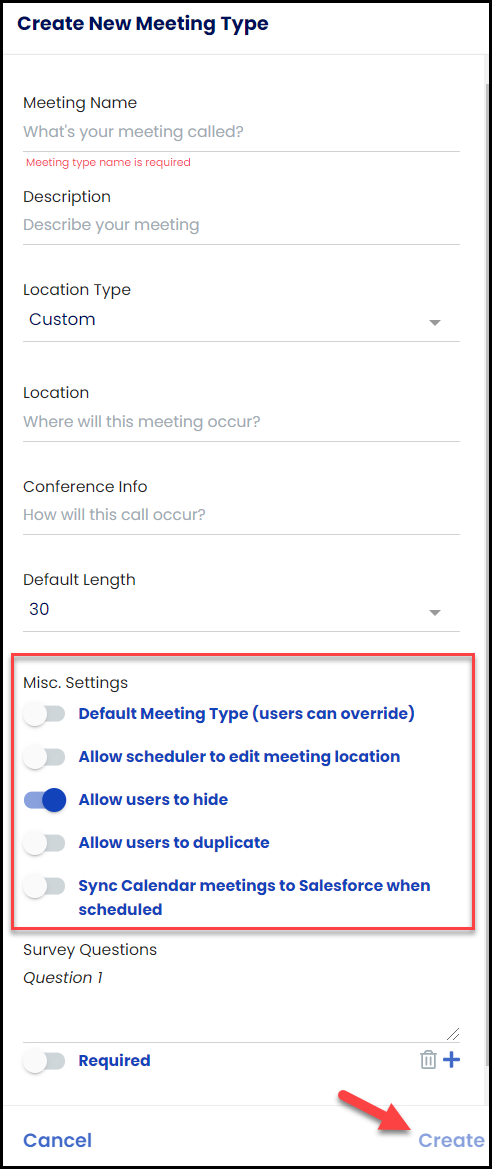
Creating a New Meeting Type:

-
Admins can create and customize new meeting types for their users here. From the Create New Meeting Type window, enter meeting parameters like web meeting links or conference rooms that will be included in the meeting invitation.
-
Optionally, add survey questions (e.g. “How many licenses is your company considering?”).
-
Once you've completed all the fields and functions that you want your users to use, click the Create button.

-
-
Settings
-
Default Meeting Type: The Meeting Type will be first
-
Allow Scheduler to edit: Users will be able to modify the Meeting Type
-
Allow users to hide: Allows users to hide the Meeting Type from their view in the sidebar
-
Allow users to duplicate: Users will be able to make a copy of the Meeting Type
-
Sync Calendar meetings to Salesforce when scheduled: When an event is scheduled through the meeting type, the event will sync to Salesforce
-
-
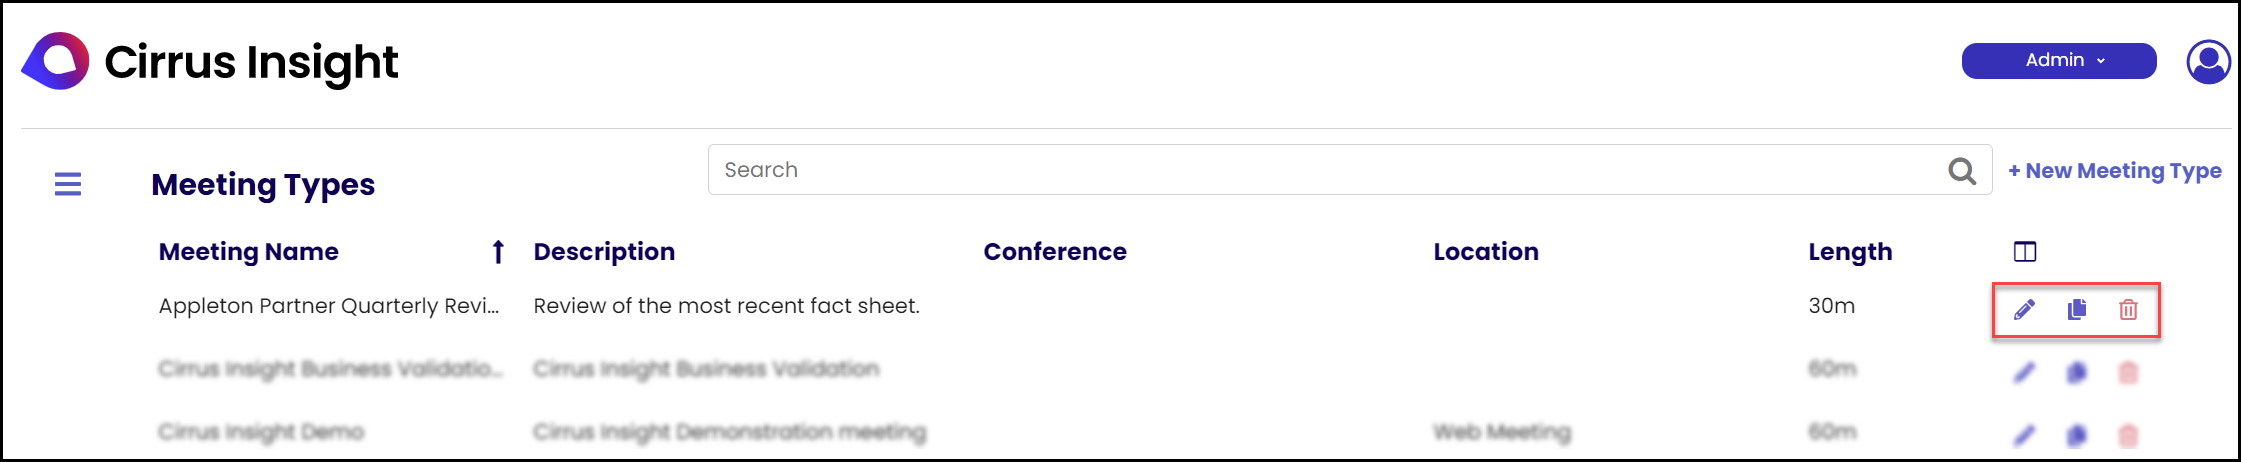
Managing Meeting Types:
-
As an Admin, you can edit, duplicate, or delete existing Meeting Types for your org.

-
Scheduling Settings
Scheduling settings contain all the org level feature controls that affect all users within the org. You can learn more about changing these features here.
Click here if you would like to learn about how users configure their scheduling settings.
General
-
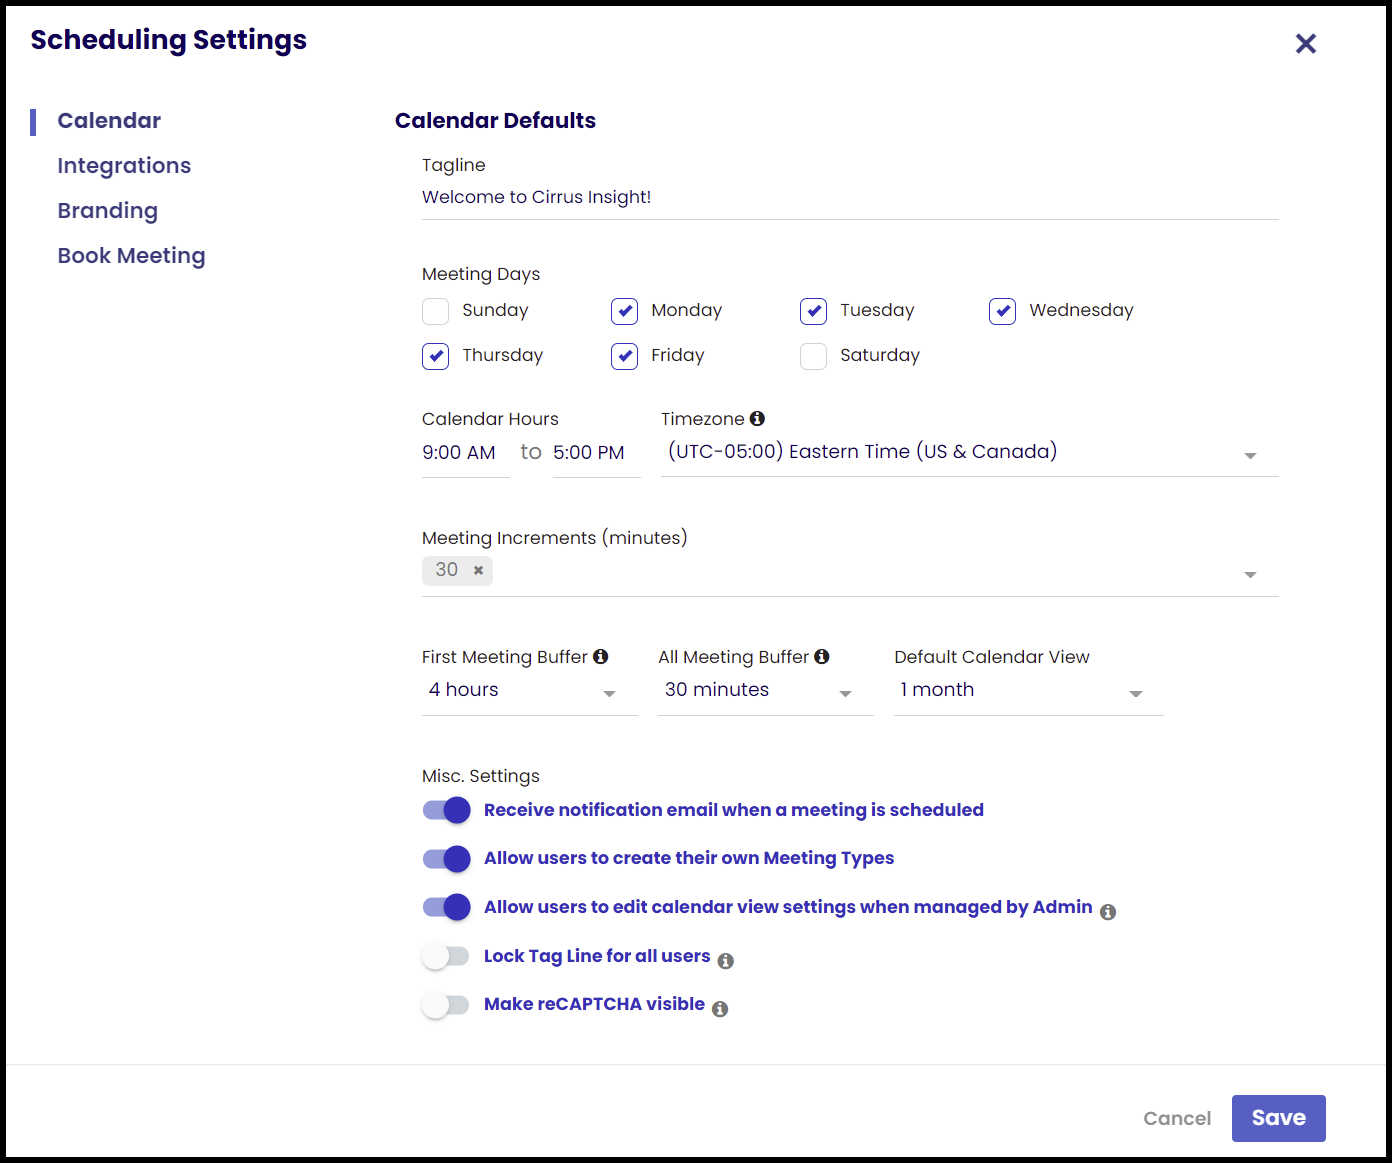
Add parameters to Calendar Defaults like Calendar Taglines or Meeting Days, and set availability with days, hours, time zone, and meeting lengths.
- Decide if users should be allowed to create Calendar Views.

Integrations
-
Microsoft Teams: Enables the 'Microsoft Teams' Location option on Meeting Type configurations.
-
Custom Location: Enables the 'Custom' Location option on Meeting Type configurations.

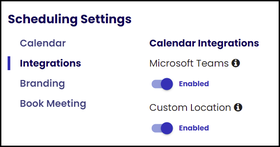
Learn more: Admins | How do I set up the Microsoft Teams Integration for Scheduling?
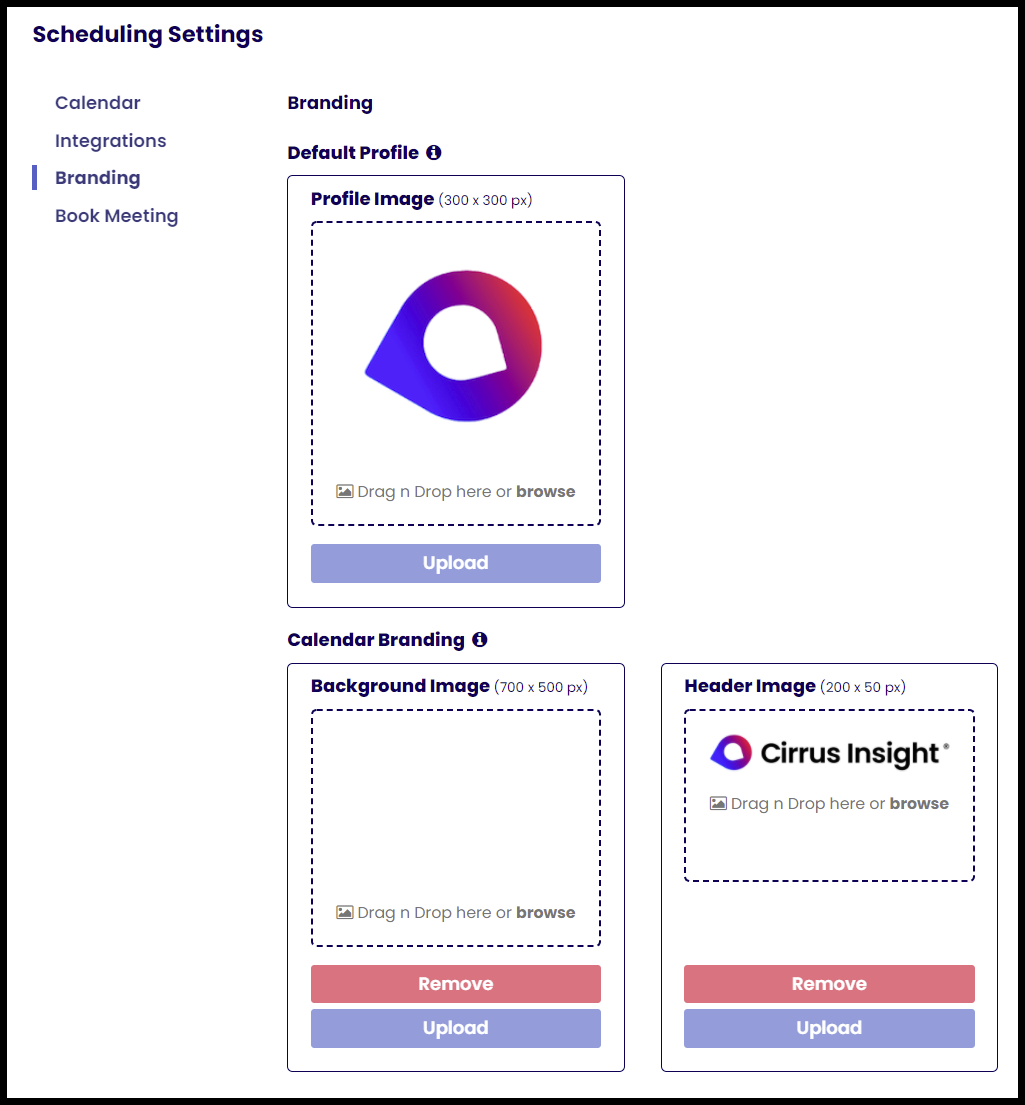
Branding
-
Default Profile Picture: A profile image helps tie your scheduling page to your brand
-
Calendar Branding: Custom branding assets establish brand identity and consistency

Notifications
The Notifications page contains the admin org level control to enable or disable the SMS Reminders feature for user's scheduling page. You can learn more about the feature here.

Advanced
-
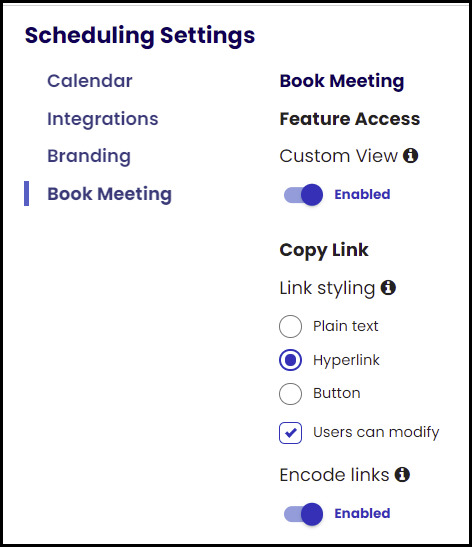
Feature Access:
- Book Meeting: Controls access to Book Meeting for all users Learn More
-
Custom View: Controls access to Custom View links for all users Learn More
-
Copy Link:
-
Link Styling: Control how your calendar link looks when pasted.
-
Encode links: Converts your calendar link into an encoded string of characters.

-
- Allow Cancel Meeting Option: If enabled, recipients can cancel meetings via the Scheduling confirmation email or the confirmation web page.
Learn more:
- Admins | How do I adjust org. settings for Scheduling?
- How do I set up Calendar Scheduling?
- How do I set a Custom View for my Scheduling link?
Smart Scheduler
- With Smart Scheduler, create a single schedule for multiple Sales Reps to automatically route customers to the appropriate and available Salespeople to ensure customers will always be connected with the best company rep to meet their needs, removing potential for mismatched reps and customers.
Learn more:
Updated Nov 2024